
KBabcock
True Classic
I just finished replacing the heater valve in my 85 X1/9 with AC Heater box. I'll start off with saying that was a nightmare of a job due to two things. One, the location of the old valve is a royal pain to get to, makes the paddle box look like easy access. Two, a OEM replacement valve is no longer available so had to figure out what valve to use. I'm hoping I can save the next member some pain but outlining what I have done, so let's start with the replacement valve.
The old valve is a 90 degree valve made of metal, it is a plunger type and mounts to a bracket on the back of the heater box. See this excellent post by LarryC on the AC Heater box. It was super helpful and gives you a good look at the old valve and where it is mounted.
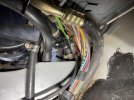
Here is a picture of my original valve from the drivers footwell. The 90 degree rubber heater hose is attached to the feed pipe, the other hose exits the other side of the valve up to the heater core. The black cable running down the center is the push-pull control cable. To see this you have to jam yourself to the base of the foot well with your head resting on the clutch paddle then try to reach in. Imagine yourself working inside a child size coffin with a 8"x8" access hole you need to reach into work.

When I started the job my first thought was, go with another 3rd party 90 degree valve and mount it in the same location. This idea was ditched when I removed the old valve and found out how hard it is to reach and work back there, this lead to to decisions.
1) I am moving the valve location, this brought up the question of where to. You have to think about 3 things, the two connecting hoses and the push/pull cable. This greatly limits the locations. I looked at setting it up above the center tunnel and under the heater box lots of room, easy cable access but it would require a molded "S" shaped hose to the heater core which I had no idea where to find one that would fit so I choose the passenger side of the heater box.
2) I am going with a straight through design, these are far more prevalent and fitted the mounting locations well. I did a great deal of searching and researching before I selected following valve.

This vale is inexpensive, well made, an in line design with metal attached cable bracket. It's valve arm sweep is 1.4" where the original was 1.5" so it is a close match. This allowed normal heater level control operation at the dashboard. It can be mounted or left unmounted and it will work fine.
So here is a quick drawing showing where the old valve was mount and where the new valve will go from a top view. Please note the in let pipe in the first picture should be closer to the passenger side I drew it too far left.


So now that I have the valve picked out and its location identified I needed to get the hoses. For the intake hose that comes up from the center tunnel I used the same 5/8" 90 degree molded hose that was originally there (it was in good shape). You will need to trim the hose so the long end is the same size as the short end. Then mount it onto the intake side of the valve, the side opposite the cable mounting bracket. The valve has the flow of water identified on it. I found that mounting the hose on the valve then mounting the the hose and valve onto the inlet pipe works best. Before mounting it attach a piece of flexible heater hose 5/8" and 9.5" long on the outside of the valve. This pipe will attach to the top of the heater core on the side of the heater box. I attached this pipe last to the heater core and used a plyer to help work it on. I also put a little spit inside each hose to add with slipping them on.
Here is the new hose next to the old hose to the heater box.

When you mount the 90 degree pipe it will be about 60 degrees off center towards towards the passanger side, this will be obvious as you mount it.
Now comes the push-pull cable. The current cable is too short to reach the new mounting location so will need to be replaced. I used the Midwest-Bayless

This cable solves two problems, First it is long enough to reach the new location of the valve and two it has pre-finished ends that fit the valve control arm perfectly. See picture below. You can see that the circular coil on the right fits the peg on the valve perfectly. You will need to obtain a couple of washers and a retaining washer as shown below, the pencil is where the cable goes in the mounting order.


Now to get the cable in, you need to remove the old cable which means dismantling the heater controls on the dashboard as outlined in the manuel. This was a bid of a pain and I will mention that the instructions in the manual are good but missing details. The control unit (The piece that hold the levers and buttons) needs to be wiggled down and to the left to access a screw in the back where the red dot is on the picture. This takes some real fidgeting, look at the picture in the manual to see how it should look when moved out of the way. I can't even tell you how it finally came out because I tried so many different ways to move it. Be patient and know it does come out.

Once you get it you will need to route the cable to the new valve. I ran the cable down from the control in the same path as the old cable then ran it under the heater box up into the top of the passenger compartment and to the valve. See pictures below it is the green cable coming out from under the heater box on the passenger footwell. This is the only part which I am not super happy with, due to the number of bends the cable is a little stiff to operate but I can't see a better route.


Below are pictures of the vale mounted in the new location. 1) Valve 2) inlet pipe to hose.


I hope this makes your installation easier, trying to figure out how to do this is half the challenge so you're halfway home, good luck.
The old valve is a 90 degree valve made of metal, it is a plunger type and mounts to a bracket on the back of the heater box. See this excellent post by LarryC on the AC Heater box. It was super helpful and gives you a good look at the old valve and where it is mounted.
AC_Heater Box Rebuild
About the time that I was starting to rebuild the AC system last summer, my AC-Heater blower started to become balky. So that halted my AC project, which I will pick up in my other thread when I finish a re-build of the AC Heater box. It is just as well, since I discovered that the upper...
www.xwebforums.com
Here is a picture of my original valve from the drivers footwell. The 90 degree rubber heater hose is attached to the feed pipe, the other hose exits the other side of the valve up to the heater core. The black cable running down the center is the push-pull control cable. To see this you have to jam yourself to the base of the foot well with your head resting on the clutch paddle then try to reach in. Imagine yourself working inside a child size coffin with a 8"x8" access hole you need to reach into work.
When I started the job my first thought was, go with another 3rd party 90 degree valve and mount it in the same location. This idea was ditched when I removed the old valve and found out how hard it is to reach and work back there, this lead to to decisions.
1) I am moving the valve location, this brought up the question of where to. You have to think about 3 things, the two connecting hoses and the push/pull cable. This greatly limits the locations. I looked at setting it up above the center tunnel and under the heater box lots of room, easy cable access but it would require a molded "S" shaped hose to the heater core which I had no idea where to find one that would fit so I choose the passenger side of the heater box.
2) I am going with a straight through design, these are far more prevalent and fitted the mounting locations well. I did a great deal of searching and researching before I selected following valve.
Four Seasons 74627 Heater Valve
This vale is inexpensive, well made, an in line design with metal attached cable bracket. It's valve arm sweep is 1.4" where the original was 1.5" so it is a close match. This allowed normal heater level control operation at the dashboard. It can be mounted or left unmounted and it will work fine.
So here is a quick drawing showing where the old valve was mount and where the new valve will go from a top view. Please note the in let pipe in the first picture should be closer to the passenger side I drew it too far left.
So now that I have the valve picked out and its location identified I needed to get the hoses. For the intake hose that comes up from the center tunnel I used the same 5/8" 90 degree molded hose that was originally there (it was in good shape). You will need to trim the hose so the long end is the same size as the short end. Then mount it onto the intake side of the valve, the side opposite the cable mounting bracket. The valve has the flow of water identified on it. I found that mounting the hose on the valve then mounting the the hose and valve onto the inlet pipe works best. Before mounting it attach a piece of flexible heater hose 5/8" and 9.5" long on the outside of the valve. This pipe will attach to the top of the heater core on the side of the heater box. I attached this pipe last to the heater core and used a plyer to help work it on. I also put a little spit inside each hose to add with slipping them on.
Here is the new hose next to the old hose to the heater box.
When you mount the 90 degree pipe it will be about 60 degrees off center towards towards the passanger side, this will be obvious as you mount it.
Now comes the push-pull cable. The current cable is too short to reach the new mounting location so will need to be replaced. I used the Midwest-Bayless
Heater Control Lever Cable - 42" CUT TO FIT REPLACEMENT (Fiat X1/9 All, 128, 124, 131, Lancia) - NEW
This cable solves two problems, First it is long enough to reach the new location of the valve and two it has pre-finished ends that fit the valve control arm perfectly. See picture below. You can see that the circular coil on the right fits the peg on the valve perfectly. You will need to obtain a couple of washers and a retaining washer as shown below, the pencil is where the cable goes in the mounting order.
Now to get the cable in, you need to remove the old cable which means dismantling the heater controls on the dashboard as outlined in the manuel. This was a bid of a pain and I will mention that the instructions in the manual are good but missing details. The control unit (The piece that hold the levers and buttons) needs to be wiggled down and to the left to access a screw in the back where the red dot is on the picture. This takes some real fidgeting, look at the picture in the manual to see how it should look when moved out of the way. I can't even tell you how it finally came out because I tried so many different ways to move it. Be patient and know it does come out.
Once you get it you will need to route the cable to the new valve. I ran the cable down from the control in the same path as the old cable then ran it under the heater box up into the top of the passenger compartment and to the valve. See pictures below it is the green cable coming out from under the heater box on the passenger footwell. This is the only part which I am not super happy with, due to the number of bends the cable is a little stiff to operate but I can't see a better route.
Below are pictures of the vale mounted in the new location. 1) Valve 2) inlet pipe to hose.
I hope this makes your installation easier, trying to figure out how to do this is half the challenge so you're halfway home, good luck.
Attachments
Last edited:
")