Attachment of water pipes inside bottom tunnel

Ulix

True Classic
Hi,
Does anyone have pics showing how the pipes are attached inside the tunnel?
I would like to try cutting them short and pulling them out towards the front, then pushing new pipes of the original ID back through.
I would like to visualize what I am dealing with before I start.
I found old threads on this, but all the pics are gone.

Thanks.
 
This is a photo I saved from XWebforums earlier. I do not know who to credit for this.

coolantpipes.jpg
 
Ulix, Once you do this could you repost with any insight on what works or doesn't as this will be my next project to do.

Thanks, Carl
 
Björn, thanks for the pic.
Does this mean that the pipes are attached to the tunnel and not the underside of the car floor?

Carl, I will report back with pics after this is done.
 
Hi Ulix, I have done as you suggested on a 1988 Bertone (cut & pulled through the front), a bit of wriggling and pulling worked fine, but some others that have tried it couldn't move them, so at some stage Bertone may have changed their method of holding them in the brackets to stop them rattling. I used a bit of silicone on the new ones when installing.
 
This job went better than I had hoped.
I bought two length of 1.4m long stainless steel tubing, 35mm OD, 1mm wall thickness (1,5mm works also).
The 1.4m is a little long, more on that later.

Cut the old tubes front and rear with an angle grinder with a fresh cutting wheel (so that you have the full OD of the cutting wheel to work with). Leave about an inch sticking out of the tunnel front and rear.
On my car, although the very ends of the old tubes looked bad with rust holes in them, the rest of the tubes were actually quite sound so I was able to reuse the cut off bent sections. This seems to be the case on most cars.
The rear bent sections will fall right off, the fronts are held on by two brackets.
With a buch of wiggling and twisting, I was able to pull the pipes through the brackts without cutting them. To do this I had to unbolt the brackts holding the track rods to the floor of the car:

IMG_5489.jpg

Then, hit the pipes with a hammer from the rear of the car and they should move out towards the front fairly easily without mushrooming the end of the pipes.
Pull them out the front while twisting with a pair of channel lock pliers.
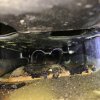
Peek inside the tunnel and you can see the brackets holding the pipes (in the background of the pic. Yellow stuff is old cavity wax, "wall" in foreground seems to be insulation material, heater pipe is on the left):
IMG_5477.jpg

Dent the floor up a little where the short pieces of connecting hose and their hose clamps will sit to give these some space.
Slide in the new pipes from the front. They slid in super easy on my car:

IMG_5511.jpg

I cleaned the crud out of the bent sections with a pot scrubber on a string:

IMG_5516.jpg

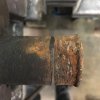
On one tube, I cut off the badly corroded end:
IMG_5514.jpg

I cut the not-so-old rear hoses into sections to connect the pipes:

IMG_5523.jpg

This is what it looks like in the rear, the pipes are too long and I will have to shorten them:

IMG_5526.jpg

This is an easy job if the bent sections can be reused.
If not, you could probably go to a muffler shop and have them bent from new pipe (we don't have muffler shops over here unfortunately).

In summary, I would never remove the bottom tunnel except maybe to repair some bad rust.
Even if you wanted to use the nice stainless reproduction pipes, you could cut them and slide them through and reconnect, maybe even by welding.

After installing these pipes, the method of sliding smaller OD tubing through the old tubing makes no sense to me anymore.
This is much easier and yields a better result.

Hey Ulix,

great write up. I was planning to follow a similar procedure and have recently procured the following stainless reproduction pipes:

85670365401292.jpg

I'm planning to cut them just before the bends as you suggest so that I don't need to open the tunnel. My only concern is the integrity of the rubber "joiner" sections given that they are connecting to non flared pipes. I was considering getting the cut sections flared to help with the sealing. I'd be interested in hearing up how that particular joint holds up for you.

But good job and thanks for taking the lead on this approach to the repair.

Cheers,
Dom.
 
Hi Dom,

I considered the lack of a flare.
In theory, the flare is needed for a secure seal.
I, and others, have had rusty pipe ends so that the hose was pushed onto the pipe much further than normal to have the hoseclamp clamp onto good metal. So the clamp was no where near the flare.
I convinced myself that this was the same as not having a flare at all, so in effect, I have been driving around like this for a long time.

But if you have the chance to flare the pipes, this would be optimal.
You probably have to leave the flare off rear of the long straight pipes, otherwise you won't be able to pushe the pipe through the tunnel.

Oh, I haven't taken the lead, this has been done many times by others, just not documented. :)
 
There is a risk of hose detachment from the tube even with a flare on the end of the tube. No flare significantly increases this risk further.
Convincing one-self this is not a problem is Murphy waiting to happen.

If producing a flare is not possible, push the joint hose far up as possible on the tube, about 50mm. Then apply two USA style liner worm drive clamps or a single T-bolt clamp on each hose to tube joint (four total). The Norma hose clamps as shown do not deliver enough clamp pressure to assure a secure connection. Even if two of these Norma clamps are used, the connection remains questionable.

Deburr and round off the open end of the tube. If there is a sharp edge on the end of the tube, movement and flexure will eventually cut the hose causing a failure. This is another reason why tube ends are flared.


Bernice


Hi Dom,

I considered the lack of a flare.
In theory, the flare is needed for a secure seal.
I, and others, have had rusty pipe ends so that the hose was pushed onto the pipe much further than normal to have the hoseclamp clamp onto good metal. So the clamp was no where near the flare.
I convinced myself that this was the same as not having a flare at :)all, so in effect, I have been driving around like this for a long time.
 
there are alot of DIY ways to make the flare. google DIY intercooler flare. I did the one using a harborfright wire crimper on my coolant tubes. works great and $7 is cheap insurance.

Odie
 
there are alot of DIY ways to make the flare. google DIY intercooler flare. I did the one using a harborfright wire crimper on my coolant tubes. works great and $7 is cheap insurance.

Odie

I would be leary of crimping Stainless that way - Aluminum or mild steel is more forgiving - did you do the crimp/flare on stainless?
 
Then apply two USA style liner worm drive clamps or a single T-bolt clamp on each hose to tube joint (four total). The Norma hose clamps as shown do not deliver enough clamp pressure to assure a secure connection. Even if two of these Norma clamps are used, the connection remains questionable.

Here's the ones with the "liner" - they work quite well. McMaster has them, but most hydraulic supply companies have them as well.

upload_2017-9-19_12-6-3.png
 
Ulix, nicely done, thanks for the tutorial. On mine the leak is near the bend just before the tube enters the tunnel in front. Otherwise they seem pretty sound. I considered attempting a repair by welding the single leak but I already know where that will lead. So your method is on my list.

Only guessing but I imagine some people's experience where they could not get the pipes to come out this way was due to the pipes rusting onto the support braces in the tunnel. So it might depend on how bad the condition of the tubes/tunnel box is. Also, mine looks like the car got the "undercoating option" added to the original sale, so there is a huge buildup of the stuff everywhere. That will have to be removed before the tubes will pass through the tunnel.

Dom, who makes the stainless water heater (small tubes) pipes? I've seen the large coolant ones but not the two for the heater. I'd like to pass some heater tubes through the tunnel when replacing the larger coolant tubes. Partially for insurance (the heater tubes are the same age and likely the same condition as the coolant tubes) but also it would be nice to get the section of heater hose (through the spare tire well, etc) completely out of the cabin by extending that tube further back (where I live staying cool is a much larger task than staying warm).

Regarding hose clamps. Not to pick on anyone but "Norma" is a brand name, not a style of clamp, and they offer pretty much every type of clamp known (a friend of mine is one of their US reps and often gives me bags of samples to try out). Actually the Norma Group is a large conglomerate of companies that includes several clamp makers. Furthermore, the "lined" style of clamp is not a USA design (it originated in Germany), and many of Norma's clamps are not made in the USA. But I get it, Norma is a name often affiliated to the basic worm clamp much like "Band-Aid" is used to refer to any bandage or "Kleenex" to all tissues. Norma has several choices of lined and smooth wall clamps, including constant tension ones of various types. I only point this out to help avoid confusion....the reference to using a liner style clamp is a good one none the less. And I agree that double clamping (positioning the heads 180 degrees apart) would be good insurance.

The use of a hose splice here does not seem too much different than the use of a coolant hose anywhere, provided allowance is made for any flex or movement between the pipe ends. Either firmly secure both tubes near the joint, or allow a few inches of space between them with a longer section of hose, or ideally both.

Hand forming a bead in 'annealed' stainless would not be a problem, but much more difficult in non-annealed S/S. Likewise for varying grades of stainless. So it would depend on what type stainless is used.
 
not sure if it was annealed or not. it was 316L stainless (on the receipt)
I am guessing it was as it wasnt too hard to put the bead on. given, the crimpers are pretty large giving a pretty decent fulcrum.

Odie
 
Well, no this style of hose clamp is NOT a German invention, the patent goes back to:
"But already in 1896, the Swedish inventor Knut Edwin Bergström took out a patent for his advanced worm-drive hose clamp. Shortly after, he founded the “Allmänna Brandredskapsaffären E. Bergström & Co.” in 1896, ABA for short. And as of 1949, the entrepreneur Ove Skafte Rasmussen and his Rasmussen GmbH conquered the German and European market with their hose clamp. Both companies merged to become NORMA Group in 2006."
https://blog.normagroup.com/en/the-history-of-the-hose-clamp/

-Embossed hose clamp that is common in Europe goes back to ABA, Sweden.... and Saab Scania & Volvos are full of ABA clamps as were many German brands... My regards for them is extremely dim, do they function as needed, yes. Can they be reused, often maybe to no. Have they been known to fail, occasionally. Given an option should they be used, better think twice and consider the possible problems. Specially when far better alternatives are available.

Worm drive hose clamp is UK, Commander Lumley Robinson:
https://www.hemmings.com/magazine/hsx/2013/10/L--Robinson--amp--Co-/3730581.html

-Early 1920's.

Norma is a large conglomerate that makes an assortment of stuff including that embossed worm drive hose clamp which they are known for, but is of Swedish origins by ABA. Norma group also owns Breeze, a USA hose clamp brand. https://blog.normagroup.com/en/

Since Ulix is in Germany, the clamps used were referred to "Norma Clamps" due to Ulix being in Germany and Norma being a commonly available brand.

*Liner style hose clamps became more common once silicon hoses came into common use. Some variant of them is made by nearly every manufacture of hose clamps.
There is a tendency for silicon hose to compress and contract as the operating/ambient temperature drops. To address this problem, constant tension hose clamps have been introduced as a viable solution.

Gates (SB power grip) offers what is essentially shrink tube hose clamp:
http://www.gates.com/products/autom...ooling-system/hose-clamps/powergrip-sb-clamps


Bernice


Regarding hose clamps. Not to pick on anyone but "Norma" is a brand name, not a style of clamp, and they offer pretty much every type of clamp known (a friend of mine is one of their US reps and often gives me bags of samples to try out). Actually the Norma Group is a large conglomerate of companies that includes several clamp makers. Furthermore, the "lined" style of clamp is not a USA design (it originated in Germany), and many of Norma's clamps are not made in the USA. But I get it, Norma is a name often affiliated to the basic worm clamp much like "Band-Aid" is used to refer to any bandage or "Kleenex" to all tissues. Norma has several choices of lined and smooth wall clamps, including constant tension ones of various types. I only point this out to help avoid confusion....the reference to using a liner style clamp is a good one none the less. And I agree that double clamping (positioning the heads 180 degrees apart) would be good insurance.
 
Coolant hose connection failure often results in serious engine damage. The "leak" even small will rapidly drain the cooling system resulting in near instant over heating and serious engine damage. A small amount of effort and resources applied as needed to reduce this risk as much as possible is wise insurance to prevent a serious disaster that can be mostly if not completely preventable.

Back in 2008, the block coolant drain valve opened up on the track. This caused the all the coolant to exit the cooling system with near instant head gasket failure. While the head gasket was replaced, and engine continued on for the remainder of this event, the head was warped and this engine was mostly disposed of after this first LeMons race. After this, it became my instance that ALL cooling system connections are double to triple secured with high quality clamps, drain valves removed or safety wired closed and all cooling system components doubled check before a LeMons event to track testing. Since then, there have been zero cooling system failures or problems.

This also known as failure of the two penny causing many thousands of dollars in repairs and many hours of wrenching.

https://jalopnik.com/5121314/italia...le-at-lemons-other-than-the-blown-head-gasket

False sense of security due to cognitive bias is a grand invitation for Murphy to have a wonderful run on all that can be affected.


Bernice


Thanks for all the additional info.
If this installation starts leaking, I will switch over to T-bolt clamps.

On silicone hoses, I might start using spring loaded clamps such as this:
https://www.akr-performance.de/media_products/mmclamp-25t/normal/MMCLAMP-25T_1.jpg
or this:
https://www.turbozentrum.de/documen...oZentrum-Ultra-HD-Schelle---Schlauchsch_2.jpg
 
Back
Top