bhagen

Low Mileage
Hello my friends, I have lurked around this forum for a while soaking up all of the amazing and helpful knowledge you all have to offer, but I have finally found a problem that needed a forum post!
I am new to the x1/9 universe, only recently learned how to drive stick (and only yesterday I pulled off the Targa top and learned the real reason why this car is so awesome).

I have been chasing very small lighting gremlins around, and my last culprit to catch is the instrument cluster lighting. Only one light is on above the left side of the speedo, and I can only really see if I am going between 30 and 40 mph at night.
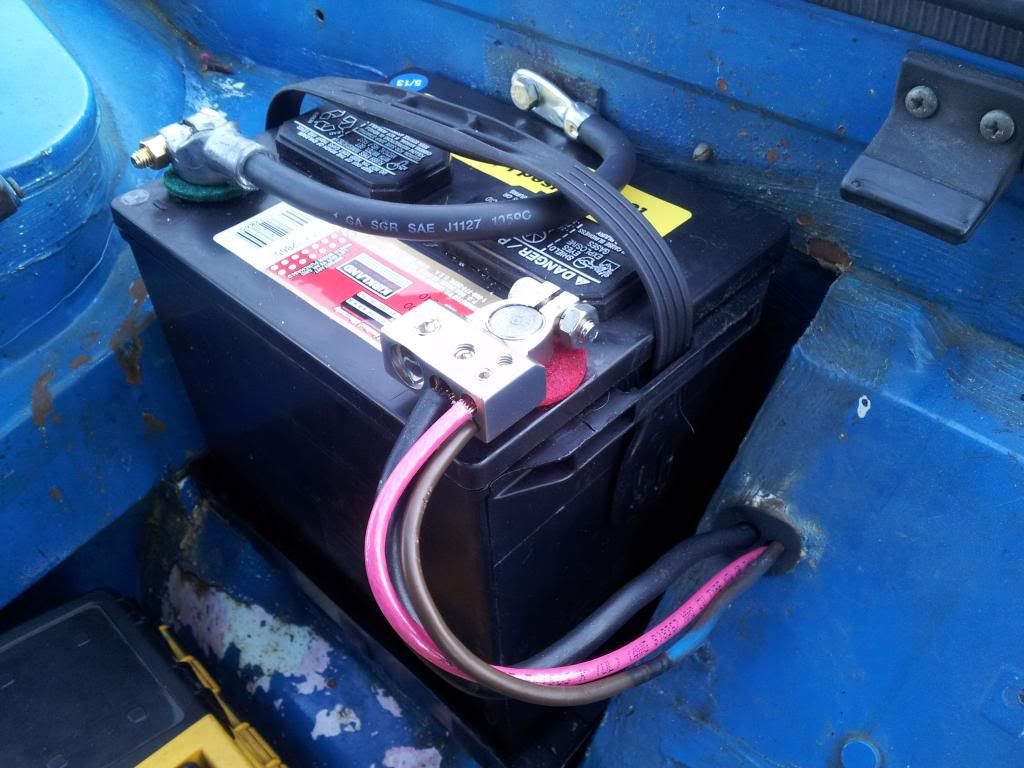
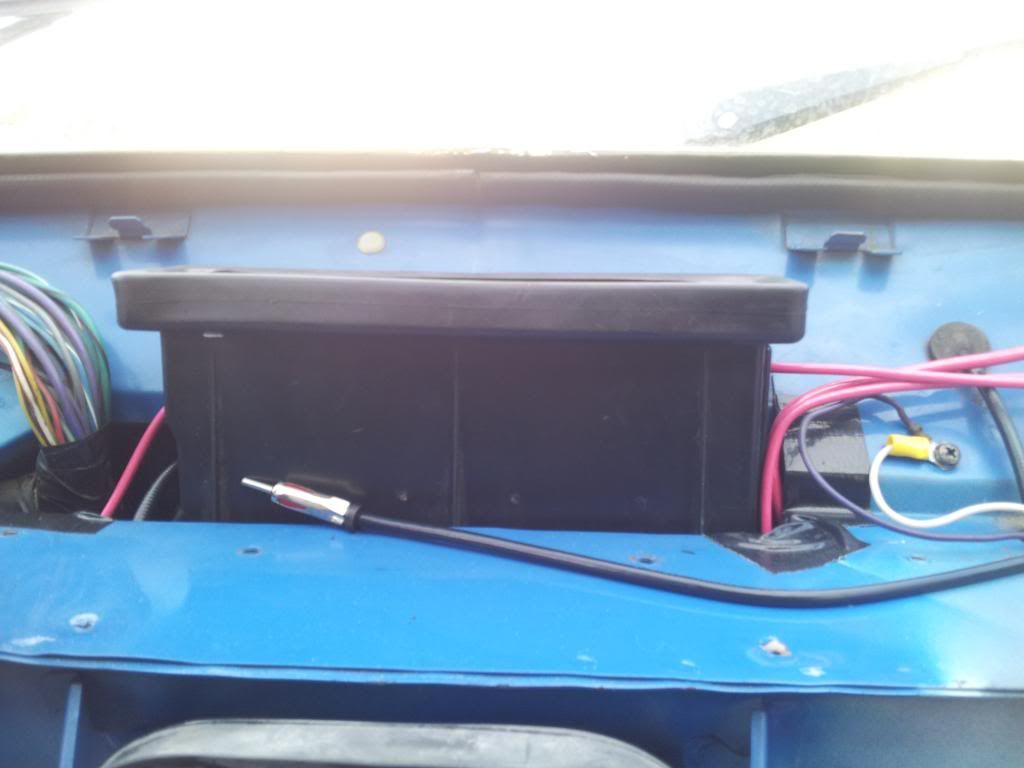
I have removed the 5 screws from the front of the cluster and removed the plastic face, but the actual gauge assembly will not budge. I looked down the black grille to see if I could find the speedo cable connector, but all I can see is a black cable, no connector.

http://imgur.com/nNlBz6O

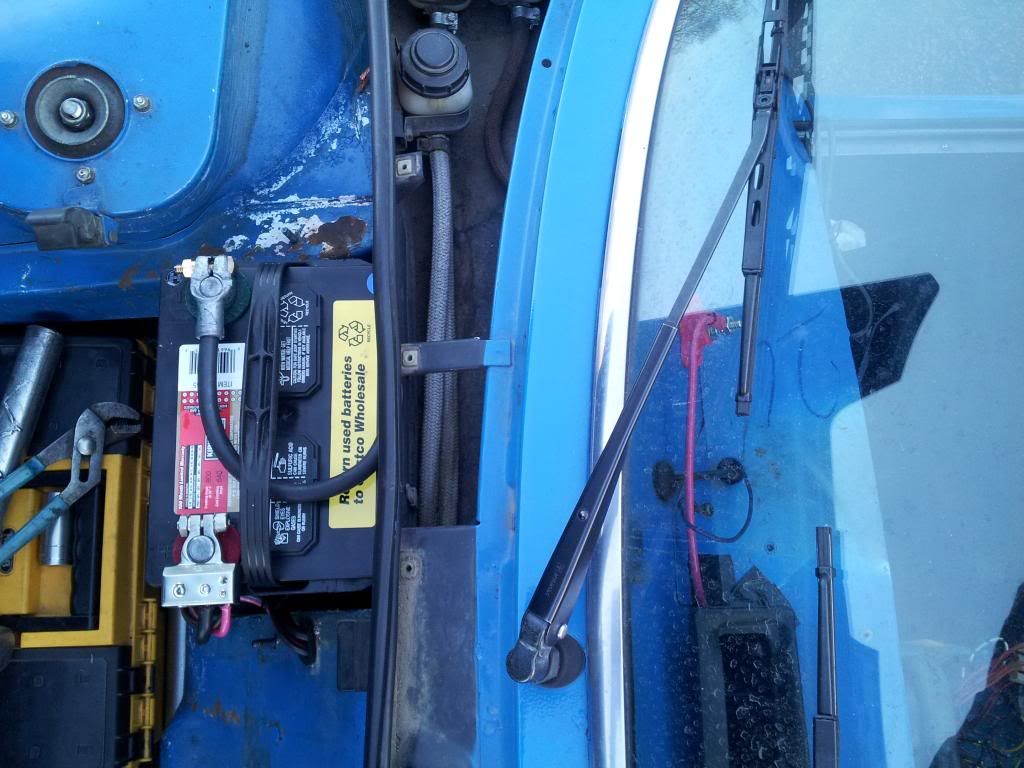
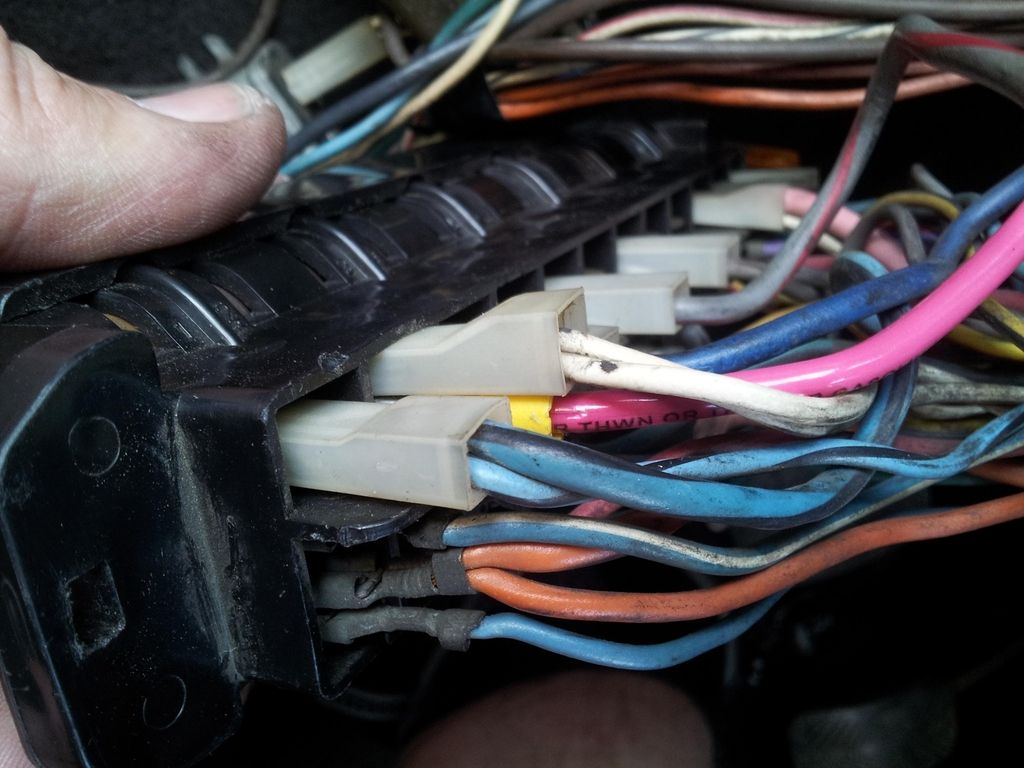
There is a white connector just barely poking out of the firewall. I was able to attempt to unscrew this with two fingers jammed under the wiper assembly, but it just keeps spinning with no results.

http://imgur.com/XRL0QhO

Could it be that at some point the cable was re-installed without the two pieces, and instead the long piece was just plugged directly into the cluster? Again the extent of my knowledge barely exceeds the Haynes manual, and it didn't have much to say on this matter.
Thanks for any help anyone might be able to offer.

Also, does anyone know where I could get some of the push-on weather stripping that is used around the doors and where the targa top sits on the roll bar? I ordered some from bayless but it seems like there should be a cheaper generic kind somewhere.
 
H
Could it be that at some point the cable was re-installed without the two pieces, and instead the long piece was just plugged directly into the cluster? Again the extent of my knowledge barely exceeds the Haynes manual, and it didn't have much to say on this matter.
Thanks for any help anyone might be able to offer.
Your profile says you have a '74 (I approve - check out my sig), and the '74 has a one piece speedo cable. You get the instrument panel out by pushing the cable towards the rear of the car from that space under the grill to help work the panel out. If you need more slack in the speedo cable, there are few extra inches in the driver's footwell.

If you haven't taken the grill in front of the windshield out yet, be aware that as well as the three obvious screws, there is also a hex bolt, 7mm head, installed from underneath the grill pointing up. (This is generally considered to be part of the Italian revenge on the rest of the world for the sack of Rome in 410 AD). Once you get the panel a few inches out, you can reach in behind it and undo the three electrical connectors and the cable/speedo connection.

Your speedo cable sheath looks decidely non-stock, and the plastic face is not supposed to come off separately from the rest of the panel, so someone has changed something in the past 40+ years. When you get the thing out, post a photo of the cable/speedo connector and we can tell you whether it's stock or not (which will matter if you ever have to order a replacement).
 
Agree with Eric in that it is not typically required to remove the clear plastic cover from the instrument pod to remove it from the vehicle.

Not sure on an early car like a '74, but the later cars used five fasteners to secure the "scuttle" grilles in place. On later cars, normally it helps to remove the scuttle grille to get at the short speedo cable, but in your case it looks like maybe a better approach would be to dive under the dash, pull the carpet back some, and see if you can generate some more slack in the speedo cable to allow more rearward movement of the cluster pod. With enough slack you'll then be able to get your hand in there to loosen and remove the collar holding the cable sheath to the back of the speedo housing.

Have any youngsters around? Smaller, more dexterous hands are an asset!
 
Thank you both for the quick replies,
Eric, you have 5 of these things? That is impressive! I unfortunately discovered that ridiculous screw a bit too late, but it is nothing a bit of superglue and black sharpie can't fix. My '74 aint exactly a show car.

I went down into the driver footwell as Dan suggested and removed the speedo cable from a clip and maneuvered it around a few other cables to get a few inches and I was just barely able to unscrew the cable.
Here is a few pictures of the speedo connector:
http://imgur.com/a/hESwJ

I've got the dash out now, so I will begin the process of testing all the lights. I also want to do the brown wire mod while the dash is out because of the easy access to the frunk in terms of wiring.
Thank you both for your help, I really appreciate it!
 
Another '74 owner here... this place is awash in 79-ups so welcome to the 1300 series fray.

For the brown wire mod on my 1300, I ran an 8 gauge wire to the passenger side and with a ring terminal mounted it to a junction post behind the passenger side "bertone" dash grille. If i ever need access when the dash is in, I just remove the bertone grille and add what I need. Pics without the dash in place:

20140208_161313_zps968c5778.jpg

20140208_165637_zpsa296ead3.jpg

20140208_160211_zps68d1777d.jpg


Once that was in, I had a nice strong 12V source to supply any and all modifications being done to the car...
20140216_152726_zps3a88f902.jpg


Red 10ga wire on left of "defroster duct is the brown wire mod", the one on right is the "starter relay mod".
20140216_152752_zpsc052b058.jpg


"Brown Wire Mod" piggybacked on fuse block:
20140216_152802_zps5221df46.jpg


Starter Relay Mod - utilizing lots of the old seat belt interlock wiring and relay (looking up underneath on passenger side)
20140216_152735_zps84511d7d.jpg
 
I was just barely able to unscrew the cable.
Here is a few pictures of the speedo connector:

Yep, that's the stock '74 speedo cable connector. A good thing on balance, although the one-piece style is a nuisance getting it in and out the first time. Now that you know the trick, you'll find it a lot easier.

The '74s are interestingly different than the later years, mostly in a good way. Post here or drop me a line if you find yourself reading something that doesn't seem to apply to your car.
 
Nice to know there are helpful people on the Internet like you guys here.
thanks for the pictures, that looks like a very clean way to do it. Would you mind giving me a little more info on what the wire gets connected to in the fuse box? As I understood it I need to connect it to somewhere around the key.
I also had the cover removed from the steering column and just happened to feel the fourish wires going into the ignition switch and they were fairly warm. A little bit disconcerting. I had the headlights on, but had not started the car.


It seemed to be the brown wire that was warm. My dad said that there had been electrical work done on it in the past, but didnt know what had been done.

The wire to connect to for the brown wire mod is fuse #2, look for the single terminal that has 2 white wires attached to it, thats the place to piggyback into.

The headlamp relay mod will also help redirect some of that current flow away from that brown wire and the old ignition and headlamp switches. On a '74, there's an easy way to do that just by using the relays already there under the dash.
 
Ok just so I am completely sure, I would run a wire from the battery (or in my case I'm putting in a 5 fuse block) and splice it into the wire that goes into fuse #2? That doesn't seem so bad!

Also, for the headlight relay mod, are there two unused relays available? I thought that two were needed.

Thanks again for the help.
 
Hooking to one wire to the #2 terminal back feeds the power to fuse #10, #9, and #2, which feeds the headlight motors, cigar lighter, hazard lights, engine fan, horn, and relay, as well as provide more current to the brown wire junction terminal via the pink wire.

As for the headlamp relay(s), many use two relays, but frankly one relay can handle the power load without issue. I used the original buzzer relay located under the dash on the drivers side.
 
OK... Good... now replace ALL the lamps as...

just being OLD they get dim.

I'm not familiar with the early clusters but the later ones had 3 watt bulbs and BLUE covers over them. Installing 5 watt bulbs and removing the BLUE covers makes things so much brighter.

There are also some LED replacements as well but those are even more foreign to me. Write a new post if you are interested.
 
Lastly... Do you know there are a bunch of GREAT GUYS...

locally near you?

FIATAMERICA has monthly meetings, about 100 members and they do loads of things every year and have meetings once a month. Here's their site: http://fiatamerica.com/

Tell'um Tony sent ya...
 
Well, my dash is bright, and I have more information than I ever could have hoped for!
Thank you all for the help, and for showing that there are helpful and informative people on the internet! I hope that I can stay active on this forum (and maybe eventually help other people rather than asking for help).
I am building up the courage to do the brown wire mod as zonker has so kindly described with plenty of detail.
Thanks again guys.
 
P.S. Do NOT reinstall that 7mm bolt... No need to!

What Tony said. BTW, there's another bolt just like it (doubtless designed in by the same comedian) on the underside interior of the side airvents into the engine bay.
 
OK... Good... now replace ALL the lamps as...

just being OLD they get dim.

I'm not familiar with the early clusters but the later ones had 3 watt bulbs and BLUE covers over them. Installing 5 watt bulbs and removing the BLUE covers makes things so much brighter.

There are also some LED replacements as well but those are even more foreign to me. Write a new post if you are interested.
reviving an old post. If you put 5w bulbs in where 3w were, do you run into any overheating/fire issues?
 
Your profile says you have a '74 (I approve - check out my sig), and the '74 has a one piece speedo cable. You get the instrument panel out by pushing the cable towards the rear of the car from that space under the grill to help work the panel out. If you need more slack in the speedo cable, there are few extra inches in the driver's footwell.

If you haven't taken the grill in front of the windshield out yet, be aware that as well as the three obvious screws, there is also a hex bolt, 7mm head, installed from underneath the grill pointing up. (This is generally considered to be part of the Italian revenge on the rest of the world for the sack of Rome in 410 AD). Once you get the panel a few inches out, you can reach in behind it and undo the three electrical connectors and the cable/speedo connection.

Your speedo cable sheath looks decidely non-stock, and the plastic face is not supposed to come off separately from the rest of the panel, so someone has changed something in the past 40+ years. When you get the thing out, post a photo of the cable/speedo connector and we can tell you whether it's stock or not (which will matter if you ever have to order a replacement).
Hi. New owner of an old ‘74 signing on with lots of newbie challenges. And this one has me stumped as well. Page 193 of the service manual makes removing the instrument cluster look so simple. I’ve used spudgers, swearing and gentle persuasion, but also cannot get the cluster to move more than 1/4 inch. Is the ONLY way to get it out far enough to get your hands behind it is by removing the outer cowl and pushing the cable through the firewall? They forgot that part in the manual it would seem.
 
reviving an old post. If you put 5w bulbs in where 3w were, do you run into any overheating/fire issues?
Another choice would be to run LEDs. Given you have a small alternator on your car, reducing the load by using LEDs could help and increase the brightness of the lights.
 
Don’t put 5w bulbs in use LED as Karl suggests if you want ‘bright’. However, I found in my recent instrument clean up, just replacing the bulbs for new and cleaning the contacts was more than good enough.
 
Back
Top