Chronicle of a Rebuild - 1983 X1/9

Colltech

'85 and '83
I've finally gotten around to writing a detailed history of the two year long restoration/rebuild of a 1983 X1/9 I recently finished.

I offer this as small repayment to the many Xwebforums members who were always willing to share their expertise, wisdom and encouragement without which, I doubt I would have completed this daunting project.

Special thanks to Karl Mead for his assistance in getting this post organized. The post contains many pictures - too many for me to want to go through the process of trying to upload one at a time. Instead, here is a PDF version that you can download and read at your convenience:

https://dl.dropboxusercontent.com/u/3359580/Ed Taylor X1:9/Ed Taylor How I came to buy an X1-9 s.pdf

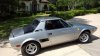
Lastly, as a "teaser", below are some photos of the completed car.

Thanks again to all who helped. I hope you enjoy the story!

Ed
Austin, TX


One nice X! I notice you do not have center caps on the wheels. I used PVC pipe end caps sanded and painted. I think they are 1 1/2 inch. Mine are flat but another X'er with a sweet red X1/9 I told this fix about used some caps that were round making a very nice addition. You have to do a little trimming and sanding and it can be permanent like mine or a temp fix until you find the right caps. Once again I say ONE NICE X!
 
Great write-up, Ed

Documenting projects takes a lot of time, and it looks like you've done a great job on both the documentation and the project itself. Thanks for sharing, and congratulations on the jobs well done!

Pete
 
Thanks for the idea! Truth is, I have the original center caps but I leave them off because some of the tabs are questionable and I would hate to lose them!

Ed
 
Indeed this is a great chronicle, one to aspire to.

There are jpgs of each finished page that could be posted for those who might prefer to look at this as an online experience. It is 30 odd pages so it would be one loooong post

Thank you for making your story available Ed and a really great job of saving this car from a sad end.
 

Attachments

  • ed taylor how i came to buy an x1-9 s.pdf
    1.5 MB · Views: 48
Indeed this is a great chronicle, one to aspire to.

There are jpgs of each finished page that could be posted for those who might prefer to look at this as an online experience. It is 30 odd pages so it would be one loooong post

That would be very nice :D
 
Just realized that the original post is 1 year old, but thanks for posting. The write up was a very enjoyable (and informative) read.
 
Thanks Beezee! Here are some pics of the finished product:

20160702_160946.jpg 20160702_162520.jpg 20160702_160507.jpg 20160702_160434.jpg 20160702_160353.jpg 20160702_160802.jpg

Ed
 

Attachments

  • 20160702_162520.jpg
    20160702_162520.jpg
    323.7 KB · Views: 68
  • 20160702_162520.jpg
    20160702_162520.jpg
    323.7 KB · Views: 65
That is one fine looking X-1/9!
I hope you get many years of enjoyment out of her.
 
Hi Ed;

Any tips for fixing the bent up "wings" on the hood? My hood is also bent up where someone tried to open it while latched.
 
Beezee,

Getting the entire front trunk hood perfectly flat (its really a big curved surface) was one of the hardest, most labor intensive things I tackled. As I said in my post, it was my first attempt at body work and I'm sure everything I did could have been done much faster (but not much better) by someone with more experience. The hood, like many X1/9 hoods, was pocked with dents and BOTH wings were pretty severely bent up. You can't just bend them back down because you end up with a "valley". And, you can't access the dent from the back because the hood bracing is there.

Basically, you have to bend the wings down on the same plane as the rest of the hood and address the resulting valley with body filler. This was a process I had to do more than once to make sure the area blended seamlessly into the overall shape of the hood. If not, once its painted with gloss and clear coat, any ripples would be quite noticeable.

Guide coat is your friend - it will show you all the peaks and valleys in your work. Since I worked mostly at night, I also used a very powerful flashlight with a tightly focused beam. If you lay it on the hood and shine it across your work area, you will easily see shadows form wherever there is a high or low spot.

I would guess I ended up spending well over 30 hours doing and redoing and redoing again that hood until it was perfectly shaped. The good news is that it ended up being flawless and to me, well worth the effort.

Hope this helps!

Ed
 
Last edited:
Back
Top