EFI Reluctor "Engineering" advice sought

Dr.Jeff

True Classic
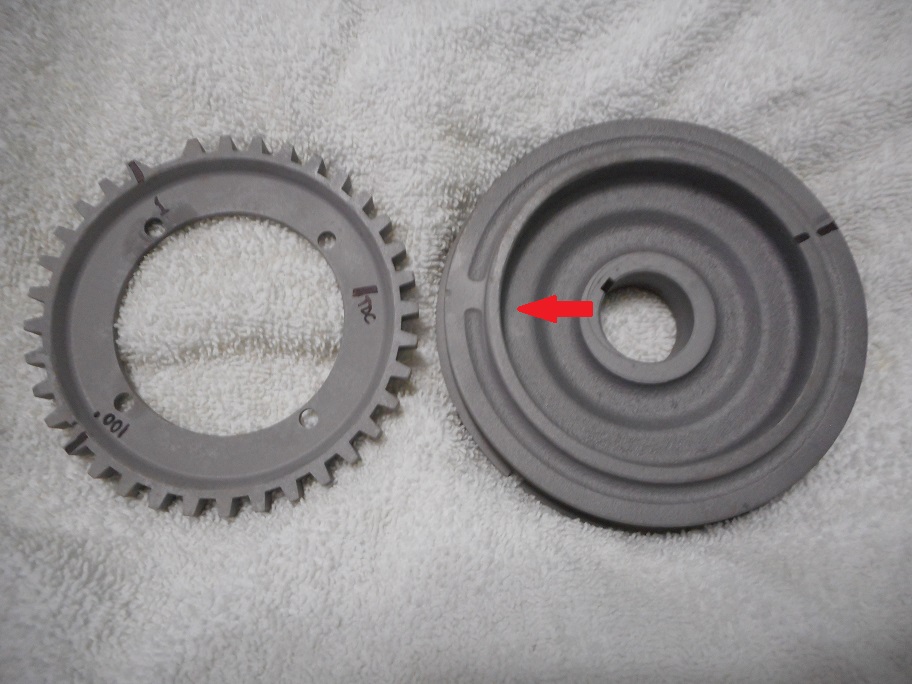
I'm looking for suggestions from any of our engineers, machinists, or other clever minded individuals. I want to mount a toothed ring (reluctor, trigger, whatever) onto the stock X1/9 front crank pulley. These are the parts I'm referring to (ignore the markings):
002.JPG


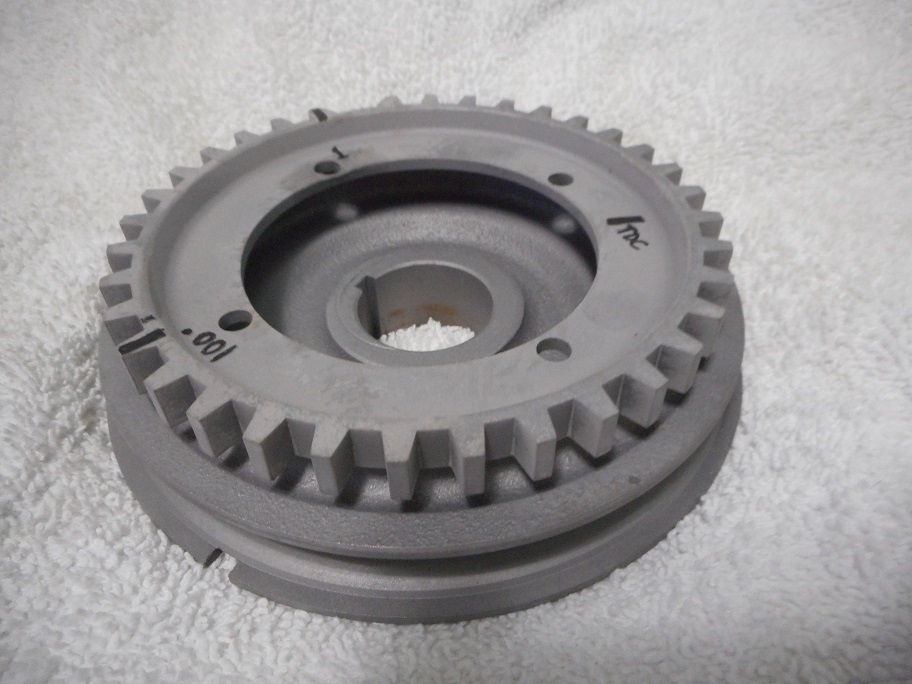
The ring needs to be perfectly centered and aligned once mounted. Actually attaching the ring to the pulley is not a problem; as you can see it has 4 holes for mounting bolts. These happen to be located over the wide landing on the pulley (red arrow, above), which is thick enough and flat enough to drill and tap 4 holes onto that portion of it. And the ring will mate directly against the face of the pulley to securely hold it flat (this was how it was attached to its original pulley from a different vehicle). Here is what they will look like mated:
004.JPG


The difficult part is locating the 4 holes (to be drilled into the Fiat pulley) so that the ring is perfectly square and centered. As noted, it will be square axially due to being flat against the pulley. But the holes need to be at exactly the right points to also make it accurately centered radially (so it isn't out of round when spinning). So just to be clear, the question is about locating the right position for the holes so it is not off-center (not about actually drilling them).

I can measure things, eyeball it, and get the holes really close. Maybe even open the mounting holes on the ring to allow a little adjustment before tightening the bolts. But I'm sure there are some tricks to achieving this more accurately. Any suggestions?
 
Last edited:
I'm no professional machinist, but I would mount the pulley on a rotary table and use a dial indicator to get it perfectly centered. It could be clamped from the center, which frees up the periphery for indication, but that method would rely on the pulley's concentricity - the center hole has to be perfectly in the center of the outer diameter. If you are not certain of that, it would be better to clamp it on the outside edge and indicate center from the center bore. Then you can be assured that your 4 holes are perfectly concentric with the spin of the pulley.

Then you would need to carefully measure the PCD of the 4 holes. Once that's established, then the rotary table would be mounted on an XY table under a drill press or milling machine. Position the rotary table on the XY table and use a centering indicator to get the center bore of the pulley directly under the tool (drill or end mill). Then use the XY table to offset (in either the X or Y axis, doesn't matter) by the amount of the radius of the PCD of the 4 holes in the reluctor wheel. Then use the degree wheel on the rotary table to make the 4 holes at whatever spacing they are at (I am assuming they are evenly spaced at 90, but if not, that's easy to compensate for).

That's the only way I know of to do it with good accuracy. I realize it involves a rotary table, 2 types of indicators, and a good XY table. I said it would be accurate, I didn't claim it would be easy or could be done with a hand drill. Even .001 out (a thousandth of an inch) will be readily visible when the reluctor wheel spins, and I'm not sure what it would do to the signal to have some teeth closer to the reader than others. So I would not skimp on accuracy.

Pete
 
If you have a lathe, you could make a cylindrical part with an OD that will fit the pulley on one end and an OD of the tooth wheel on the other end to make an alignment tool.
 
Quote: "The difficult part is locating the 4 holes (to be drilled into the Fiat pulley) so that the ring is perfectly square and centered."

Well, it ain't gonna be perfect. Dr.Jeff, do you have a tolerance specified on the sensor you are installing?
 
I have various measuring tools (including dial indicators), a XY table (might be big enough), a drill press, but not a rotary table. I can see where that would work though. And I am concerned about the concentricity of the pulley itself - after all, it is a Fiat part. :(

I have a small lathe. I thought about trying to chuck the pulley in the lathe and use the tool post to hold a scribe at the correct diameter from the center. If I can mark a good circle at the right place on the pulley, then the holes just need to be spaced apart from one another correctly around that circle. I'll have to see if it will fit in my lathe.

I guess "perfect" is a relative term. The gap tolerance between the tooth wheel and the sensor is less than 1 mm. I haven't found any information to indicate how much variance is acceptable for the sensor's accuracy. I'm sure the OEM stuff isn't "perfect", but the closer I can make it to "perfect" the better. Thing is, even if I can mark the location for the holes correctly and use the drill press to drill the holes, it isn't likely to end up with "perfectly" placed holes. Just doesn't happen without better machining equipment. So I wonder if this is something that should be taken to a machine shop to have done? Although experience tells me that may not end up any more accurate. :mad:

Thanks for the input, please keep it coming.
 
Jeff,

have you considered "relocating" the mounting holes ?
if so - put pully in lathe, get square in both directions, then spot face the front face ......you can make a nice simple locating step for the trigger wheel.....

then put trigger wheel in lathe.....center same......machine ID to push fit over previously machined step .......

redrill holes.....

be aware that they "will" break throu into the V groove ......make very sure that bolts don't eat up said v belt !

I also used the factory front cover (the later one with 2 extra holes - circa 45mm apart) and just machined a block of ally to mount the sensor off it ....
 
Simon’s point is a good one - it is unlikely the stock pulley is round, so putting in a lathe & trimming and truing the stock pulley makes sense.
 
Can you make the holes in the toothed pulley big enough that cover any slop your calipers and everything else at your disposal would create. Take a short bit of time to center it up on the engine. Then just tighten the bolts? maybe even a quick tack weld to sure it stays put? or find a machinist who could get this done in like an hour and pay him the $50-100 and not worry about it? Some things just are not worth fretting about doing yourself in my opinion.
 
I had my pully turned on a lathe then set the wheel angle for the sensor , tacked it, then put it on a rotary table on a drill press and put in the holes for the screws. I don't think you have much room between the pully and frame when in the car so maybe take a close look at the stack up. I also metal finished the screws inside the V Groove.


DSC00398.JPG


DSC00409.JPG
 
I'll try to respond to all of the above thoughts in list form:

1) The location of the existing 4 mounting holes on the trigger wheel is inside of (smaller diameter than) the Fiat pulley's V-groove. See the red arrow on my prior picture. So the mounting bolts will not interfere with the belt, even if they go completely through the pulley. I like that aspect of this wheel, it makes for a more secure mounting in my opinion.

2) Even if the pulley isn't true (which I'm sure it isn't), it won't matter so long as the trigger wheel is. In other words, it needs to be centered with respect to the crank, not the pulley. Trueing the pulley isn't too much of a concern, so long as I can get the wheel true. So mounting the wheel around the pulley's raised ridge (lip) requires more machining/trueing. It seems to me it is easier to just worry about getting the wheel's bolt holes true, and not the pulley?

3) This trigger wheel is from a Ford 3.8 V8, not from a Escort 4-cyl. Therefore it is a different (smaller) diameter and mounting arrangement than the ones shown in many of these applications. I like that it has existing mounting bolt holes and they fit the beefy inner portion of the pulley rather than the thin V-groove portion. But this also makes it not convenient to machine the pulley and mount the wheel over the big ridge/lip (as shown in the above photos). Although even if it could be done that way, that seems to have its own issues (noted in #2).

4) It appears there is no frame interference anywhere near this pulley/trigger arrangement. And using the smaller diameter trigger wheel (as noted in #3) makes that even better by keeping everything more compact.

5) This has not been addressed, but another possibility may exist. The pulley pictured is the larger "non-AC" version. The engine this is going on has the smaller "AC" pulley. I intend to swap to the larger one, but may have to use the smaller pulley (if the large one won't play well with the AC setup). That was another reason I choose the smaller trigger wheel, so I would have that option; the larger wheel (Escort fitment) is too big to mount on the AC pulley.

6) I'm somewhat inclined to do as a couple members mentioned; that is to do what I can to make the holes true (with respect to the crank centerline), but allow for some additional adjustment before it is tightened down. Also I suppose the trigger wheel's outer circumference could be slightly trued after the fact, by mounting it and shaving any high spots while the engine cranks. The teeth are large and vertical enough on the sides/faces that a minor amount of removal will not change the profile. And it is soft steel, so it's easy to work with.

This is a continual thought process that keeps changing. Please let me know if I did not address any of the great ideas already presented. And keep more of them coming. Thanks.
 
Last edited:
Dr.Jeff. the reason I asked earlier about the tolerances of your sensor is because a digital signal can usually tolerate a high level of noise. The teeth on the wheel are basically yes/no so a "maybe" is easy to toss into the right bucket. So aside from mechanical interference I'm not sure you need an intense level of accuracy. A 0.75 mm +/- 0.25 gap between trigger wheel and sensor should be doable with a bit of slop in the mounting holes and a set of feeler gauges.
 
I'm looking for suggestions from any of our engineers, machinists, or other clever minded individuals. I want to mount a toothed ring (reluctor, trigger, whatever) onto the stock X1/9 front crank pulley. These are the parts I'm referring to (ignore the markings):
View attachment 16307

The ring needs to be perfectly centered and aligned once mounted. Actually attaching the ring to the pulley is not a problem; as you can see it has 4 holes for mounting bolts. These happen to be located over the wide landing on the pulley (red arrow, above), which is thick enough and flat enough to drill and tap 4 holes onto that portion of it. And the ring will mate directly against the face of the pulley to securely hold it flat (this was how it was attached to its original pulley from a different vehicle). Here is what they will look like mated:
View attachment 16308

The difficult part is locating the 4 holes (to be drilled into the Fiat pulley) so that the ring is perfectly square and centered. As noted, it will be square axially due to being flat against the pulley. But the holes need to be at exactly the right points to also make it accurately centered radially (so it isn't out of round when spinning). So just to be clear, the question is about locating the right position for the holes so it is not off-center (not about actually drilling them).

I can measure things, eyeball it, and get the holes really close. Maybe even open the mounting holes on the ring to allow a little adjustment before tightening the bolts. But I'm sure there are some tricks to achieving this more accurately. Any suggestions?


I would measure the hole pattern then put the pulley in the mill vice and use the DRO to center the pulley from the center hole then use the DRO to lay out and drill the hole pattern.

It might help to know what tools you have to work with. or you could just send it to me and I'll do it but that takes the satisfaction of doing it yourself away from you. That satisfaction is why I have so many tools, I mean why pay someone $50 for something when you can do it yourself for $500. lol
 
I have a small lathe. I thought about trying to chuck the pulley in the lathe and use the tool post to hold a scribe at the correct diameter from the center.

OK, with only a lathe, how about this. Get some round stock of your favorite metal - 6061 aluminum would do nicely. Not sure of the exact size of the hole in the reluctor ring, but about an inch larger than that. Cut a disk (or order one) that is about 3/4 thick (again I'm guessing at the measurements here, you would need to work that out). Bore out the center so it's large enough to have the crank snout, plus the crank nut, pass through. Then affix the aluminum ring to the pulley, as close to center as you can get it. Bolt it on from the back of the pulley, maybe. It's important that it be mounted permanently - if the pulley is weldable, use steel instead of aluminum and weld it on there.

Once the ring is on the pulley, mount the pulley in the lathe, using the center hole. You might have to custom turn an arbor for this. Once you have the pulley mounted in the arbor (hopefully without unchucking the arbor, which will ensure concentricity), turn a step down in the aluminum ring which is the same size as the inner hole of the reluctor wheel. Now the step on the aluminum ring is concentric with the center bore of the pulley.

Unchuck the pulley, put the reluctor wheel in the oven and the pulley in the freezer, then pop the reluctor wheel onto the aluminum ring. If you have gotten your tolerances right, once cooled they should be fairly well inseparable. Then it's a simple matter of drilling and tapping the 4 holes to ensure that inseparability.

Pete
 
I concur with Pete, I missed that you had a lathe. The other option you could try would be to make an "alignment tool" turn the end to fit the pulley then step it up to the diameter of the center hole in the reluctor wheel, clamp them together and use the holes in the reluctor wheel as a drill guide to drill the holes. Make a drill sleeve out of some scrap, an old bolt will work fine, to reduce the hole in the reluctor down to the tap drill size to keep it aligned while you're drilling it. you can make the same type of sleeve to fit the tap as well to keep it aligned while you tap it. once you have it drilled make some spacers to fill the gap between the pulley and reluctor and you're good, The tolerances don't have to be all that tight on this.
 
There's a bunch of good ideas floating here. My contribution would be that after you get it mounted, set it up on your lathe with a key way shaft and dress the teeth.
 
I used a narrow trigger wheel fitting a into the back of the pulley which was machined to match the depth of the trigger wheel, centering on the a boss left on the pulley:

DSC_0167.jpg


I am using a sensitive hall sensor mounted thusly:

DSC_0398.jpg

You will note there is no missing tooth, as I am using a cam sensor reading a steel pin on the aluminum cam pulley:

DSC_0399.jpg

Paul Davock
 
I'll try to respond to all of the above thoughts in list form:

1) The location of the existing 4 mounting holes on the trigger wheel is inside of (smaller diameter than) the Fiat pulley's V-groove. See the red arrow on my prior picture. So the mounting bolts will not interfere with the belt, even if they go completely through the pulley. I like that aspect of this wheel, it makes for a more secure mounting in my opinion.

2) Even if the pulley isn't true (which I'm sure it isn't), it won't matter if the trigger wheel is. In other words, it needs to be centered with respect to the crank, not the pulley. Trueing the pulley isn't too much of a concern, so long as I can get the wheel true. So mounting the wheel around the pulley's raised ridge (lip) requires more machining/trueing. It seems to me it is easier to just worry about getting the wheel's bolt holes true, and not the pulley?

3) This trigger wheel is from a Ford 3.8 V8, not from a Escort 4-cyl. Therefore it is a different (smaller) diameter and mounting arrangement than the ones shown in many of these applications. I like that it has existing mounting bolt holes and they fit the beefy inner portion of the pulley rather than the thin V-groove portion. But this also makes it not convenient to machine the pulley and mount the wheel over the big ridge/lip (as shown in the above photos). Although even if it could be done that way, that seems to have its own issues (noted in #2).

4) It appears there is no frame interference anywhere near this pulley/trigger arrangement. And using the smaller diameter trigger wheel
(as noted in #3) makes that even better by keeping everything more compact.

5) This has not been addressed, but another possibility may exist. The pulley pictured is the larger "non-AC" version. The engine this is going on has the smaller "AC" pulley. I intend to swap to the larger one, but may have to use the smaller pulley (if the large one won't play well with the AC setup). That was another reason I choose the smaller trigger wheel, so I would have that option; the larger wheel (Escort fitment) is too big to mount on the AC pulley.

6) I'm somewhat inclined to do as a couple members mentioned; that is to do what I can to make the holes true (with respect to the crank centerline), but allow for some additional adjustment before it is tightened down. Also I suppose the trigger wheel's outer circumference could be slightly trued after the fact, by mounting it and shaving any high spots while the engine cranks. The teeth are large and vertical enough on the sides/faces that a minor amount of removal will not change the profile. And it is soft steel, so it's easy to work with.

This is a continual thought process that keeps changing. Please let me know if I did not address any of the great ideas already presented. And keep more of them coming. Thanks.


So let me get this right; the real world example that is out there on a running in a car today is dismissed as NG? Hmm, really?

1) I don’t understand your response on this point about the fastener locations so I can’t really comment on this one. Good thought about through holes in the belt groove but for me I do not have “V” belt issues and it’s been tracked with high revs and driven on the street. My screws are metal finished on the inside surface – smooth and seamless. The screws are secured with loctite and inner surface is no rougher than stock. If you don’t clean up the holes/screw then yeah you will eat the belt – don’t do that.


2) I think you are saying the two machined surfaces (OD of the crank and ID of the pully) are NG. I can’t figure where you get this assumption. What is “true”? Does the runout need to be 0.001mm or 0.1mm? These are two machined surfaces that are a slip fit an I can say with confidence, the runout/concentricity is truer than you need. You don’t need a press fit for this. If you live center the pully in the lathe you will get the most concentric cut about the CL of the shaft to locate the toothed ring. Look up GD&T and Concentricity Datums.


Spotting in multiple fastening points about the shaft CL makes no sense (I think you are saying this is your preference). Which screw hole is the master datum for that? (GD&T reference) To get the toothed ring to fit, each screw hole would have to be oversized to get all the screws through – more slop than the factory pully fit for sure. So if I understand your assumption (I may be wrong here) you assume all the screw holes will have a net fit. If that is your assumption that isn’t how it works. You may be better with a locating/datum pin (dowel pin) strategy but again one hole would be a master datum and one a 2way datum and the others oversized; the toothed wheel would never be truly concentric with this. You added in a whole bunch of unnecessary stacked tolerance.


3) This is what I got out of the explanation of the level of precision you are looking for, you want to put the crank/pully/wheel together then spin the crank and machine the OD of the toothed wheel getting the ideal concentricity about the crank CL. So OK if I read this right, you will need to permanently install the front seal and front plate then weld the whole crank/Pully/wheel together then machine it. If you don’t the first time you unbolt assembly of that stack up, all your precision work goes out the window. You made that argument with the assumed pully slop. What changed to make that pully fit better?? Except now you have the pully fit tolerances AND the retaining screw tolerances together.


So I have to comment on the idea of a spaced ring attachment because it is truly spooky to me. OK so I am not sure what you decided to do about the pully/wheel stack up but If you are planning to make spacers and bolt it all together that is major bad practice – major bad. The cyclic loading of the shaft spinning will loosen them up very quickly. I don’t believe the toothed wheel is balanced so you have an asymmetrical mass spinning and yes, you will get concentric deflection too – yippee! Like a wheel out of balance spinning at the end of a stick (like spinning plates on a stick).


There are many reasons why everyone centers the toothed wheel on the pully but the most significant reason is it is best practice to manage the inertial bending loads and have the largest surface for the clamping load to deal with the rotational shear loads. The fasteners are there just to keep it clamped in place and in this case do manage some of the shear. Doing multiple bending, shear and torsional loads on cantilevered screws is NG. Don’t do this.


4) My set up is close to the frame (5 to 10mm maybe) so if not an issue for you because of the smaller dia then right on!

5) I saw some noise about AC and tuned it all out


6) “I'm somewhat inclined to do as a couple members mentioned; that is to do what I can to make the holes true (with respect to the crank centerline), but allow for some additional adjustment before it is tightened down.” What? How is this more precise than the pully fit to the crank? I don’t get this one. “I want it precise but adjustable”.


So, you asked a question but I think you already made your mind up before hand so this is kinda a wasted post. I am an engineer and an Automotive Engineer with a background in kinematics (look that one up to). You asked for an engineering response and ya got it. Definitely think the attachment concept through, I don’t think you are on the right track.
 
More excellent input - awesome!

The lathe I have is only one of those "mini" ones, so I'm limited to what will fit in it. The chuck does have "inside bore" keys (I think that's what it's called), so I might be able to chuck the pulley from it's center (crankshaft) hole. That would keep anything I do centered with the crank and not the pulley. I'll have to see if the pulley will even fit into the lathe and if the chuck will hold it this way. But that's a start (I'll play with that today).

I'm the type that typically does as described by Brian P, I'll buy expensive equipment rather than pay a shop to do something. Unfortunately I am currently living in a "temporary" situation, to be the full-time caregiver for my 95yo mom. So some of my equipment is still in storage (in another state), and I'm reluctant to buy anything more for now. If I don't find a way to do this with what I have on hand then I'll likely take it to a machine shop (maybe :p).

But first I'll see what I can do with some of the above suggestions.

I appreciate the input about the tolerance for these triggers/sensors. That was something I could not find and was unsure just how accurate I had to be. With respect to that, does it matter what type of sensor this is (hall, VR, etc)? I am using a stock one from a 90's Ford (I'll have to look it up to see what type that is). It is used with the "missing tooth" trigger system:
s-l300.jpg


"Dallarsx19", I just read your last post and it seems we have several misunderstandings. But frankly I did not follow everything you said. I will try to clear up a few points.

Nothing was said about the typical factory trigger wheel systems being no good. As to the center bore/crank mount of the pulley, I was saying to center the trigger wheel from that, rather than from the OD of the pulley.

The trigger wheel I have is a different size than the one you are thinking of (not the same one you used); this one is much smaller diameter, so the mounting points are much closer to the centerline than the V-groove on the pulley. Therefore the mounting holes will be closer to the centerline and not interfere with the V-groove in any way.

Nothing was said about using multiple mounting points. Not sure I follow you.

If you go back up to the pictures I posted at the beginning of this thread, you will see the trigger wheel rests directly against the pulley face. So there would be no "spaced ring attachment" (if that's what you meant).

The mounting ideas being discussed are the same as was used on the Ford OEM pulley for this trigger wheel.

I asked the question because (as noted a couple of times) I do not know how I will approach this. I am looking for input. It sounds like you have valuable input to offer, but I'm not sure I was able to follow much of it. Perhaps you can assist by adding a little more explanation please.

Thanks again to everyone for your continued input.
 
Back
Top