First Start Up!

Jepp78bertone

True Classic
Hey folks, So tonight is FIAT friday at my place! Which is not unusual for me as I typically spend my friday nights working on my x, however tonight marks a very special FIAT friday, as tonight is going to be the first attempt at starting my rebuilt engine.

For those of you who have been encouraging me throughout this project, I am so EXCITED to share it with you, regardless of the outcome tonight.

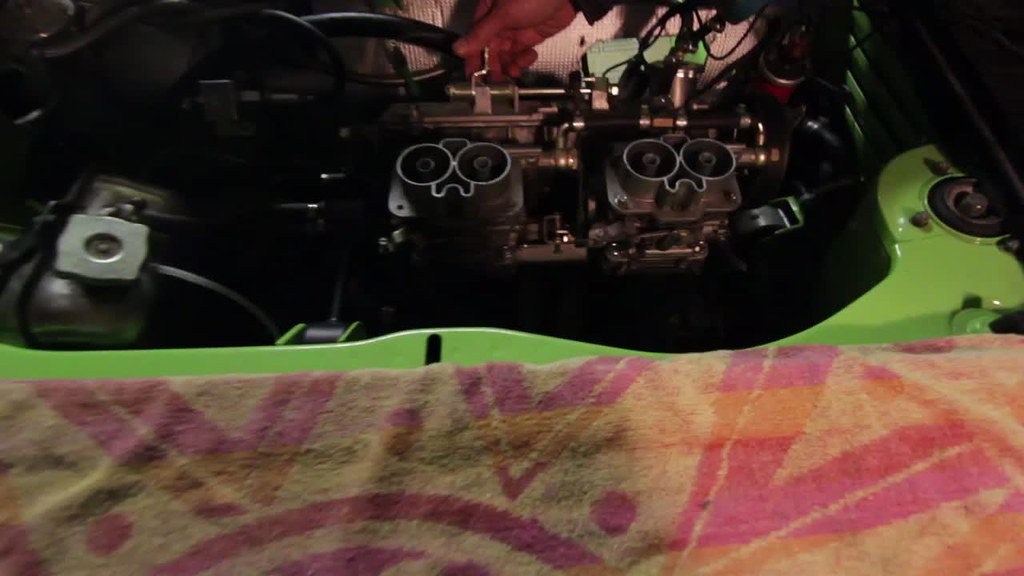
My engine is a 1500 with 86.6mm small fly-cut pistons. Otherwise stock 1500 head that has been ported, polished, and deshrouded following step by step Steve C's fiat performance guide. Twin DCNF 40's on a PBS manifold professionally built by matt. (THANKS ROOSTER) Exhaust is 4-2-1 headers to ANSA free flowing muffler. I am unsure on my camshaft. I bought it off of a gentleman that also sold me the ANSA exhaust set up. It came with a 34DMTR carb that he said was jetted accordingly to the cam and exhaust set up. He said the cam was aftermarket and that together with the set up it gave significantly more performance. I am hoping it works well. If the twin webers seem to cause me a lot of grief, i can switch to my 34DMTR. I had my machinist set the valve clearances when he did a full valve job on the head. I will be running bosch electronic ignition from a 79' x19.

I should remind everybody that is all 100% brand new to me. I have never built an engine before, so if there is anything that needs to be clarified, or something that you see that screams STOP! THIS IS WRONG, please don't hesitate to chime in and save me from seeing 4 years of work blow up in front of me. :p

I have a question about timing.

Question #1

Do I set my engine to 5'BTDC to start with, or do I leave it at TDC and then once running, with a timing light, set ignition timing to 5'TDC?

As of right now, I have the crank mark in the bell housing opening set to 5'BTDC and the rotor in the disturber pointing to the #4 wire on the cap. wires are set 1-3-4-2. If i open the oil cap, and look down into it - aka #1, both valves are down. Will this be okay, or should I set the crank back to TDC, and then carry out ignition timing with a timing light after it is running?

Question #2. - Vacuum lines

I have no vacuum lines at all. Is that normal for a dual carb set up? I have tried to dig around the forum for info on vacuum advance for dual dcnf's but can't seem to find much.

My distributor has a vacuum port on it, should I plug it? or is it okay to just leave open?

Question #3. - Fuel Pressure

I am running a facet electric solid state fuel pump and a filter king pressure regulator. But I don't have a gauge to know what PSI I am going to be running. I will see if I can get my hands on one before tonight, but if not, is there a way to know if I am pumping too much, or too little fuel?

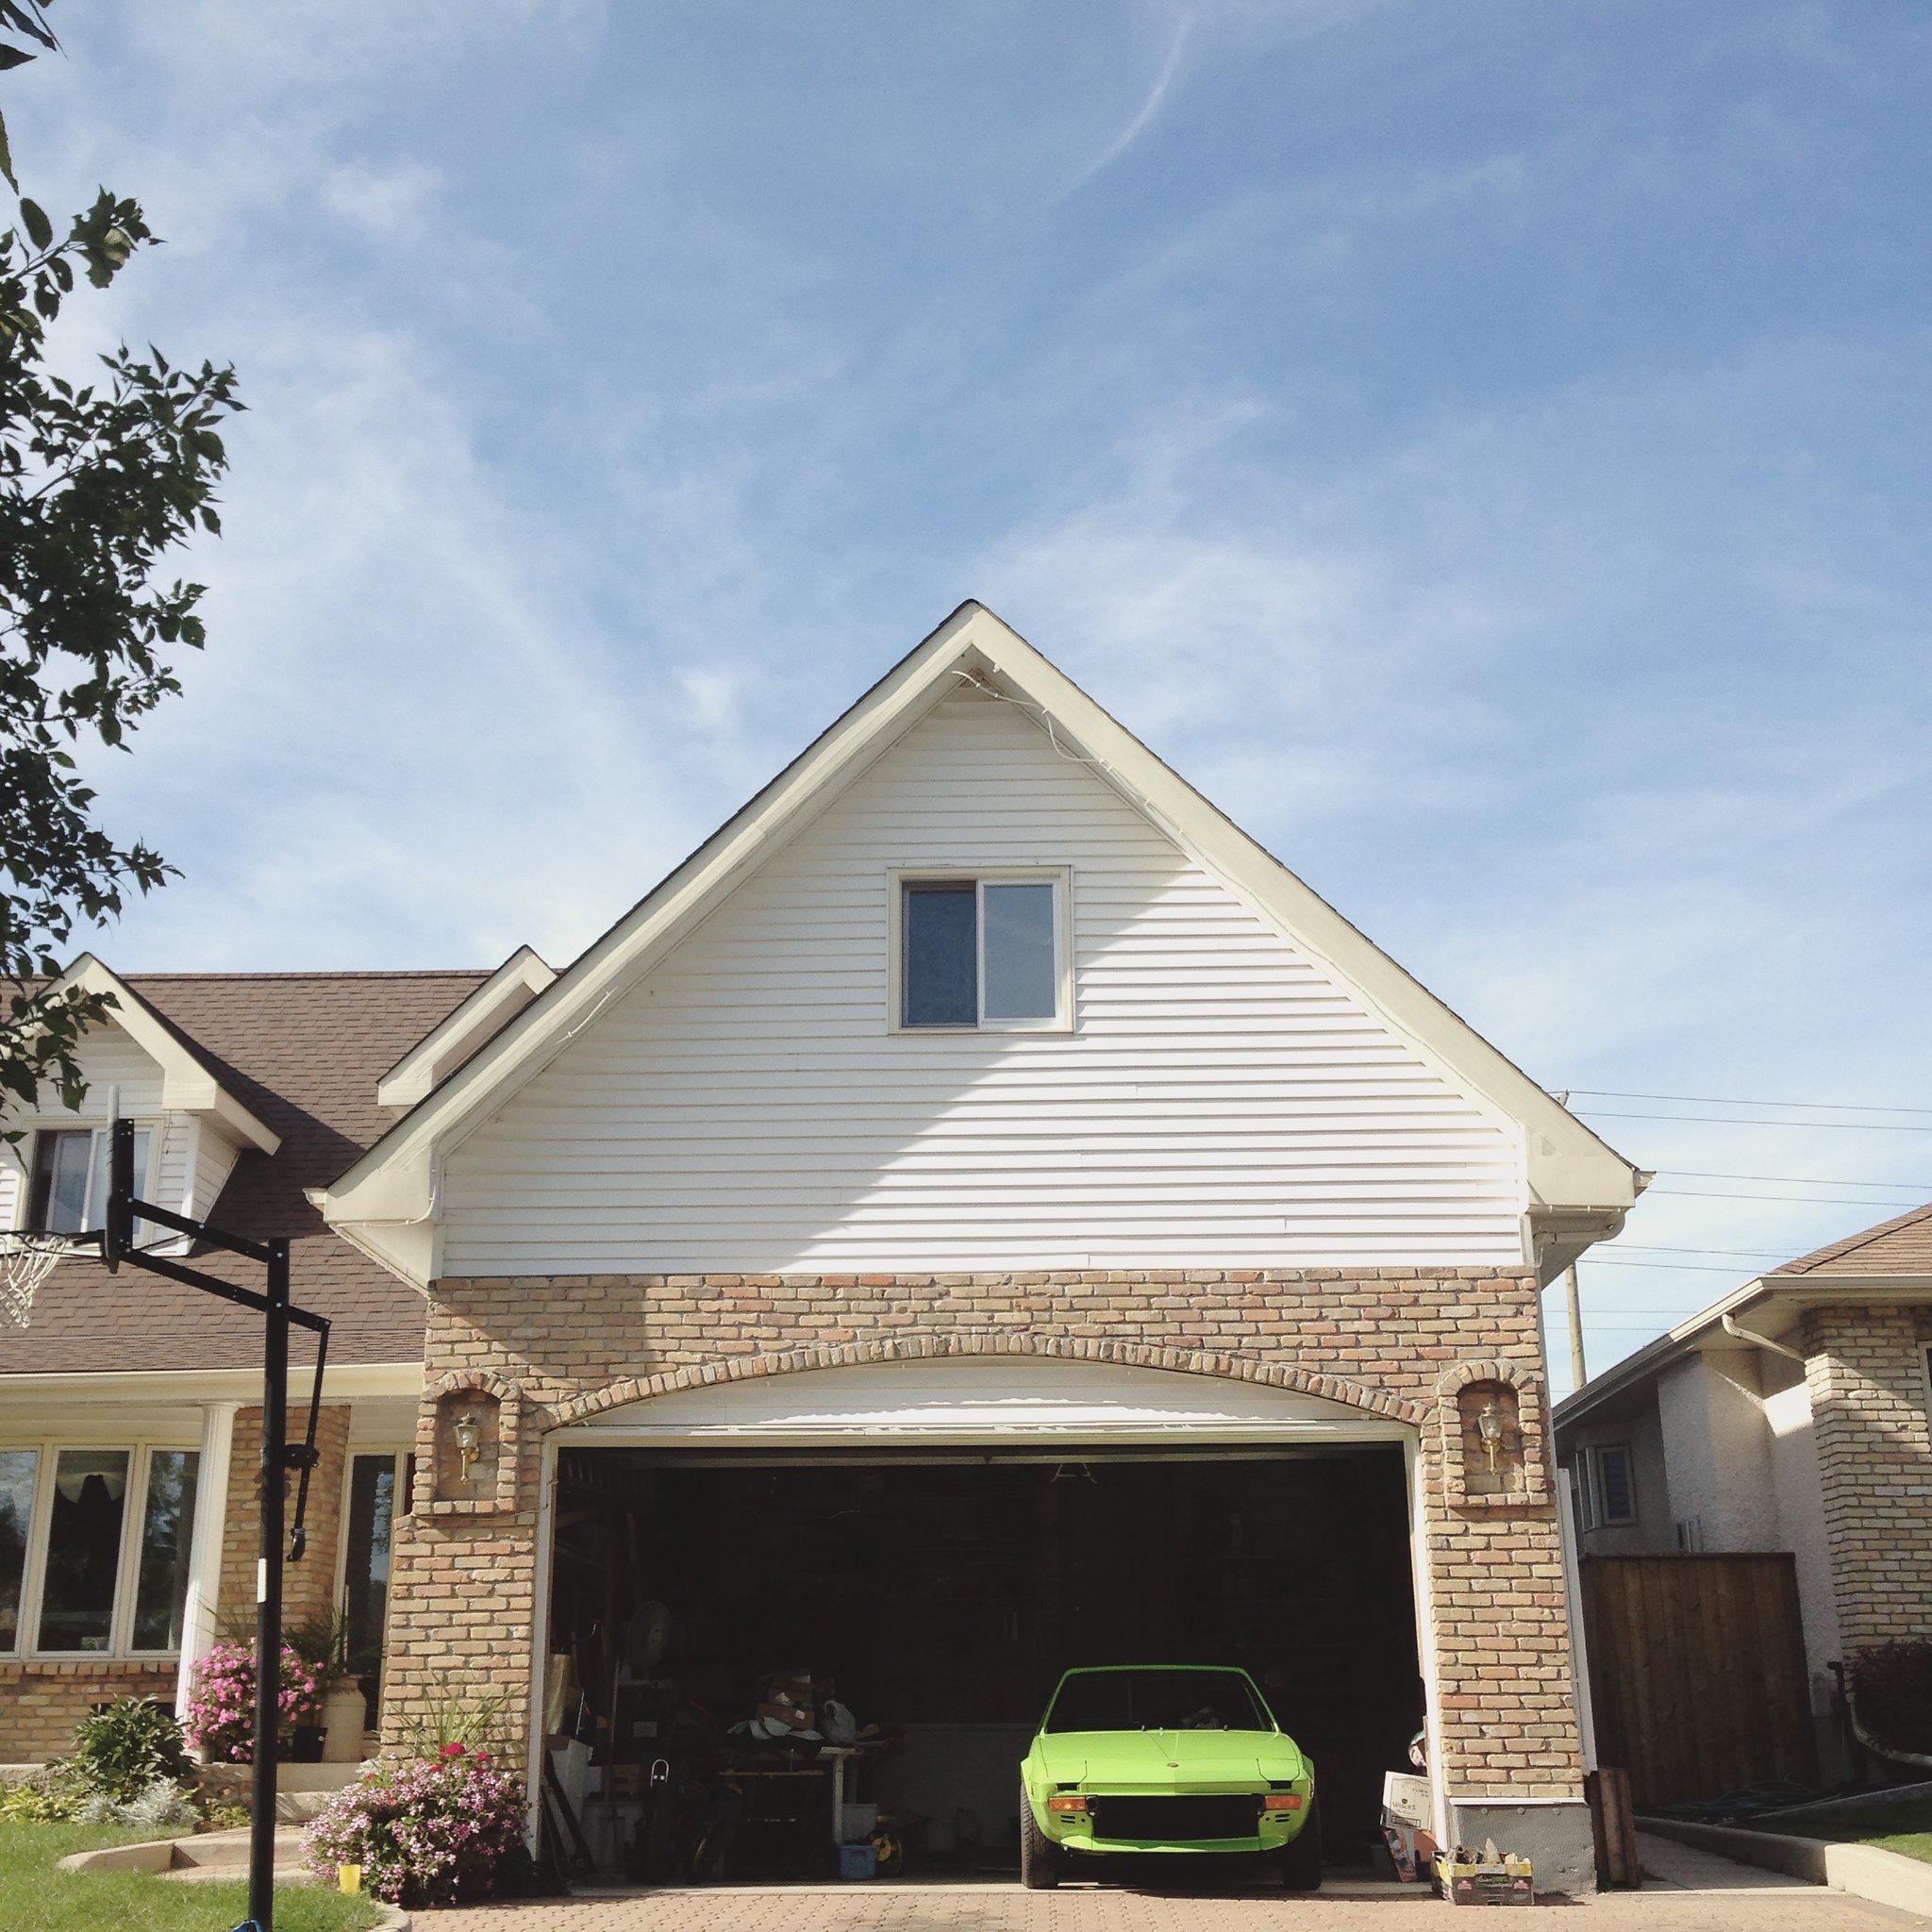
Thanks everybody, I really appreciate the help! I will make sure that I capture the startup with video, but in the mean time, here are some pictures to enjoy.

SOHC by Josh Epp, on Flickr[url=https://flic.kr/p/yK49ML]SOHC by Josh Epp, on FlickrSohc by Josh Epp, on FlickrSOHC by Josh Epp, on Flickr
21505704152_d06b4d7923_k.jpg
[/url]SOHC by Josh Epp, on Flickr

Fingers crossed it will make noise tonight.

-j
 
Didn't enjoy the pics at all

Ya little snot! How dare you get your engine finished before me?!?!? hahahahahahahahahahahahahahaha:laugh::laugh::laugh::laugh::laugh::dance::dance::dance::dance::dance:

Great work Josh. You should be very proud of your efforts.

The only way you're going to know about your fuel pressure is to get hold of a gauge. From memory I think Webers prefer 2.5-3.5psi. More than that will cause the fuel bowls to overflow. It's all related to the strength of the spring in the needle valves.

5 degrees BTDC is a good place to start. I've run dual carbs for years and never had vacuum lines, but then I've not had a vacuum equiped dizzy either. You've reminded I should look into that for my new build.

Excellent work young man! Hope it goes well tonight and can't wait to see and hear a video.

Cheers,

Rob
 
awesome!!!!

if you paid as much attention to the engine as the rebuild of the body...it should purr, or rather ROAR.
when she starts, keep an eye on the oil pressure, and don't blip the throttle more than to get her to operating temps....I know.. so tempting, but this where the fruits of your labor come to play.
rings need to seat, oil cycling .
as for the carbs and synchronizing then find a UNI-SYN vacuum device that sets over one barrel of the carbs and tells you how much air each barrel is drawing and adjust accordingly.
can't wait for the video !!!!
mikemo
 
That all looks great Josh... slapping the new baby on the bum for the first time certainly is a milestone, but judging by the standard of the rest of your work, I think you should be good.

Oil pressure primed?
Coolant filled (I see you have an OEM rad cap on there too, nice!)
Fuel pressure primed? Have you checked the float levels?
Got the earth straps on the engine /trans connected?

It's always nice to see oil pressure indicated on the gauge before the engine bursts into life...maybe whip the plugs out and spin it over on the starter (coil power disconnected) and confirm that the light goes out and the gauge indicates something.

Check the plug gaps and reinstall. 1342 make sure the firing order is correct.

Radiator cap off and extra coolant or distilled water handy to top up, allen key sitting in the bleed screw at the top of the radiator ready to go for the cooling system bleed. Confirm that your fans function as you want them to cycle on /off three times to confirm everything has made full temp (for your retorque procedure)

Key on and confirm your carbs are full of fuel. I like to run a return line on my setups, but for startup not 100% needed, you can get to that later. You can install another T in the line between the carbs and solder up one end, then drill out the return side with a 1/32 hole. Actuate the throttle a couple of times to confirm you have fuel as it should squirt from the pump jets, no fuel should overflow and the pump should slow right down once the bowls fill and the needle valves seat.

Carb balance and adjustment just needs to be close for this initial 10/15 minutes of running, your going to fine tune that second or third start. For now just wind the idle mixtures in until they lightly seat and then back them all out 1.5 turns. Carb synchronization is tricky if you've never done it before, but again for now it just needs to be close, so just visually inspect that the throttle blades all are at the same angles and all achieve full throttle, nothing binds and the throttle returns easily on it's springs.

5 degrees of static is good for initial start. If the crank / flywheel is on 5BTDC and the rotor is pointing to number 4 when the valves on 1 are both open (overlap period) then you have it ignition timed correctly. Distributor with no vac advance connected is good for now, but you might need to rethink that when it comes to driving.

The non vac distributors get set at 10 static, and have mechanical advance of an additional 28 so give total advance of 38. Not sure what the vac distributors give as mechanical adv. only but I can look it up for you, basically you want to see around 38 total. For now though it will be fine. Do you have a dial back timing light available?

So once you've confirmed oil pressure, confirmed the fuel bowls are full, confirmed the coolant is topped up about and inch from the top of the header tank, checked that you have nothing leaking or dripping, checked you have nothing that can foul the timing belt, it's time to try for a start.

I don't like to let a fresh engine idle, so adjust the idle speed screw to keep it above say 1500 revs, and vary the speed while it's running. Don't race it or get on the throttle hard (plenty of time for that later) but a smooth rise and fall of the revs from 1500 to 3500 or so. Look for leaks and drips... and if you see any fix them (often a hose clamp will just need a tweek)

Keep an eye on the temp and pressure gauges. while it's running.

Keep an eye on the coolant level in the header tank and top it off, once the temp starts to come up put the cap back on, and then walk to the front of the car and just crack the bleeder, close it once fluid runs out. You'll probably need to do this several times until you get no more initial hiss of air. Once the fans cycle on/off for the third time, shut her down.

Then crack open a beer and bask in the moment. :dance:

Let it cool down over night and in the morning do the retorque procedure.

Good luck. :)

SteveC

Edit: BTW I just noticed, the way you have the "choke" levers sitting right now the enrichment devices are ON. Get a piece of stiff wire and connect the two cable clamps together so the enrichment levers stay off, you shouldn't ever need a choke, just press and release the accelerator pedal once before turning the key.
 
Last edited:
Check List - Thanks Steve.

That all looks great Josh... slapping the new baby on the bum for the first time certainly is a milestone, but judging by the standard of the rest of your work, I think you should be good.

Oil pressure primed?
Coolant filled (I see you have an OEM rad cap on there too, nice!)
Fuel pressure primed? Have you checked the float levels?
Got the earth straps on the engine /trans connected?

It's always nice to see oil pressure indicated on the gauge before the engine bursts into life...maybe whip the plugs out and spin it over on the starter (coil power disconnected) and confirm that the light goes out and the gauge indicates something.

Check the plug gaps and reinstall. 1342 make sure the firing order is correct.

Radiator cap off and extra coolant or distilled water handy to top up, allen key sitting in the bleed screw at the top of the radiator ready to go for the cooling system bleed. Confirm that your fans function as you want them to cycle on /off three times to confirm everything has made full temp (for your retorque procedure)

Key on and confirm your carbs are full of fuel. I like to run a return line on my setups, but for startup not 100% needed, you can get to that later. You can install another T in the line between the carbs and solder up one end, then drill out the return side with a 1/32 hole. Actuate the throttle a couple of times to confirm you have fuel as it should squirt from the pump jets, no fuel should overflow and the pump should slow right down once the bowls fill and the needle valves seat.

Carb balance and adjustment just needs to be close for this initial 10/15 minutes of running, your going to fine tune that second or third start. For now just wind the idle mixtures in until they lightly seat and then back them all out 1.5 turns. Carb synchronization is tricky if you've never done it before, but again for now it just needs to be close, so just visually inspect that the throttle blades all are at the same angles and all achieve full throttle, nothing binds and the throttle returns easily on it's springs.

5 degrees of static is good for initial start. If the crank / flywheel is on 5BTDC and the rotor is pointing to number 4 when the valves on 1 are both open (overlap period) then you have it ignition timed correctly. Distributor with no vac advance connected is good for now, but you might need to rethink that when it comes to driving.

The non vac distributors get set at 10 static, and have mechanical advance of an additional 28 so give total advance of 38. Not sure what the vac distributors give as mechanical adv. only but I can look it up for you, basically you want to see around 38 total. For now though it will be fine. Do you have a dial back timing light available?

So once you've confirmed oil pressure, confirmed the fuel bowls are full, confirmed the coolant is topped up about and inch from the top of the header tank, checked that you have nothing leaking or dripping, checked you have nothing that can foul the timing belt, it's time to try for a start.

I don't like to let a fresh engine idle, so adjust the idle speed screw to keep it above say 1500 revs, and vary the speed while it's running. Don't race it or get on the throttle hard (plenty of time for that later) but a smooth rise and fall of the revs from 1500 to 3500 or so. Look for leaks and drips... and if you see any fix them (often a hose clamp will just need a tweek)

Keep an eye on the temp and pressure gauges. while it's running.

Keep an eye on the coolant level in the header tank and top it off, once the temp starts to come up put the cap back on, and then walk to the front of the car and just crack the bleeder, close it once fluid runs out. You'll probably need to do this several times until you get no more initial hiss of air. Once the fans cycle on/off for the third time, shut her down.

Then crack open a beer and bask in the moment. :dance:

Let it cool down over night and in the morning do the retorque procedure.

Good luck. :)

SteveC

Edit: BTW I just noticed, the way you have the "choke" levers sitting right now the enrichment devices are ON. Get a piece of stiff wire and connect the two cable clamps together so the enrichment levers stay off, you shouldn't ever need a choke, just press and release the accelerator pedal once before turning the key.

Steve, I really really appreciate your detailed help here! Really calms the nerves, so thank you!

Oil Pressure primed - I primed the oil in the engine with a drill on an old distributor I modified, and had oil come all the up through to the top of the engine. I will crank it over a few times and see if the idiot light goes out. But I DONT have an oil pressure gauge to know if it is climbing or not. Will I be okay without one?

Coolant - I filled with coolant and bled it with the rear slightly raised, and the heater valve open until coolant came out of the bleed screw, then screwed it in. Checked for leaks, fixed some leaks as like you said just from a tiny drip from hose clamps needing to be tighter. Coolant level now is about 3/4 full in the tank.

So I leave the tank rad cap off during start up?

Plug Gaps - Good thing you said something, I completely forgot to check them before I torqued my plugs in. OH Well, better now then after the explosion :dance:

Earth Strap - Are there two? I only have one on the transmission side. Its big and brand new.

Fuel Pressure/Float levels - I have a gauge to test fuel pressure but it doesn't display small enough figures to be able to dial in anything under 5p.s.i. .... I know there are lots of opinions on fuel pressure, but what is ideal for dual 40's?

Fans - How can I confirm if my fans are working unless the car reaches operating temp? I have a brand new thermostat. I have rigged up a temporary external temp gauge in the engine bay to be able to see it at all times rather then depending on the instrument cluster.

Carbs - full of fuel check. I bought this set up from Rooster who had them set up by Matt. I have visually inspected them for what you suggest to look for and it looks good. Although I really don't know what I'm doing. haha :hmm: I trust that they are set up properly.

Timing Light - Yes, I do have one. I spent all last night watching youtube videos on how to use it! Should be a good "hands on" learning experience.

Length of run time - How long should 3 fan cycles last do you suspect?

Choke - I rigged a wire up to pull both choke levers together and to the right. Is that correct?

Alright, I think I'm done with the questions. Time to get back to work!

Thanks for all the tips Steve, Mike, and Rob!
 
Steve, I really really appreciate your detailed help here! Really calms the nerves, so thank you!

No problem.

Oil Pressure primed - I primed the oil in the engine with a drill on an old distributor I modified, and had oil come all the up through to the top of the engine. I will crank it over a few times and see if the idiot light goes out. But I DONT have an oil pressure gauge to know if it is climbing or not. Will I be okay without one?

Even better that you have pre-primed the system, crank it anyway just to confirm your sender wiring all works as it should. No gauge in the USA, will be OK but an OP gauge is nice thing to have... I know the senders are expensive but might be a worthwhile upgrade to get rid of the voltmeter and fit a OP gauge. If your not fussed with originality then go for quality supplementary mechanical OP and temp gauges for peace of mind when driving hard.

Coolant - I filled with coolant and bled it with the rear slightly raised, and the heater valve open until coolant came out of the bleed screw, then screwed it in. Checked for leaks, fixed some leaks as like you said just from a tiny drip from hose clamps needing to be tighter. Coolant level now is about 3/4 full in the tank.

So I leave the tank rad cap off during start up?

I always do, just for the first five minutes and you will see the level rise as the fluid expands, or you'll see it drop quickly as any air burps out. You'll still need to bleed it when hot, you almost certainly will get a tiny bit more air out

Plug Gaps - Good thing you said something, I completely forgot to check them before I torqued my plugs in. OH Well, better now then after the explosion :dance:

not hard to forget... run as wide a gap as the manufacturer recommends

Earth Strap - Are there two? I only have one on the transmission side. Its big and brand new.

one on the trans and one on the battery up front.... :wink2:

Fuel Pressure/Float levels - I have a gauge to test fuel pressure but it doesn't display small enough figures to be able to dial in anything under 5p.s.i. .... I know there are lots of opinions on fuel pressure, but what is ideal for dual 40's?

Floats can dance around a bit during transportation, always pays to check them before you start tuning, should be fine for initial start up, but do check them before you begin adjusting anything else. Fuel pressure, under 5psi will be OK for now. Rig up a return line and then it over pressure becomes less of an issue, as long as the needle and seat isn't overpowered you'll be OK for now.

Fans - How can I confirm if my fans are working unless the car reaches operating temp? I have a brand new thermostat. I have rigged up a temporary external temp gauge in the engine bay to be able to see it at all times rather then depending on the instrument cluster.

Just bridge the terminals at the sender on the radiator just to confirm they work...then reconnect them before you start.

Carbs - full of fuel check. I bought this set up from Rooster who had them set up by Matt. I have visually inspected them for what you suggest to look for and it looks good. Although I really don't know what I'm doing. haha :hmm: I trust that they are set up properly.

they will need balancing for sure... I'll run you thru how I do it when the time come if you want.

Timing Light - Yes, I do have one. I spent all last night watching youtube videos on how to use it! Should be a good "hands on" learning experience.

They are easy to use, one with a inbuilt tach and the ability to dial the beam back to find full advance is really handy.

Length of run time - How long should 3 fan cycles last do you suspect?

Ten maybe fifteen minutes for the fan to come on the first time... the cooling system of the X19 is quite large and efficient, so it can take a while. Once the fan cycles the first time it should be on/off every couple of minutes if your varying the revs 1500/3500

Choke - I rigged a wire up to pull both choke levers together and to the right. Is that correct?

Yes levers to the right is off, in your first pic they were to the left which is on.

Good luck with the first run...I think you'll be OK...it is pretty exciting the first time, and very satisfying when it all goes well. I still get a kick out of first fires and I've done well over a hundred.

SteveC
 
Jepp... I can only add a few comments and/or alternatives...

Initial Timing:

What the others describe is correct but I feel a simpler and easier method is timing on number 1... like the rest of the world. I put the car in second with brake off, pull plug #1 and place a finger over the hole, scooch the car forward and/or backward until the timing mark is at ZERO (0) and air PUFFS out of the hole. No real need to worry about the 5 degrees yet...

Timing after starting:

You will probably be twisting the dizzy one way or the other to initially start the engine. Snug down the dizzy clamp but leave it just loose enough to twist about 45 degree. Back fires out the carb, too advanced, back fire out the exhaust, too late.

Once running and warm:

Set timing to 5 degrees and accelerate and listen to the engines response. Then try 10 and listen again. After each time test to see which setting allows you to RE-START the car easy. My pure stock 1500 starts and runs great with good power and mileage at 7 degrees and both centrifugal and vacuum advance. I'm just saying that work great for me on 91 octane and you will need to test and tune until its OK for you.

Vacuum Advance:

Dual 40's are BIG HOLES as compared to a stock 28/30... Just plain numbers here without determining the AREA of the venturi's, I have 58mm of total air passage and you have 160mm. When you open these carbs there is little vacuum present to operate a vacuum motor. Most engines like this are used for RACING and are FUN on the street, but don't expect them to be able to operate smoothly cruising around the block. Your car is gonna make a LOT of noise and there is really nothing like the sound of these engines WIDE OPEN and with the exhaust you have as well.

Soooo... I say all that so say this. Carbed 1500' and their stock cams were set at 5 degrees. FI 1500s were set at 10. With your Mystery Cam... start out and 10 and go from there. You will need to tune the carbs and dizzy with this cam and unless it is a KNOWN make and model... no one can really say where it should be set. Octane ratings, temperature and driving style so that is starts and runs without pinging will keep you busy for the year or two... (Hopefully not...)

Earth Strap or Ground Strap...

From your description of one on the battery to the chassis and one on the chassis to the trans... that is the way they came from the factory using the entire chassis as a Ground so in many cases, only one wire with +12 volts is needed to operate a circuit and the ground path back to the battery is the chassis.

I suggest that you ALSO add another such strap between the chassis and the Dogbone or Cam cover so there is a SECOND path back to the battery. The one below at the trans gets dragged through muck and mire and can be a problem that is hard to trouble shoot (too me three weeks...) It can be a braid or a covered 00, 02, 04 ? gauge like the one on the battery with two flat terminal ends to easily bolt it up top.

I'm running out of pixels... Good Luck!
 
SMOKE SHOW!

:dance::dance::dance::dance:

WELL, thanks to all of the fine folks here on this forum, I can happily say that my sleepless nights of dreaming of turning the key to hear this thing start, are finally over!

After going through each and every suggestion given by those who responded, and diligently reading over start up procedures, we gave her a go. ALL THE BUILD UP AND ANTICIPATION, ALL CAME DOWN TO THIS MOMENT.

Started pretty well instantly. One crank and she fired up!

The headers and exhaust had a coating of paint that burnt off and flooded not only the garage, but probably the whole neighbourhood with smoke, but what the heck, I was a happy boy.

I'm working on uploading the video as I type, so don't go very far, its coming. However, I can't promise it'll be ready for tonight. The sound quality isn't that great, but you get the idea.

Engine started, but there is much work to do to get it "running" properly. Carbs are finicky as I imagined, but in my opinion its a door thats finally been open to a world of learning and not to mention the JOYESS SOUND IT MAKES!

Okay. I'm exhausted. I've been having trouble sleeping preparing for today and it all went so well. So i'll get that video up and posted as soon as I can.

Once again, thank you to you guys who chimed in this afternoon to get this thing ROARING to life.

Peace.

-j
 
Josh, you remind me of myself!

I've been working on these beauties since I can remember. My dad bought a '76 when I was a toddler, and as I grew up he had me wrenching around in it. Now I bought an '86 and work on it myself, still learning many things about it. Keep up the stellar work!

Sorry I'm not offering much in terms of technical help. The older breed seem to have that covered. Ya hear that Papa?

Oh, be weary of Papa Tony (Black-Tooth). He's on a one man campaign to get us youngsters banned from this forum.
 
Hi Josh and others,
Congrats to your build. I am in process on putting dual 40 dcnf on my x. What was your final solution on the vacuum advance line? I am asking myself the same question.
Also I am not sure what to do with the crank housing breather line.
My current set up is a single carb (40 dcnf) and the breather line is connected to the air filter via a custom build connetion. I wonder what other/your solutions was. On the pictures above it doesn't look like the hose is connected to anything.
Cheers,
Torben
 
Back
Top