Injector wiring harness...

Jonohhh

True Classic
Well, I may have just come across an issue that may be the root of some of the unexplainable high rpm running issues.

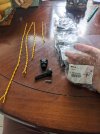
The fuel injector harness- both the outer layer of insulation and the sheath on the copper wire itself, are rock solid and brittle. There are many locations where both the feed and ground wire for a particular injector have the insulation broken at the exact same place along the wire.
PXL_20210623_173354547.PORTRAIT.jpg


At the split for cylinder 2, the injector connector fell off in my hand- and looking at the two wires next to each other in the area, it's hard to imagine that that is not a dead short, or at least one with a moderately low resistance (there were about 1 or 2 strands of copper wire contacting each other).
PXL_20210623_173419048.PORTRAIT.jpg

PXL_20210623_173456734.PORTRAIT.jpg


Now. I know this is a bad thing to say considering I own two Italian vehicles.

But I don't electrical.

So that leaves me with a few options. I could wrap it up with electrical tape, and use crimps to repair the fallen off Injector connector...but that's not how I like to roll.

So I have a few questions. How do y'all feel about using something like this- a premade four cylinder Injection harness from Holley, made to work with our Bosch EV1 Injectors. Of course, the connector is standardized and so common that I could make a harness like this myself, but I'd rather leave it to someone who knows what they're doing. I would need to slightly modify the harness to work for our application with the valve cover grounds- but I would likely leave the connector in place and install a connector on the ecu side of the harness as well, so I can disconnect the injector harness as wanted.
Screenshot_20210623-131122.png


It seems unnecessary to buy a whole ecu harness from MWB, so im heavily considering this. It's quite expensive for what it is- I may try to find a cheaper option- but regardless the insulation looks pretty unsubstantial given it's going to he above the exhaust manifold, so I will add layers of heat insulation as needed.

And in the case of purchasing a harness- I know we have some great electrical people around here- if anyone wants to make one, I'd much rather pay someone in the community the $80 than a big company- just if anyone wants to.

So, thoughts?
 
Wow, those wires are crispy. I saw your earlier post with the loose injector connector but thought it had been cut off and left laying around. For the wires to completely break off like that, then ya - the others are also toast. Definitely time to replace all of it. o_O

I am in the same boat as you, I do not like electrical work. But I've managed to do several jobs and realize it really isn't as difficult as it seems. I honestly think you could make a new harness yourself with a little coaching. The parts to make it are readily available and pretty inexpensive. The only thing you will need to invest in is a crimping tool for the type of connector pins these use. Frankly you don't need one of the expensive fancy crimpers; I have one that was under $15 if I recall, and it works great. In fact I often go back to it because the pricey specialty ones I've invested in can have drawbacks in certain situations.

Look at it this way. With the Holley harness you need to either modify the large connector on the other end or make an adaptor for it. If you can do that then you can make the whole thing. :)

Consider it before buying something that isn't exactly what you need. ;) Just think how proud you will feel after learning a new skill. :D
Man well, I guess it just takes a little encouragement. I'll be gathering up some supplies in the next while...I hope the end result is good enough for me to want to share.

I'm admittedly surprised that seemingly, both the power and ground wires to the injectors are brown, but that's okay- just one more step with the multimeter. I think I'm going to cut the old harness an inch or so after the O2 wire splits off, and remake the harness from there downstream.

I've done electrical work in the past on my 1965 Impala SS, but not in a very professional manner. I'm hoping to minimize the number of auto parts store crimps I use (hopefully zero). Once I get to making it I guess I'll update this thread with all the info- though it may be a while as the Abarths engine just arrived, so I'll be trying to get that done.


Thanks for the encouragement Dr. Jeff, we'll see where it takes me 😳
 
I'll make a few recommendation for you. First get this style of injector connectors:
s-l300 (1).jpg

The wire across the top is a release to remove the connector from the injector....MUCH easier to work with than the original style. Also with the housing and separate "pins" (terminals) you can crimp them onto new wires that do not need any splices in them - making each wire one-piece from end to end. And finally the boot is a nice addition. They come as 'kits' like this and you can find them really inexpensive on AliExpress (they have sets of four also, I buy extras for other projects):

The reason both wires are the same color is because they are one circuit in a loop - there is no difference which one goes to either side. They are a ground triggered circuit. So get a roll of wire of the same gauge as the originals and cut it into the lengths needed, then crimp on the ends.

Don't use the plastic wire loom cover. It is too stiff plus it won;t hold up to the heat. At the very least get some PET cover. Or for more money you can get some that is insulated to protect the wires from the heat. But honestly it doesn't need it, it took 40 years for the old wires to cook that much. The basic PET is also available really inexpensive from AliExpress:

Use heat shrink tubing to secure the ends of the PET. You guessed it, AliExpress:
This is 4:1, you can get regular 2:1 or 3:1 for even less.

The crimp tool cames in a lot of versions at all price points. I like a simple "plier" type that is used for lots of these little crimp fittings (which are different from the typical "parts store crimp connectors"):
But the "ratcheting" type will allow you to change the end pieces for other types of crimping:

So the whole thing can be made for around $25., and you still have the tool for future projects.
 
Great, thank you so much for the help!

Yesterday I picked up some heatshrink and wire for it. In the coming weeks I'll be getting some injector connectors. I'll definitely go for the quick release type- and honestly I'll probably order them off of FCP euro since they're not too expensive, and I have a thing for OEM equipment- especially from Bosch. It'll probably be a large fraction of the overall cost regardless but whatever. I look forward to driving it again- hopefully running better than it ever has.
 
Finally got all of the connectors in! I decided to go with twisted wires for each cylinder, just so it's easier to keep the harness clean and together. Certain parts of the harness, such as the ground wires and throttle position switch were perfectly fine and soft- so I have decided to keep those as is. In terms of splicing the new wires to the old harness....I'm doing some research on the best way to do that cleanly.

But overall it's coming along!
 

Attachments

  • PXL_20210717_181642357.jpg
    PXL_20210717_181642357.jpg
    205.9 KB · Views: 113
In terms of splicing the new wires to the old harness....I'm doing some research on the best way to do that cleanly.
That's always a delima, to get a effective and reliable splice without being too bulky or interfering with the rest of the harness. Some say it's best to solder, others say to crimp. Personally my soldering skills have always lacked. I do not like the common insulated crimp connectors (first two pics below), but there are a few non-insulated options (other pics):

I do not like these...
50pcs-Insulated-Straight-Butt-Connectors-Electrical-Crimp-Terminals-Assorted-Kits-Wire-Cable-T...jpg

These "heat shrink solder filled" ones work better but are quite bulky, especially with very small wires...
images.jpg


These work fine but are still a little long in some applications such as small wires....
H994016c6884a413.jpg


These are similar to the last but much smaller...
22-18AWG_HighTemp_Butt_Connector.png
Wirefy-BN-100_07.progressive.jpg

There is another one like that last one but even shorter, so the wires are over lapped instead of end-to-end when crimped in the tube (couldn't find a pic). They are good for very small wires in very tight places.

Reported to be the best is this type; also a small/short crimp-on non-insulated splice, but it can accommodate multiple wires. Particularly when you have two wires on one side but only one on the other....
Brass-Wiring-Splice-Crimp-Terminal (2).jpg
Brass-Wiring-Splice-Crimp-Terminal (1).jpg


Naturally all of them except the first two will need heat shrink to protect them.
 
Last edited:
All done! I ended up going the route of a crimp with heat shrink around the connector, for each wire (as shown above by the photo with the orange wires). Overall, it turned out pretty clean underneath. Protective sheath I used turned out pretty poor, so I'll likely be going back and revising that next time the manifold is off.

Crimping the EV1 connector ends went without a hitch...man I love those connectors. I try to use them wherever I can when I design systems for FSAE. Unfortunately they're pretty heavy so they're hard to justify on a 400lb formula car.


The car definitely runs better, I think. If I had to guess, the cylinder 2 wires were occasionally shorting out and preventing either that injector (or all, not sure how the internal circuitry is linked) from firing as it should. It seems to pull better up top now, which is good since that has been an issue since I got the car.

Something still isn't 100%- I felt a brief but sudden hiccup as I accelerated through 6000 rpm on two occasions, but overall I would say there has been an improvement that I am convinced is not placebo.


Thank you Dr.Jeff for all the help! I wasn't really confident about diving into the harness like this but some hardware and tools later...I think the end result turned out half decent. Unfortunately I don't have any good photos of the complete harness as I did the sheath after it was on the car partially, but here's what I do have.

PXL_20210719_052402370.jpg
PXL_20210719_031927837.jpg
 
Nice work! I think it was wise to go with the barrel crimp/ heat shrink for the connection to the main harness in the bay. The low-temp solder type barrels work fine in the cabin where the connections are static & not subject to extremes of temp. I do not trust them in the engine bay. Solder type connections are generally to be avoided in that environment.
 
Well done! Glad it worked out for you. ;)

In the past I've been using those same barrels you used for splices. However I just ordered and will try some of the ones in the last picture (in post #7). I've been reading that they seem to work really well in tight places, especially with tiny gauge wires. I will be making a couple of harnesses for things like interior LEDs that have very little current draw (i.e. very small wires) and will need to do things like splice three wires together, etc. Those crimps are supposedly great for that.

Your engine "hiccups" may not be from the wiring. It could be dirty injectors, an ignition issue, or other reasons. Really need to do some diagnostic investigating to find the cause first. :)
 
Back
Top