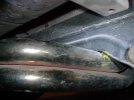
Installing Vick's Header with FI Muffler

Russe11

True Classic
After some discussion (https://xwebforums.com/forum/index.php?threads/exhaust-options.43171/) I purchased a Header from Vick Autosports (https://www.vickauto.com/parts/performance-exhaust-header-4-1-fiat-x19-sku-27-6919/) to install in my 1981, Fuel Injected X1/9. Probably the most significant factor in the decision was the Stainless Steel construction. Another factor was the claim in the description that it would work with stock mufflers for Fuel Injected cars as well as for Carbureted cars. I wanted to use the FI version, because that would allow me to use the brace from the transmission to the flange of the header to muffler joint. There have some hurdles along the way, and I thought it would be useful to document how I'm approaching it.

The first thing I noticed was that the flanges of the header and the muffler would not interface properly.

IMG_0764[1].JPG


The FI exhaust system has an adapter flange in that spot, between the muffler and the catalytic converter, but the configuration on the cat-side is a 4-bolt flange. My solution was to make a flange to adapt the different bolt-circle diameters and joint type. Raw material came in the form of a 2 1/2lb cast iron dumbell weight.

IMG_0779[1].JPG


At this point, I could physically join the parts. I removed the old exhaust system and temporarily installed the header. That's when the length discrepancy became apparent to me. I was referred to a post from Andrew at Vicks, in which he explained that adjusting the length of the header by cutting the collector would allow the parts to fit. So, I hung the muffler with the tailpipe in its proper positionand the adapter in place on the muffler to find where the collector needed to be cut. This is how it lined up:

IMG_0804[1].JPG


So, it was clear to me that I'd need to cut the muffler, instead.

to be continued...
 
After some discussion (https://xwebforums.com/forum/index.php?threads/exhaust-options.43171/) I purchased a Header from Vick Autosports (https://www.vickauto.com/parts/performance-exhaust-header-4-1-fiat-x19-sku-27-6919/) to install in my 1981, Fuel Injected X1/9. Probably the most significant factor in the decision was the Stainless Steel construction. Another factor was the claim in the description that it would work with stock mufflers for Fuel Injected cars as well as for Carbureted cars. I wanted to use the FI version, because that would allow me to use the brace from the transmission to the flange of the header to muffler joint. There have some hurdles along the way, and I thought it would be useful to document how I'm approaching it.

The first thing I noticed was that the flanges of the header and the muffler would not interface properly.

View attachment 69094

The FI exhaust system has an adapter flange in that spot, between the muffler and the catalytic converter, but the configuration on the cat-side is a 4-bolt flange. My solution was to make a flange to adapt the different bolt-circle diameters and joint type. Raw material came in the form of a 2 1/2lb cast iron dumbell weight.

View attachment 69095

At this point, I could physically join the parts. I removed the old exhaust system and temporarily installed the header. That's when the length discrepancy became apparent to me. I was referred to a post from Andrew at Vicks, in which he explained that adjusting the length of the header by cutting the collector would allow the parts to fit. So, I hung the muffler with the tailpipe in its proper positionand the adapter in place on the muffler to find where the collector needed to be cut. This is how it lined up:

View attachment 69096

So, it was clear to me that I'd need to cut the muffler, instead.

to be continued...
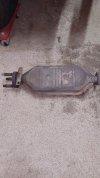
The carb muffler has a longer tube leading to the end of the catalytic converter as compared to the FI muffler.

Nice work on the adapter.

Looks like a trip to the welder to place an appropriate flange at the right distance to use the header flange.
 
Transfering the slip-joint connector to the end of the header showed where the muffler would need to be cut, so I marked it and cut the tube.
The stub of pipe was bored out of the conical piece in preparation for welding it in its new location. It would have been a little simpler to replace the FI Flange joint with a flat flange like the Carb mufflers have, instead of reusing these parts, but this approach allows me to retain the flex-joint which I'm hoping will prevent a premature failure in the system.
The conical tip was slipped over the end of the muffler's inlet, bolted up to the header, and the location was marked for welding (the slip joint will simply get clamped):

IMG_0812[1].JPG


That's where it stands, at the moment. A friend who is a retired welder offered to help with the flange.
I have some design decisions to make about how to deal with the brace to the transmission while avoiding the new location of the O2 sensor. I'll post again when those items are complete.
 
Last edited:
The carb muffler has a longer tube leading to the end of the catalytic converter as compared to the FI muffler.
Actually, it's the other way around. There was a very helpful photo from RX1900 posted an earlier thread. I'll copy it here (Carb on top, FI Below):
F1383897-4BF0-43A1-BB2B-D6391148E11C.jpeg


I believe that if I had chosen the Carb version of the muffler, the header would have been a direct fit. I think the flanges would have mated properly, and there might not have been any trimming required. But if there was, it would have been simply cuttting the collector. The slip joint with the flange would have required no welding.
 
Last edited:
It is a direct fit.

Thanks for posting that. The picture reminds me of something I intended to mention: The slip-joint piece supplied with the header has the flange welded on at a bit of an angle. Since it fits free on the collector, and the flange on the FI Muffler is free to rotate, it can be adjusted to find the sweet spot where axis alignment is good.

Having never worked on a Carbureted car, the picture also raises a question for me: There is a bracket on the muffler (also seen in the comparison picture above). What does the other end of that bracket connect to?

Thanks
 
Last edited:
Having never worked on a Carbureted car, the picture also raises a question for me: There is a bracket on the muffler (also seen in the comparison picture above). What does the other end of that bracket connect to?

That bracket is the "hanger for the passenger side end of the cat. Here are some pics I just took of my 78 project car. Fortunately(?) I never got rid of the cat, it was still under the workbench. The 78 has a nickel plated steel IAP style header without the slip joint fitting that came from Vicks about 12 years ago. You can see the bracket on the muller in the second picture, it connects to nothing without a cat in the system.
20221225_073523.jpg20221225_073558.jpg20221225_073607.jpg
Just an FYI, the 85X had this exact setup in it (IAP style header with carb muffler) setup in it and never had a stability issue without the support bracket found on the later cars (and maybe the 74 too?). All the springs mounts and springs were present and in good working order. I bought the 85 in 2013 and autocrossed it for 2 or 3 seasons. That driveline is sitting in the garage now with the exhaust still attached. :) So maybe the late model support bracket isn't necessary without a cat, the cat for my 78 is incredibly heavy for its size.

The 85's driveline is in the graveyard of engines and transmissions in the corner. :( @Brayden_connolly pulls the whole package intact. I was impressed.
20221225_075827.jpg20221225_075747.jpg
 
Last edited:
One thing to keep an eye on after the install is setting a floor jack to raise the rear of the car. The jack point on the cross member is a hair's breath away from the header so it takes careful placement of the jack saddle to avoid putting any load on the header when lifting. The header blocks your view of the jack point so it takes more gymnastics to line everything up than the stock exhaust does.
 
One thing to keep an eye on after the install is setting a floor jack to raise the rear of the car. The jack point on the cross member is a hair's breath away from the header so it takes careful placement of the jack saddle to avoid putting any load on the header when lifting. The header blocks your view of the jack point so it takes more gymnastics to line everything up than the stock exhaust does.
Thanks for that tip. I'll watch out for that.
You've reminded me of another thing that I should have mentioned: I was initially a little worried that the header passing under the rear crossmember would reduce the ground clearance, but in reality there is virtually no change on that front. It's in nearly the same plane as the jacking point (and the oil pan, for that matter).
 
That bracket is the "hanger for the passenger side end of the cat. Here are some pics I just took of my 78 project car. Fortunately(?) I never got rid of the cat, it was still under the workbench. The 78 has a nickel plated steel IAP style header without the slip joint fitting that came from Vicks about 12 years ago. You can see the bracket on the muller in the second picture, it connects to nothing without a cat in the system.
View attachment 69122View attachment 69123View attachment 69124
Just an FYI, the 85X had this exact setup in it (IAP style header with carb muffler) setup in it and never had a stability issue without the support bracket found on the later cars (and maybe the 74 too?). All the springs mounts and springs were present and in good working order. I bought the 85 in 2013 and autocrossed it for 2 or 3 seasons. That driveline is sitting in the garage now with the exhaust still attached. :) So maybe the late model support bracket isn't necessary without a cat, the cat for my 78 is incredibly heavy for its size.

The 85's driveline is in the graveyard of engines and transmissions in the corner. :( @Brayden_connolly pulls the whole package intact. I was impressed.
View attachment 69125View attachment 69127

Now, that bracket makes sense to me. In both cases, it connects right at teh flex joint. In the older (carb) system, it unified the parts of the exhaust system that were after the flex-joint. And in the newer (FI) system, the brace unified everything before the flex-joint with the engine/transmission.

I'm glad to hear that you had no problems without any brace. Without the catalytic converter in the system, there is less mass cantilevered from the flange, which would make it easier on it. But I still think I'll be happier about it when I've got something in place. I'm thinking a couple of standoffs between the brace and its mounting points will move it out of line with the O2 sensor. And a flange welded to the other end which can be clamped to the collector will secure that end. We'll see how that goes.

Brian
 
We’ll, nothing’s as simple as it first appears…
The test fitting had been done with nuts on just a couple studs, and not torqued down. When things were tightened up, there was a significant interference between the header and the cross member. We cut the dog bone and threaded the rod to make it adjustable. Tipping the engine gave clearance (barely). Used a coupling nut and two jam nuts, so one end needs to be disconnected to adjust, but that’s simple enough.

C697C9A3-5719-4FB5-9C2D-0F24B9FD535C.jpeg


EDIT: I forgot to mention Dad’s suggestion
of how to establish whether changing the length of the dog bone would get us the clearance we needed. We used a turnbuckle like this, and measured the distance between the bolts:

83D019BF-2F0A-4B27-9F5D-BD485E311216.jpeg
 
Last edited:
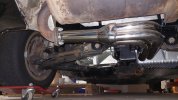
My friend the retired welder did a great job putting the FI flange back on the shortened inlet. This allows me to retain the flex joint in that spot. It also gives a clue as to why Fiat changed the relative lengths of the parts. Dealing with the springs on the studs that close to the 180 bend is awkward.

0E4D628B-99CF-48E6-BFA1-B41757C4A471.jpeg


I may revisit this with some Belleville washers to get a more compact arrangement.
 
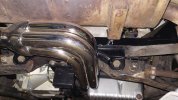
Once the location was established, we adapted the brace from the engine mount. It needed to be offset to avoid the ‘knuckles’ of the collector and the O2 sensor. We decided to just make the clamp nuts for the slip joint do double duty:

CE926517-E3E6-4CAB-95DA-507AB57A6A68.jpeg


In the background, you see Dad peeling the protective tape of the tailpipe I polished like a fun-house mirror


4A1C4310-408D-4E79-BB3F-2D02666A0C67.jpeg


That’s my take on what’s involved in fitting a Vick’s Header to a FI muffler. If I were doing it again, I’d probably have used a Carb muffler.
I’m hoping the clearance issue I addressed by shortening the dog bone doesn’t come back to bite me.
 
Last edited:
I’m hoping the clearance issue I addressed by shortening the dog bone doesn’t come back to bite me.
I had a similar issue on my 85 with the IAP style header (which is sold by several vendors). One of the tubes barely contacted the cross brace, pretty much only when the engine was hot and you accelerated/decelerated quickly or went over a bump. You can see it was making a shiny spot on the tube in this picture.
IM003514b.jpg
That was years of "wear", so obviously it was just an annoyance. I tried a new dogbone which made it worse, then switched back to the original dogbone and it went back to "normal" levels of annoying me. I solved the exhaust rattle issue by having the car K swapped. Simple fix. ;)
 
I solved the exhaust rattle issue by having the car K swapped. Simple fix. ;)
that's a very expensive way to fix an exhaust rattle from the poorly designed headers touching, would have been far cheaper to get a different set of headers that actually fitted...

SteveC
 
Once the location was established, we adapted the brace from the engine mount. It needed to be offset to avoid the ‘knuckles’ of the collector and the O2 sensor. We decided to just make the clamp nuts for the slip joint do double duty:

View attachment 70546

In the background, you see Dad peeling the protective tape of the tailpipe I polished like a fun-house mirror


View attachment 70547

That’s my take on what’s involved in fitting a Vick’s Header to a FI muffler. If I were doing it again, I’d probably have used a Carb muffler.
I’m hoping the clearance issue I addressed by shortening the dog bone doesn’t come back to bite me.

Very nice work !!! First time I have seen it done properly :)

Very good to have machined that adapter flange to retain the swivel joint at the muffler, and great to have retained the brace from the tranny !

Well done. Thanks for sharing.
 
Back
Top