
You are using an out of date browser. It may not display this or other websites correctly.
You should upgrade or use an alternative browser.
You should upgrade or use an alternative browser.
boxy02
True Classic
Couldn’t find anything specific in my search of the forums here. But I did find a write up for the old 500s. They do seem to share some aspects with the 850s & 600s (link below).

 www.fiatforum.com
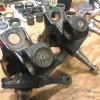
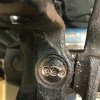
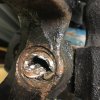
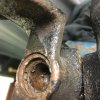
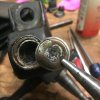
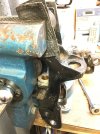
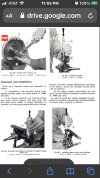
I used the drilling method on the bottom plugs and it worked well. I used the punch method on the top/zerk fitting plugs and I broke a bit of the grooved keeper that holds the plug in place after installation. I’ll likely grind down and fit a temporary copper disk in the groove and “weld back” the keeper part. Since it’s cast iron, it may or may not work, but I’ll pop it in the oven to get it up to temp anyway.
I must say this is my least favorite r&r on my 600D hotrod so far.
My new kingpins are slightly shorter than the originals. I hope this won’t be a problem. The other parts seem to be the same type, but inferior quality (to be expected in today’s manufacturing I suppose). I’ll need to find a shop to install & ream the bushings to spec. Fun stuff.
Kingpin renewal | FIAT 500 (Classic)
Hello fellow 500'ers I have a set of genuine Fiat workshop tools for renovating the steering hub kingpin sets on 500/126's :- 74056 Remover and installer, knuckle pillar and leaf spring bonded rubber bushings 74106 Remover and installer, knuckle pillar bushings 90316 Reamer, knuckle pillar...
I used the drilling method on the bottom plugs and it worked well. I used the punch method on the top/zerk fitting plugs and I broke a bit of the grooved keeper that holds the plug in place after installation. I’ll likely grind down and fit a temporary copper disk in the groove and “weld back” the keeper part. Since it’s cast iron, it may or may not work, but I’ll pop it in the oven to get it up to temp anyway.
I must say this is my least favorite r&r on my 600D hotrod so far.
My new kingpins are slightly shorter than the originals. I hope this won’t be a problem. The other parts seem to be the same type, but inferior quality (to be expected in today’s manufacturing I suppose). I’ll need to find a shop to install & ream the bushings to spec. Fun stuff.
Attachments
-
 126A758C-EC46-4E4D-91D6-BB11DDA1A339.jpeg274 KB · Views: 88
 -
 8F47AC2B-135E-49A7-8D4B-4F6D58BC93FF.jpeg289.7 KB · Views: 87
 -
 92049FB6-1283-43D1-BE93-54E1BA52CDA1.jpeg277.7 KB · Views: 90
 -
 72559FCC-03F0-46F2-9E82-C8B81DE753E3.jpeg166.7 KB · Views: 88
 -
 A4638F29-EE9F-4C01-8BAB-1884E79D5F71.jpeg175.2 KB · Views: 93
 -
 371588E4-31E7-4508-9002-AA167E01CA7F.jpeg239.5 KB · Views: 88
boxy02
True Classic
Good to know, thanks!I must admit I paid the local Fiat people ridiculous money to do this job. I did however weld fittings onto the cast iron uprights for coil overs and there was not a problem.
boxy02
True Classic
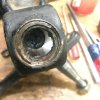
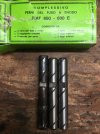
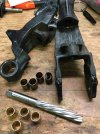
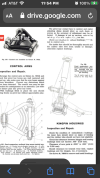
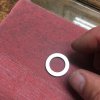
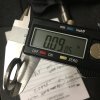
After receiving no replies from several shops I contacted to install and ream new kingpin bushings, I decided to remove the old bushings, install new ones and ream them myself. I bought the 15.02mm (0.5913”) reamer from Rotagrip in the UK (~£100 shipped to the USA). Worked really well, I took my time and the pin is tight & in-line. Very pleased with the results.
Attachments

kmead
Old enough to know better
Interested in selling the ream? Or are you setting up a side businessAfter receiving no replies from several shops I contacted to install and ream new kingpin bushings, I decided to remove the old bushings, install new ones and ream them myself. I bought the 15.02mm (0.5913”) reamer from Rotagrip in the UK (~£100 shipped to the USA). Worked really well, I took my time and the pin is tight & in-line. Very pleased with the results.
")
boxy02
True Classic
Interested in selling the ream? Or are you setting up a side business
 I haven’t thought that far ahead, hmmm.
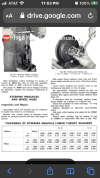
RobM
True Classic
I had my Fiat 850 kingpins rebuilt in the mid-2000s by a local automotive machine shop (machine work was all they did), using a rebuild kit from Art Bayless. Thereafter, any time I attempt to grease them, the grease gushes out the top. I fear the grease is not working its way down the internal grooves. Any suggestions?
boxy02
True Classic
Sorry, just saw this. Other than dismantling the knuckle/spindle and removing the kingpin for cleaning, inspection and new lubrication, I don’t know how you’d get the old grease out to force the new lube in. Of course you’d be destroying the upper knuckle bushing and the grease retainers in the process.I had my Fiat 850 kingpins rebuilt in the mid-2000s by a local automotive machine shop (machine work was all they did), using a rebuild kit from Art Bayless. Thereafter, any time I attempt to grease them, the grease gushes out the top. I fear the grease is not working its way down the internal grooves. Any suggestions?
RobM
True Classic
Thanks Mike. I periodically try to grease them, and figure worst case scenario, they'll have to be rebuilt again at some point.Sorry, just saw this. Other than dismantling the knuckle/spindle and removing the kingpin for cleaning, inspection and new lubrication, I don’t know how you’d get the old grease out to force the new lube in. Of course you’d be destroying the upper knuckle bushing and the grease retainers in the process.
SuperTopo
True Classic
After receiving no replies from several shops I contacted to install and ream new kingpin bushings, I decided to remove the old bushings, install new ones and ream them myself. I bought the 15.02mm (0.5913”) reamer from Rotagrip in the UK (~£100 shipped to the USA). Worked really well, I took my time and the pin is tight & in-line. Very pleased with the results.
Great post. Thanks for giving me the confidence to do it myself. I just ordered a reamer from the UK. I'll post the results when I get it.
kmead
Old enough to know better
In a post on Facebook from Trent Liles aka Ditchdigger on Retrorides mentioned he does these rebuilds at Vintage Underground in Eugene OR
Might be worth contacting them. It won’t be cheap but it will be done well.
 vintageunderground.com

Might be worth contacting them. It won’t be cheap but it will be done well.
Complete Automotive Restoration Services - Eugene, Oregon - Vintage Underground
Explore our comprehensive auto restoration services. From coach building to metal fabrication, our skilled team is dedicated to bringing classic cars back to life with precision and care.
vintageunderground.com
boxy02
True Classic
This is awesome, but take your time and think about your setup before you start reaming. The UK reamer is shorter than the factory piloted, self-centering reamer. And getting the vertical end play of the spindle in the knuckle takes patience to get the lower spacer-shim within the required spec. The first side I completed was a little on the “tight” side. The second one was perfect. As this is my car I don’t mind the minimal variation. Good luck and be patient, figure out all your specs first.Great post. Thanks for giving me the confidence to do it myself. I just ordered a reamer from the UK. I'll post the results when I get it.

Attachments
boxy02
True Classic
Good to know someone is doing this. I wonder which reamer he is using. I’ll have to read up.In a post on Facebook from Trent Liles aka Ditchdigger on Retrorides mentioned he does these rebuilds at Vintage Underground in Eugene OR
Might be worth contacting them. It won’t be cheap but it will be done well.
Complete Automotive Restoration Services - Eugene, Oregon - Vintage Underground
Explore our comprehensive auto restoration services. From coach building to metal fabrication, our skilled team is dedicated to bringing classic cars back to life with precision and care.
View attachment 75370