New fabric lightweight Targa Top + Refreshing issues

Chromaphase

True Classic
Hi everyone,
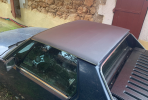
I usually only post about my problem, so here a post about my process on doing the lightweight targa top for this summer.
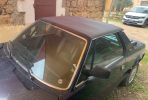
I have one top that is quite heavy but with a very nice padded liner for winter. (10.5kg)
its way too heavy for me take it off by myself everytime so after seeing some nice posts here I will try it also.
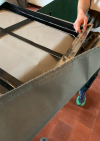
I bought a spare top for 100$. It was kind of bare. (9kg) no padding at all.

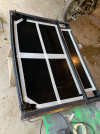
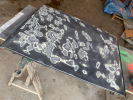
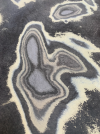
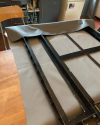
I didnt do a very refine job, so to speak. Cutting the fiberglass was a real pain with all the dust.
This is also a test, to see if it will matter or not, if theweight difference would be that interesting.
The pieces I cut from it were kind of heavy... Will give you the new weight tomorrow and take some photos of the rest of the process.
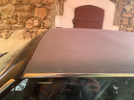
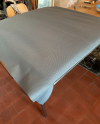
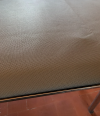
I bought this kind of fabric HERE Not super fancy but its cheap, so I bought for two tentatives.

My aim is to use the heavy, padded one in winter, and to use this lightweight one in summer, basically always open except if I park the car in the street or in my home
(Note: I live in south of France so its kind of sunny everyday during the summer time)

I have some glue but I will try to clamp it from the left to the right, will take some photos.
The rigidity is still quite good, but wouldnt cut more of it.
 

Attachments

  • dscds.PNG
    dscds.PNG
    1.7 MB · Views: 63
  • ssdsdad.PNG
    ssdsdad.PNG
    2.6 MB · Views: 66
And here is the heavy one,
For this one I need your help - as always !
It has many cracks from last summer. It was sold to me in a bad shape already but it went for the worst.

Anyway, so many bubbles, some burst already, some others were revealed with a gentle overall sanding.
Look at how many - many - layers it got. Its insane. Im counting 5 layers of black paint and 4 layers of white primer.

You see maybe like 50 holes there. But at first it was like 10 cracks... just by sanding a bit a searching I found so many hidden bubbles.
Problem is, I cannot sand it to the bare fiberglass, it would take me days of sanding and brakes my sanding tools.

What can anyone do in this kind of situation ?
Thanks
 

Attachments

  • zczxc.PNG
    zczxc.PNG
    3 MB · Views: 46
  • xzczxc.PNG
    xzczxc.PNG
    1.7 MB · Views: 49
Bedliner? A 'levelling' coat and a finish coat, as you seem to have given it many low spots.
Actually my problem isnt really about leveling so to speak...
More about, what kind of madness it is to have so many layers.

And most important... will I have new bubbles in the upcoming future after the repaint job... !

Here also some photos of the ongoing lightweight top project.
It can easily be clipped between the top and the side chrome parts.

For the back, I just finished some simple screwing. I thought about gluing but seems I dont need it...

Now my biggest problem is the front of the top, because there is a recess that fit the top of the windshield... kind of tricky.
 

Attachments

  • sdfsdfsf.PNG
    sdfsdfsf.PNG
    1.9 MB · Views: 38
  • dsfdfdsf.PNG
    dsfdfdsf.PNG
    1.4 MB · Views: 35
  • sadasdsad.PNG
    sadasdsad.PNG
    1.8 MB · Views: 40
  • dfsfsd.PNG
    dfsfsd.PNG
    1.4 MB · Views: 36
Nice work on the "light weight" top. Yes, Fiat had different versions of these tops....some with more insulation and upholstery, therefore heavier. For the new fabric cover I would use glue in addition to what you have already made. If you drive the car with this top in place the air / wind will want to rip the fabric off strongly.

As for the finish on your second top. Other members have refinished their tops and I don't recall anyone ever finding all those layers. So I'm guessing previous owners have repainted yours several times. Honestly the best thing to do is completely sand it flat and remove all bubbles before applying any new finish.
 
Actually my problem isnt really about leveling so to speak...
More about, what kind of madness it is to have so many layers.

And most important... will I have new bubbles in the upcoming future after the repaint job... !

Here also some photos of the ongoing lightweight top project.
It can easily be clipped between the top and the side chrome parts.

For the back, I just finished some simple screwing. I thought about gluing but seems I dont need it...

Now my biggest problem is the front of the top, because there is a recess that fit the top of the windshield... kind of tricky.
You might consider reading through this thread for more ideas on how to finish this project:

 
Nice work on the "light weight" top. Yes, Fiat had different versions of these tops....some with more insulation and upholstery, therefore heavier. For the new fabric cover I would use glue in addition to what you have already made. If you drive the car with this top in place the air / wind will want to rip the fabric off strongly.

As for the finish on your second top. Other members have refinished their tops and I don't recall anyone ever finding all those layers. So I'm guessing previous owners have repainted yours several times. Honestly the best thing to do is completely sand it flat and remove all bubbles before applying any new finish.

I see... but how to sand it well ? I mean... so many layers... is there a quick way to get it done? As I said, if I try the normal sanding, its gonna brake my equipment and sanity !

For the glue... yes surely... But now I can also take it off and try again... I also have more spare fabric to play with as well...
I will add it soon tho.

I also found this thread however he didnt really take some good photos of the interesting part to be honest... thats unfortunate !
 
I would ditch the power tools for this job. What you need is a fairing board. You need to take material of evenly and a fairing board will let you do that while conforming to the contours of the panel. The problem with power sanding is that it is very, very, very [did I say very?] easy to remove too much material. Use good sandpaper, working thru the grades starting with something pretty coarse, and accept that it will take some time. Doing it this way gives you more control and the best chance of a good job no matter what finish you decide to apply later.
 
but how to sand it well ? I mean... so many layers... is there a quick way to get it done?
Start with a coarse grit paper to cut through the worst of it easily. Then use a finer grit to smooth out the scratches left by the coarse paper.
 
Ok thanks guys I will give it a try !
Also I have finished the fabric top, its weight.... 6.2 kg !
I can hold it with one finger, its like half the weight of my other one... really happy about it.

Actually I need to cut some of the fiberglass on the side because the shape doesnt fit in my X (slight different shape than my other top)
But its already looking good on the X even half fitted.
 
hello Everyone,
Some photos of the finished product !
I have to say I turnt way better than I expected. i dont have the patience of some of you here, regarding details and hours of work :)

Im still trying to repain the other heavy top. But I think Im gonna keep this one as my main top now.
Its so easy to move it into the frunk, no noise when on highway.
Only problem is when we open the windows, the wind enters the car and the top become noisy.

I havent glued it yet anywhere and the interior is still bare.
Now I should update/modify the rubber seals because the ones that came with this spare top are really old.
 

Attachments

  • dfgdfggdfgdf.PNG
    dfgdfggdfgdf.PNG
    2.4 MB · Views: 51
  • fdfsf.PNG
    fdfsf.PNG
    2.7 MB · Views: 50
  • dsfdfdfs.PNG
    dsfdfdfs.PNG
    2.7 MB · Views: 51
Nice Job! Looks great. ;)

I've been thinking about doing this as well, mainly to make it lighter and easier to handle. Can you weigh the two tops for a comparison?
 
Nice Job! Looks great. ;)

I've been thinking about doing this as well, mainly to make it lighter and easier to handle. Can you weigh the two tops for a comparison?
Thanks !

So my original top was super heavy to me, around 10-11kg.
It has a very nice interior garnement. I will take a photo tomorrow. feel even better than a hard top car.
The spare one I bought to use for this, it was 9.5 kg, definitively will feel lighter already.

To be honest, Im also happy about the aesthetic of it, the color, etc !
 
You may have answered my question before in earlier posts, sorry.

So the factory insulated top is 10-11 kg (I'll say 10.5). The fabric covered (modified) one you just finished is 6.2 kg. A difference of roughly 4.3 kg, or a savings of 9.5 lbs for us in America. 10 pounds would make a difference when trying to lift it in/out of the frunk. :)

Yes its a huge difference, and Im not a small guy... but for the regular one, to do it alone is like 50% chance of the top to destroy your windshield.
Because you need to extend your arms to grab it, and extend again to put it in the frunk, the difference is exponential...

The new fabric one I can hold it with a single pinky if I want ;p

I bought my X last year, and barely took off the top, despite living in south of France... !

Spare top was 100 euros, fabric was like 20 euros, and I did it by myself except when I put the fabric on it I asked a friend to help me pulling it straight, and then screw the side part, took like 15min top.
 
My friends father built his own plane years ago & I remember him telling me about how he skinned it. Special fabric then painted. Don't know the specifics but now I'll ask next time I see him. Sounds like this could be an option for a less floppy top.
 
Back
Top