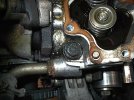
New oil leak

Tom Ginefra

True Classic
I've been driving the car regularly, since I completed my engine rebuild in mid November of 23. A total of approximately 4 months.
I followed the recommended re-torque procedure for the cylinder head, as well as a general checking of all nuts and bolts (tightening those that felt like they should be snugged up). A few days ago I noticed a fair amount of oil had accumulated in the wells around the base of the 2 Left Rear Headbolts. I checked the bolts and they were torqued to 69 ft/lbs. I cleaned the area to better identify the source of the leak, and drove the car. The next day I noticed that the vertical side behind the 2 head bolts had a new film of oil there and the gasket between the cambox and the cylinder head looked to be the source of the leak. I took off the valve cover and checked how tight each of the cambox bolts were. I decided to re-torque all of them and noticed a couple of them were easier to loosen than the others, (but they weren't near where the leak is.) It's also worth noting that prior to assembly I carefully checked the surfaces between the cambox and the cylinder head and they were both true, flat and free of any nicks or visible distortions of any kind. AND again, this wasn't leaking before. This is a new development.

I checked the manual again and was reminded that the torque for these bolts is an incredibly low 14 lbs. The term "Cambox" does not appear anywhere in the text. So, (as I did originally) I assumed the reference to "Cylinder Head Extension bolts" was the cambox bolts. I retorqued the bolts to 16lbs in an effort to better squeeze the gasket, The leak "albeit slightly less" still persists.

Screenshot 2024-03-16 5.47.22 PM.png


My questions are as follows;
1. Should I have applied any kind of a gasket sealer to the cambox gasket?
2. Is the torque rating for these bolts "really" only 14 lbs, or is that a possible misprint?
3. Has anyone had a similar experience and what did you do to correct it?

Any assistance would be appreciated
 
My understanding is that depending upon what brand of gasket set you acquire, you may get different thicknesses of that particular gasket. Typically it is the thinnest, flimsiest gasket in the entire set.

I have read some experienced people on this forum recommend that before this gasket is installed, that it be soaked in motor oil for a day or two, to help soften it up a bit. These folks are convinced that if the gasket is not soaked, it will tear from the natural expansion of the metal.

Last time I had to replace this gasket, I used Permatex black as a sealer after ensuring that the mating surfaces were surgically clean. I applied as thin a coat as I could on both sides of the gasket by dabbing with my finger. It does not leak....yet.

As to torque specs, in the chart, other M8 fasteners going into aluminum are specced at 16 and 18 ft lbs. 14 ft-lbs does seem to be a little light. Having said that, if you dial it up to 16 or 18 I think you'll be fine. Afterall, if you're using for example a 3/8" drive clicker torque wrench, then it's likely that the accuracy of the wrench is not that great at such a low torque setting and your shot group is going to be big regardless of what number you set.
 
Last edited:
My understanding is that depending upon what brand of gasket set you acquire, you may get different thicknesses of that particular gasket. Typically it is the thinnest, flimsiest gasket in the entire set.

I have read some experienced people on this forum recommend that before this gasket is installed, that it be soaked in motor oil for a day or two, to help soften it up a bit. These folks are convinced that if the gasket is not soaked, it will tear from the natural expansion of the metal.

Last time I had to replace this gasket, I used Permatex black as a sealer after ensuring that the mating surfaces were surgically clean. I applied as thin a coat as I could on both sides of the gasket by dabbing with my finger. It does not leak....yet.

As to torque specs, in the chart, other M8 fasteners going into aluminum are specced at 16 and 18 ft lbs. 14 ft-lbs does seem to be a little light. Having said that, if you dial it up to 16 or 18 I think you'll be fine. Afterall, if you're using for example a 3/8" drive clicker torque wrench, then it's likely that the accuracy of the wrench is not that great at such a low torque setting and your shot group is going to be big regardless of what number you set.
Thanks, Dan. All good info.
 
Hmm: Welcome to the world of semantics. I call these bolts the 'cam carrier bolts'. MWB calls these 'cam tower bolts'. Just check are these the 8mm x 80mm bolts? As usual, if you have a problem with leaks, you want to check:
- are the threads in the head in good condition and clean?
- are the bolts un damaged? MWB has them for sale
-are the sealing surfaces on the head unmarred and free from chisel pry mark damage?
- if the bottom sealing surface of the cam carrier is clean, is it parallel to the top surface? I have heard of cases where the bottom surface was milled to compensate for reground cams and was no longer exactly parallel as it should be. Correct that non parallelism.
- if all the above is good and your thin cam tower gasket is new, I have had success in placing a thin glaze of HYLOMAR sealing compound on each surface of the gasket. Tighten to FIAT SPECS.
 
It happens Tom. My 86 had a similar leak on the cam wheel end. This is what I found when I took the cam box off. The paper gasket was cracked in a couple spots. :(

cambox_gskt2.JPG

I followed the wisdom of the Xweb advisers at the time which was to soak the replacement paper gasket in warm water to soften it. The intention is to make it pliable enough to let it lay down without "breaking/tearing" it. The warm water worked very well. I am sure oil would do the same.

Also, I was advised to have a piece of cardboard handy to slide in the gap as the cam box moves up during removal. The cardboard is used to support the buckets and shims as you remove the cam box. You don't want them dropping out and getting mixed up. Of course, you are supposed to adjust the valves after messing with the cam box, but why make it harder by scattering the parts on the shop floor. :)
 
Hmm: Welcome to the world of semantics. I call these bolts the 'cam carrier bolts'. MWB calls these 'cam tower bolts'. Just check are these the 8mm x 80mm bolts? As usual, if you have a problem with leaks, you want to check:
- are the threads in the head in good condition and clean?
- are the bolts un damaged? MWB has them for sale
-are the sealing surfaces on the head unmarred and free from chisel pry mark damage?
- if the bottom sealing surface of the cam carrier is clean, is it parallel to the top surface? I have heard of cases where the bottom surface was milled to compensate for reground cams and was no longer exactly parallel as it should be. Correct that non parallelism.
- if all the above is good and your thin cam tower gasket is new, I have had success in placing a thin glaze of HYLOMAR sealing compound on each surface of the gasket. Tighten to FIAT SPECS.
Prior to assembIy, I checked and thoroughly cleaned all the bolts and bolt hole threads, and verified the mating surfaces were clean and true. Neither the head or the cambox had been milled.
 
It happens Tom. My 86 had a similar leak on the cam wheel end. This is what I found when I took the cam box off. The paper gasket was cracked in a couple spots. :(

View attachment 82654

I followed the wisdom of the Xweb advisers at the time which was to soak the replacement paper gasket in warm water to soften it. The intention is to make it pliable enough to let it lay down without "breaking/tearing" it. The warm water worked very well. I am sure oil would do the same.

Also, I was advised to have a piece of cardboard handy to slide in the gap as the cam box moves up during removal. The cardboard is used to support the buckets and shims as you remove the cam box. You don't want them dropping out and getting mixed up. Of course, you are supposed to adjust the valves after messing with the cam box, but why make it harder by scattering the parts on the shop floor. :)
Thanks, Jim. I appreciate you sharing what happened to you, along with the photo and the cardboard sheet tip. It seems I have a cambox re-installation, in my future. Not happy about having to redo that and having to re-shim all the valves again! Mostly, I'm pissed that I missed this info in my research and prep, before beginning final assembly. The old adage is true... the best way to learn is by doing. You can be sure if I ever build another engine, I won't forget this part. When I do this, I think I'll go the Hylomar route that johnph suggested.

Thanks again to all for the help!
 
Another technique to retain the buckets in the cambox while removing/installing is to use some of those super duper neo magnets. A couple of smaller ones or one big one per bucket. Tuck them in there next to where the cam lobes and the buckets meet, and they will keep the buckets from falling out.
 
For cam box install, I use engine assembly lube to hold the buckets in the cam box. The stuff is super sticky. As to removing the cam box, just remove it slowly, some buckets will come up with the box and some will stay sitting on the valve springs.
 
Another technique to retain the buckets in the cambox while removing/installing is to use some of those super duper neo magnets. A couple of smaller ones or one big one per bucket. Tuck them in there next to where the cam lobes and the buckets meet, and they will keep the buckets from falling out.
Love this idea for disassembly! I believe I have enough of those little boogers to pull that off, too.
 
Last edited:
For cam box install, I use engine assembly lube to hold the buckets in the cam box. The stuff is super sticky. As to removing the cam box, just remove it slowly, some buckets will come up with the box and some will stay sitting on the valve springs.
Thanks, Carl. Of course, I did that the first time around. I don't remember why now, but I did have to pull the cambox back off the head for some reason, and despite everything being clean and dry before I applied the assembly lube, some of the buckets did go AWOL. I really like Dan's magnet idea.
 
Tom,
Each time I remove the cam tower and replace the tower gasket, before installing the gasket I put the gasket on a card board and spray a small amount of Permatex Spray Sealant on both side of the gasket.

I have done many time for the last 15 years and all times success with no leak.
If need to rework later on the tower easy to remove the sealant with acetone.

I use the same product on gasket for transmission case when reassembly all time success no leak even with MTL 90 oil.

IMG_1647.JPG
 
Last edited:
I second using either Hylomar or Spray Sealant on both sides of the gasket....pretty much any gasket for that matter. I tried the "soaking" technique on some very thin motorcycle gaskets but they still leaked. Hylomar solved it. However those bike engines tend to have less than ideal tolerances and leaks are almost as common as on Fiats. :D
 
Back
Top