Non-AC Heaterbox Repair (glue?)

darwoodious

Darin Nelson
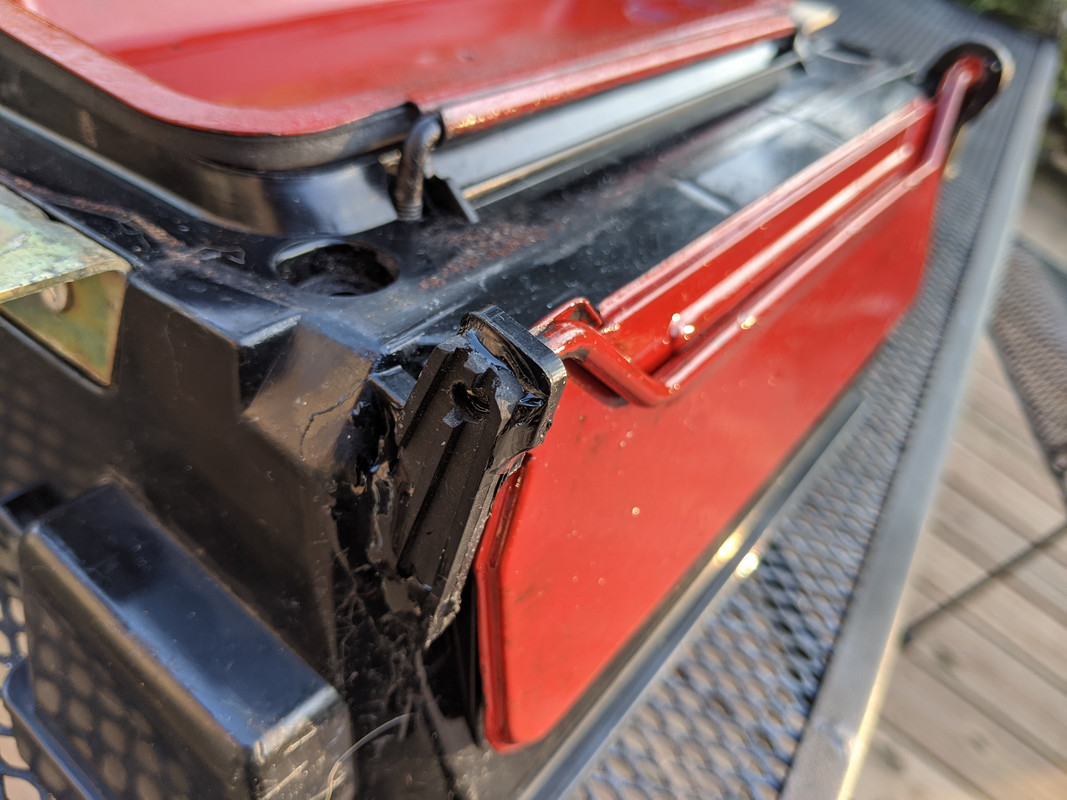
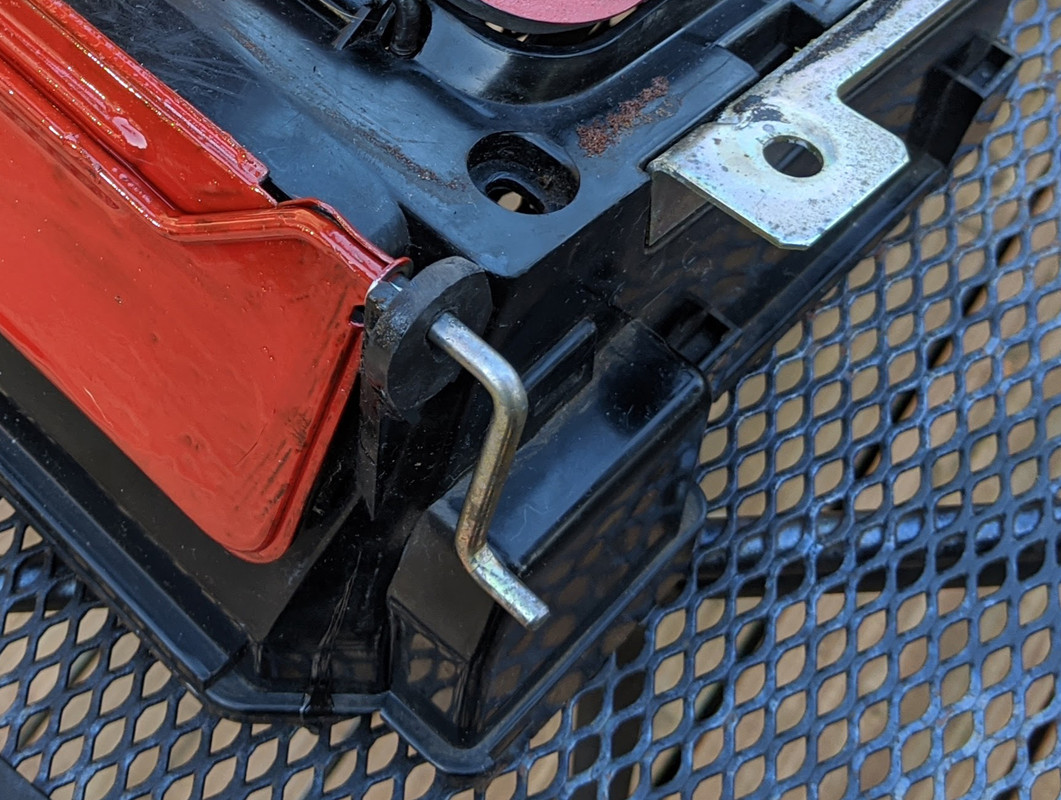
My '76 heaterbox (like this on cracked on removal some time back - specifically the upper portion near where the water lines enter/exit the core. Unlike the lower section which is some sort of flexible plastic, the upper looks to be made of some fiber composite impregnated with epoxy of sorts. I'll put photos below but the primary ask is what glue do I use to reattach the broken part? First thought is "super glue" but I also have Acrylic Cement (from TAP) which is primarily for acrylic but also bonds other platics (styrene, butyrate, PETG etc).

The bond should be strong since it is part of the spring clip attachment.

I know some of you on this forum have a lot of experience in plastics and adhesives, so thought I'd ask first. Thanks.

IMG_5370.JPG

IMG_5374.JPG

IMG_5377.JPG

IMG_5371.JPG
 
I know nothing about plastics and adhesives other than I've never had any luck with adhesion unless you know for sure it's PVC, ABS, Polystyrene, etc. and use the correct glue. I use this cheap POS for repairing console cracks, hockey stick trim repairs, and attaching spacer lugs to early grilles. Repair from the backside is usually less than elegant, but everything I've tried this on has resulted in a strong bond. One thing I've found is not to disturb to repair joint until it has cooled completely. For the cost it might be worth a shot?
 
Darin - weird that the casing would be different from the AC version (in terms of composition ) - I used black ABS cement (used for plumbing) to fuse the pivot repairs on my upper casing - clamped the repair piece (part of the heater valve lever) to maintain pressure on the joint.

IMG-20210112-154631.jpg


IMG-20210112-154555crop.jpg
 
I know nothing about plastics and adhesives other than I've never had any luck with adhesion unless you know for sure it's PVC, ABS, Polystyrene, etc. and use the correct glue. I use this cheap POS for repairing console cracks, hockey stick trim repairs, and attaching spacer lugs to early grilles. Repair from the backside is usually less than elegant, but everything I've tried this on has resulted in a strong bond. One thing I've found is not to disturb to repair joint until it has cooled completely. For the cost it might be worth a shot?
Same for me, it seems knowing the exact type of plastic and adhesive to properly bond it is imperative for a successful repair....which I seldom achieve. I've never tried one of those plastic welding kits. Maybe I should. But does the same question still exist? Do you need the right type of repair stick for the type of plastic you're using it on (I think I've seen different types of plastic weld sticks)?
 
3m two part epoxy bonds anything to anything....aluminum to mild steel, wood to rubber, plastic to metal....you get the point...
Just sayin’, I use this stuff all the time at the auto plant I work at for process tooling...
042E51EC-6ABD-4F93-8FAE-84D9698DAE14.jpeg
 
Same for me, it seems knowing the exact type of plastic and adhesive to properly bond it is imperative for a successful repair....which I seldom achieve. I've never tried one of those plastic welding kits. Maybe I should. But does the same question still exist? Do you need the right type of repair stick for the type of plastic you're using it on (I think I've seen different types of plastic weld sticks)?
There are universal rods that are supposed to work on all plastics - supposed to is the key there.... They do have specific PCV, ABS, etc. rods too but you need to know what you are working with. I originally bought tool this for dash crack repairs. To handle those you use a product called Fiberflex. Those rods are used for flexible bumper repairs and would not produce a solid joint that's needed for a case repair. The DP100 is a good shot, but it's designed to work with most, but not all plastics so it's trial and error. JB Weld makes a plastic bonder but have no idea if that will provide enough strength, or even stick for that matter.
 
I think it is indeed totally different. My 1976 parts car had what I believe to be factory AC. The upper is similar but clearly plastic like the lower section (actually, I think there are 3 sections).
IMG_5380.JPG


also, this might be interesting to early X owners, the factory AC air handler is HUGE compared to the non AC version. Well, huge considering the size of the car. I'll post some fun comparison pictures.

IMG_5381.JPG

IMG_5382.JPG

IMG_5383.JPG

IMG_5384.JPG


also, the fan on the early AC unit was HUGE! took up nearly the entire lower area.
IMG_5385.JPG


Lastly, the other interesting thing is that the heater core looks only to by 75% the size of the non-AC unit for early cars. It is placed vertically forward and the AC evaporator is flat above that giant fan.

Those Italians sure knew how to cram 15 kilos in a 10 kilo box!
 
I know nothing about plastics and adhesives other than I've never had any luck with adhesion unless you know for sure it's PVC, ABS, Polystyrene, etc. and use the correct glue. I use this cheap POS for repairing console cracks, hockey stick trim repairs, and attaching spacer lugs to early grilles. Repair from the backside is usually less than elegant, but everything I've tried this on has resulted in a strong bond. One thing I've found is not to disturb to repair joint until it has cooled completely. For the cost it might be worth a shot?
If you have a Weller soldering gun, they make tips specifically for melting plastic. One of my guns came with a plastic cutting tip (sharp disc shape) and a flat melting tip similar to the HFT tool.
 
I have one of the plastic-weld kits - it does require specific rod for most types - some you can use the cross-purpose rod. I would not use it on the casing, I think it's really too heavy gauge to plastic weld without making a supreme botch-job of it. If ABS cement doesn't work on your versi0n casing. I'd go with 2 part epoxy also, with a brace to reinforce the repair.

Thanks for the pics of the non-AC box - it's always nice to see the variant components used.

index.php
 
Last edited:
I have a spare if you want it, think it is off the '74 - postage for the upper piece would be ~$20 USD. A few marks on it but not broken.
 
I have a spare if you want it, think it is off the '74 - postage for the upper piece would be ~$20 USD. A few marks on it but not broken.
Yeah? I'd love that @Mark Olson - sure. I'll PM you with details, payment etc.

I'll still attempt to fix this upper box and if nothing else it'd be available for someone else. It's not terrible shape but where I broke it is one of the 4 locations to clamp the bottom to it so kinda important. Considering all that, I think they made it a bit too weak (and I'm sure I ham-handed it when removing it).
 
BTW, is there any interest on XWeb for the early X1/9 AC heater box? I have a bunch of that stuff -
* box shown above
* AC center console (early ones are interesting - will post a photo below)
* various early AC stuff
* no AC pump - you'd wanna upgrade to a modern unit anyways

If there is I'll put the whole lot of it on FS&W. I need to get more room in my garage and will not be running AC.

IMG_5101.jpg
 
Example of the repair I made to the center section - it was broken where the forward retainer clip attaches. Nice & solid now - I used ABS scraps & the plumbing ABS cement. Built up the sections in stages

PXL_20210201_171504731.jpg
PXL_20210201_171507986.jpg
 
I think it is indeed totally different. My 1976 parts car had what I believe to be factory AC. The upper is similar but clearly plastic like the lower section (actually, I think there are 3 sections).
View attachment 42132

also, this might be interesting to early X owners, the factory AC air handler is HUGE compared to the non AC version. Well, huge considering the size of the car. I'll post some fun comparison pictures.

View attachment 42133
View attachment 42134
View attachment 42135
View attachment 42136

also, the fan on the early AC unit was HUGE! took up nearly the entire lower area.
View attachment 42137

Lastly, the other interesting thing is that the heater core looks only to by 75% the size of the non-AC unit for early cars. It is placed vertically forward and the AC evaporator is flat above that giant fan.

Those Italians sure knew how to cram 15 kilos in a 10 kilo box!
Interesting how different the early AC and non-AC boxes are. I have both AC and non-AC later style boxes. Eventually I want to remove both and swap over some of the controls (to eliminate the AC system's vacuum system). So I'll be interested to see how they compare.
 
BTW, is there any interest on XWeb for the early X1/9 AC heater box? I have a bunch of that stuff -
* box shown above
* AC center console (early ones are interesting - will post a photo below)
* various early AC stuff
* no AC pump - you'd wanna upgrade to a modern unit anyways

If there is I'll put the whole lot of it on FS&W. I need to get more room in my garage and will not be running AC.

View attachment 42139
For vintage cars with AC, personally I prefer the rotary controls for the blower and AC temp, and slider levers for the air flow controls. So that early style console would be preferred if I had a early car. ;)
 
I originally bought tool this for dash crack repairs. To handle those you use a product called Fiberflex.
A bit off topic here. How did the tool and product work for your dash repair? I'd like to smooth out the couple of cracks in mine before recovering it. So I'm not looking for a perfect "finish", just a good repair that will be hidden.
 
A bit off topic here. How did the tool and product work for your dash repair? I'd like to smooth out the couple of cracks in mine before recovering it. So I'm not looking for a perfect "finish", just a good repair that will be hidden.
Not there yet. Real common with the 240Z crowd. This video explains the concept fairly well. Key is flexible rod and flexible filler; both used in bumper repair. I did try the tool on a test crack and it works well. A quality result depends on one's ability to do conventional bodywork with filler - it's really not much different.

 
Back
Top