Printed Fluid Reservoirs

Steve Thomas

True Classic
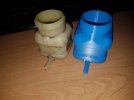
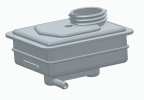
Got overwhelmed by all the things on all the lists I have so decided to get in and do something random :) Modeled up the clutch fluid reservoir and printed one. Just in PLA as a draft. The model and an original:
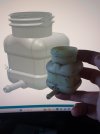
20240423_124156.jpg
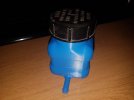
The print and the original:
20240423_210642.jpg
and the lid fits perfectly!
20240423_210728.jpg
The outlet is less than perfect. Probably functional after some clean up but not good enough. Then again, this was a draft in the wrong material :) My machine has two heads so can print a water soluble support material as it prints the real material and I am confident that I can get a perfect outcome. Need to order some decent materials.
Xref https://xwebforums.com/forum/index.php?threads/brake-fluid-reservoir.45164/post-439732
 
This is really great. What about modifying the Lid so it matches the newer cars today, that way we can then use the pressure bleeders? Again, this is really great stuff! Thank you!
 
That is great, may I through out some suggestions.

- You may want to get to a larger nipple size. current Master Cylinders can use larger nipples and hoses
- Making the tank larger would be nice
- Maybe remodel the original tank which was larger and feed both brake lines
- Maybe a nipple on top for direct attachment of power bleeder

As to martials I did a little research with GTP and generated this chart of the best martials to use. Nylon seems the best choice. Really liking what you are doing.


1713891496653.png
 
You may want to get to a larger nipple size. current Master Cylinders can use larger nipples and hoses
For clutch use, the 6mm size is fine as that's what all the clutch master cylinders come with and match the original line. For brake use on early cars though, I'm pretty sure you can still get brake masters that come with matching 6mm fittings. But yeah, 8mm fitting brake masters are more common, but I guess you'd be better off with a matching dual chamber reservoir in that case?
 
For clutch use, the 6mm size is fine as that's what all the clutch master cylinders come with and match the original line. For brake use on early cars though, I'm pretty sure you can still get brake masters that come with matching 6mm fittings. But yeah, 8mm fitting brake masters are more common, but I guess you'd be better off with a matching dual chamber reservoir in that case?
I was thinking brake fluid.
 
That is great, may I through out some suggestions.

- You may want to get to a larger nipple size. current Master Cylinders can use larger nipples and hoses
- Making the tank larger would be nice
- Maybe remodel the original tank which was larger and feed both brake lines
- Maybe a nipple on top for direct attachment of power bleeder

As to martials I did a little research with GTP and generated this chart of the best martials to use. Nylon seems the best choice. Really liking what you are doing.


View attachment 83965
Thanks. Yeah, started with clutch as it is simplest and will get to brake. On materials - I will try PP. Nylon will work but it does have higher absorption with brake fluids.
 
My thinking is to replicate the original designs as that is a good starting point and some people will want near original. Then, yes, minor mods for ease of use. The beauty of CAD/print is how easy it is to do variations as no tooling. I am happy to share the CAD for them as wants it and I will make and offer reservoirs [and other parts] in good materials once I get that sorted out. This is a spin off from my needs as I do my builds.
 
This is really great. What about modifying the Lid so it matches the newer cars today, that way we can then use the pressure bleeders? Again, this is really great stuff! Thank you!
Never used a pressure bleeder. What would need to change? Had not thought to print lids as they seem to last forever :)
 
Thanks. Yeah, started with clutch as it is simplest and will get to brake. On materials - I will try PP. Nylon will work but it does have higher absorption with brake fluids.
I hear you on the absorption but it is a commonly used material for such tanks. More importantly it has a very strong bound adhesion which to me would be very desirable in such an application.
 
I hear you on the absorption but it is a commonly used material for such tanks. More importantly it has a very strong bound adhesion which to me would be very desirable in such an application.
It is my second choice :) PP is the standard for brake fluid tanks these days - yeah, they are molded not printed. Nylon is a little harder to print that advertised as it MUST b e dry = a dehumidifier which you run thru the cycle immediately prior to printing. I don't have one. But PP needs a 4 hour heated drying cycle at controlled temperature and I don't have a way of doing that either! [domestic oven not suitable as a more precise temperature control is needed]. Now, I am going to use Nylon [and glass filled version] for lots of things as it is a very good general engineering material so I will have to set up to do that anyway. See, watch me think as I type :)
 
It is my second choice :) PP is the standard for brake fluid tanks these days - yeah, they are molded not printed. Nylon is a little harder to print that advertised as it MUST b e dry = a dehumidifier which you run thru the cycle immediately prior to printing. I don't have one. But PP needs a 4 hour heated drying cycle at controlled temperature and I don't have a way of doing that either! [domestic oven not suitable as a more precise temperature control is needed]. Now, I am going to use Nylon [and glass filled version] for lots of things as it is a very good general engineering material so I will have to set up to do that anyway. See, watch me think as I type :)
LOL, I do that all the time myself. Nothing wrong with rapidly evolving plans. Looking forward to seeing you results, keep us updated.
 
Can you split the drawing between the body and the lid? Maybe bond the two together?
I could and that is how the part was originally made. Not bonded - I think fused via heat and pressure. That large flange around the perimeter of the upper portion is the joint. But, one of the main advantages of 3D printing is the ability to make complex parts in one piece with no joints. Joints are always a problem so I won't go there. Use of temporary support structures is well understood and this is a printable part
 
Back
Top