
You are using an out of date browser. It may not display this or other websites correctly.
You should upgrade or use an alternative browser.
You should upgrade or use an alternative browser.
Rusted Out 1970 850 Spider Fix-Up
- Thread starter Daniel Gibson
- Start date
motoTrooper
True Classic
Agreed, this little roadster should be quite the eye catcher when you are out and about in it. Get ready for lots of questions at the gas stations.
Daniel Gibson
True Classic
Yes like "how hard was it to push?" or "should it smoke like that?".Agreed, this little roadster should be quite the eye catcher when you are out and about in it. Get ready for lots of questions at the gas stations.
")
All kidding aside, thank you for the compliment.
Daniel Gibson
True Classic
Thank you. I can't believe it either, until I close something and rust still falls off.Nice work on the step by step.
Fact is nice work all the way through. I can’t get over the difference between when you started and now. Amazing, just amazing.
Daniel Gibson
True Classic
Top part 2. Ok, when I started this part, I did not know how fiat attached the fabric to the rear bow, so I just went with what I know and used snaps. I already had the pliers.

And here they are attached. Again, this was before how I saw what fiat did, so mine are not as tight, and I only used 5 instead of six. It should still work ok.

Moving right along to the sides and front. Here I am just checking for overall fitment. So far so good. When I pull of tight, some of these wrinkles will disappear, and some will go away over time. Now to figure out the side wires.

I get how they are attached, but how do they go back under the top where my finger is? Can someone please send me some pics of their side wires, front to back?

And here they are attached. Again, this was before how I saw what fiat did, so mine are not as tight, and I only used 5 instead of six. It should still work ok.
Moving right along to the sides and front. Here I am just checking for overall fitment. So far so good. When I pull of tight, some of these wrinkles will disappear, and some will go away over time. Now to figure out the side wires.
I get how they are attached, but how do they go back under the top where my finger is? Can someone please send me some pics of their side wires, front to back?
Last edited:
Daniel Gibson
True Classic
Ok, part three top installation. Remember, I have no idea what I am doing. Strictly winging it. I could not find any info on this, so basically this is prior experience guiding me here. I know people love pics, so here they come!
As you may recall from a prior episode of "My Junker the Car", the front of the header bow was rusted out, so I welded new metal in. In my brilliance, I forgot to drill the holes for the fixing plate. So now I get to do that at an odd angle, and get metal filings in my car.

Here are all the holes drilled. Got lots of shiny new screws at Ace Hardware today. This car has consumed mass quantities.

I still had extra wire from the window winder adventures, but I ran out of ferrules, so got some of those as well. 1/16 ferrules. It is always gratifying to smash those on with a hammer.

Next, we thread the wire through the hole in the top header.

And work the wire through to the back. I did not use the string yet that the factory put in the top...I saved that just in case! I am thinking that I need to put a small hole in the top to feed the wire in to the attachment screw. Anybody tell me different please?

Let's attach the front of the top. Always start in the middle! And don't trim anything until you are done!

And here is for the night. Really pretty close. Need to pull the corners in a bit more, but I like it. And here is the best advice you will ever get when putting on a top...get so far, look at it, and walk away until tomorrow. It always looks better the next day. Don't stress it!

The back looks pretty good. Some of the wrinkles will come out when I put on the side brackets. I am pretty sure that these cars did not have drumheads for tops when they were new.


Tomorrow...you guessed it...more top work!

And if I have made a bunch of mistakes on this top...please be gentle when you point them out. I am trying!
BTW...doesn't the Amphicar look huge next to the Spider? Believe it or not, the wheelbase on the Amphicar is almost a foot shorter.
As you may recall from a prior episode of "My Junker the Car", the front of the header bow was rusted out, so I welded new metal in. In my brilliance, I forgot to drill the holes for the fixing plate. So now I get to do that at an odd angle, and get metal filings in my car.
Here are all the holes drilled. Got lots of shiny new screws at Ace Hardware today. This car has consumed mass quantities.
I still had extra wire from the window winder adventures, but I ran out of ferrules, so got some of those as well. 1/16 ferrules. It is always gratifying to smash those on with a hammer.
Next, we thread the wire through the hole in the top header.
And work the wire through to the back. I did not use the string yet that the factory put in the top...I saved that just in case! I am thinking that I need to put a small hole in the top to feed the wire in to the attachment screw. Anybody tell me different please?
Let's attach the front of the top. Always start in the middle! And don't trim anything until you are done!
And here is for the night. Really pretty close. Need to pull the corners in a bit more, but I like it. And here is the best advice you will ever get when putting on a top...get so far, look at it, and walk away until tomorrow. It always looks better the next day. Don't stress it!
The back looks pretty good. Some of the wrinkles will come out when I put on the side brackets. I am pretty sure that these cars did not have drumheads for tops when they were new.
Tomorrow...you guessed it...more top work!
And if I have made a bunch of mistakes on this top...please be gentle when you point them out. I am trying!
BTW...doesn't the Amphicar look huge next to the Spider? Believe it or not, the wheelbase on the Amphicar is almost a foot shorter.
Maybe it's too late, but JimM posted his instructions a couple years ago.
https://xwebforums.com/forum/index.php?threads/fiat-850-spider-convertible-top-instructions.20975/
https://xwebforums.com/forum/index.php?threads/fiat-850-spider-convertible-top-instructions.20975/
Daniel Gibson
True Classic
Never too late. Thanks for posting this.Maybe it's too late, but JimM posted his instructions a couple years ago.
https://xwebforums.com/forum/index.php?threads/fiat-850-spider-convertible-top-instructions.20975/
Cool. I looked for this post when you started on the top and couldn't find it. I tried another approach this morning and finally hit on the proper search term.Never too late. Thanks for posting this.
Daniel Gibson
True Classic
What is this now, part 4 of the top? Ok, so let us wrap it up. Below are the side hooks. Let's drill out the rivers, and get them painted.

Now, I have to cut into the top, but before we do that, let us examine the original. Looks like a slit was cut in the top about two inches from the bottom, and a one inch long gap. Time to start cutting!

I will spare you the details of how to cut with a knife, but here we are on a test fit.looks like it is going to work just fine! On this side, the top rides up just a bit, but no biggie.

And here is one all installed. I looked into the rivets, but I did not like the idea of trying to punch more holes in the top and trying to align and smash the rivets. So, I smeared E6000 all over the bars and slid them up into place. If it does not work, oh well. Still have the rivet option!

And here is the result. I still need to trim up the rubber and the excess top, but it is on. I was kinda concerned about those side wrinkles, but then I took a look at all the 850s that have sold on bringatrailer, and they all have them as well.

Oh, and the cables are installed as well. Time to install the rest of the rubber molding!
Now, I have to cut into the top, but before we do that, let us examine the original. Looks like a slit was cut in the top about two inches from the bottom, and a one inch long gap. Time to start cutting!
I will spare you the details of how to cut with a knife, but here we are on a test fit.looks like it is going to work just fine! On this side, the top rides up just a bit, but no biggie.
And here is one all installed. I looked into the rivets, but I did not like the idea of trying to punch more holes in the top and trying to align and smash the rivets. So, I smeared E6000 all over the bars and slid them up into place. If it does not work, oh well. Still have the rivet option!
And here is the result. I still need to trim up the rubber and the excess top, but it is on. I was kinda concerned about those side wrinkles, but then I took a look at all the 850s that have sold on bringatrailer, and they all have them as well.
Oh, and the cables are installed as well. Time to install the rest of the rubber molding!
Daniel Gibson
True Classic
Seal time! Guess it might work better if I take off the trim plate.

I have it installed, but I do not like the trim plates. I am having an issue where the new rubber pieces are riding higher than the originals, and the trim plates are actually running into the door panel, and the door does not close properly. I will just take them off and set them aside...they are not really doing anything.

I also installed the window seals. Oh, and the top side brackets appear to be nice and snug with the glue.

Sooo...at this point I think I am just about done. There is not much more I can show you about this car, except maybe the dash repairs. My gut tells me that nobody wants posts of me fiddling with the carb and choke, or paint touch ups. Maybe a first ride post.
I surely do appreciate you all putting up with my amateur car fix up. Now you know what NOT to do!
I have it installed, but I do not like the trim plates. I am having an issue where the new rubber pieces are riding higher than the originals, and the trim plates are actually running into the door panel, and the door does not close properly. I will just take them off and set them aside...they are not really doing anything.
I also installed the window seals. Oh, and the top side brackets appear to be nice and snug with the glue.
Sooo...at this point I think I am just about done. There is not much more I can show you about this car, except maybe the dash repairs. My gut tells me that nobody wants posts of me fiddling with the carb and choke, or paint touch ups. Maybe a first ride post.
I surely do appreciate you all putting up with my amateur car fix up. Now you know what NOT to do!
Daniel Gibson
True Classic
kmead
Old enough to know better
Feel free to post up the dash fix, given your resourcefulness it will be good one to see.
I wouldn’t be too bothered to see more about getting it running, I might even be able to chime in with some useful advice. Might.
Nice job all around. Likely the most amazing job I have seen done in a remarkably short time, nicely shared and presented.
Thank you for choosing to join us, that we all did such a fine job on our cars.
Last edited:
72Fiat850
Low Mileage
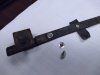
Very nice work. A little late to the party but for future reference I have attached a copy of the instructions that come with an AMCO top for one of these cars. The AMCO top has snaps already installed to attach to that rear bow. Most of the cheaper tops have those pieces glued on with contact cement, I like your solution. Curious to know what brand top that is. Many of the replacements do not have that flap that covers the gap at the top of the windshield header that yours does. Note the last instruction on the list that the bracket on the side of the frame has two adjustment screws you can use to get rid of some or all of those wrinkles.
I have also attached a picture of where my wire goes, The hole was already in the side flap of my top,, I use old bicycle shifter cables for that wire. They are stainless steel and already have an end made onto them. Sorry I couldn't get a better picture, kind of cold out here and my top has been folded and didn't want to unfold it when it is so stiff.
Last picture is of the compression rivets I finally received to replace one of my side brackets; one is installed in a bracket and the other is still in the two pieces as they come. They look very close to what I now have installed and what you seem to have had on your previous top. If I remember correctly, I installed this top in the early 80's so it has been a while, I slid a piece of metal in the pocket behind the bracket and hit them with a hammer to compress them. If you want some let me know and we can figure out how to get them to you.
Attachments
Daniel Gibson
True Classic
Thank you! This is good stuff.Very nice work. A little late to the party but for future reference I have attached a copy of the instructions that come with an AMCO top for one of these cars. The AMCO top has snaps already installed to attach to that rear bow. Most of the cheaper tops have those pieces glued on with contact cement, I like your solution. Curious to know what brand top that is. Many of the replacements do not have that flap that covers the gap at the top of the windshield header that yours does. Note the last instruction on the list that the bracket on the side of the frame has two adjustment screws you can use to get rid of some or all of those wrinkles.
I have also attached a picture of where my wire goes, The hole was already in the side flap of my top,, I use old bicycle shifter cables for that wire. They are stainless steel and already have an end made onto them. Sorry I couldn't get a better picture, kind of cold out here and my top has been folded and didn't want to unfold it when it is so stiff.
Last picture is of the compression rivets I finally received to replace one of my side brackets; one is installed in a bracket and the other is still in the two pieces as they come. They look very close to what I now have installed and what you seem to have had on your previous top. If I remember correctly, I installed this top in the early 80's so it has been a while, I slid a piece of metal in the pocket behind the bracket and hit them with a hammer to compress them. If you want some let me know and we can figure out how to get them to you.
Daniel Gibson
True Classic
Well, if you all want me to keep on posting, so be it!
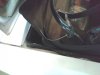
Decided it was time to get it running correctly today, so I started in on the carb. Got the choke working so it would start, and it was running way to fast! Got it warmed up enough to disengage the choke, and the car would not idle. Hey, how tough can it be to adjust the carb? Manual says adjust screws a and b. Well, there is screw a, but where is screw b? Oh, it is broken off! Crap! Anyone have a spare carb or this part off the carb I can purchase?
Here is my carb, and a close up of the broken part.


And here is what it looks like unbroken. Help!

Decided it was time to get it running correctly today, so I started in on the carb. Got the choke working so it would start, and it was running way to fast! Got it warmed up enough to disengage the choke, and the car would not idle. Hey, how tough can it be to adjust the carb? Manual says adjust screws a and b. Well, there is screw a, but where is screw b? Oh, it is broken off! Crap! Anyone have a spare carb or this part off the carb I can purchase?
Here is my carb, and a close up of the broken part.
And here is what it looks like unbroken. Help!