drkane
Longtime Owner
For those of you who do not know me, my name is Damon Royal Kane and I have been an X1/9 enthusiast since 1988 when I purchased my first 1982 Fiat X1/9. I did not know the cars as well as I did a few years later so I made a mistake when purchasing the car, it had some collision damage that was poorly repaired. I was a young architect at that time with not much money so I struck a deal with a local body shop to design a new facility for him in exchange for repairing and repainting the car. I had the car painted with a two tone low line scheme with the idea that it would break up the panels and reduce the amount of repainting that would be required given my expectation for future rust. The car came out beautifully and I have been enjoying it ever since then. I have had to deal with rust as a result of the collision damage but it has been manageable.
Back in 2002 I thought it would be nice to capture a nice X (straight and not too rusty) for a future retirement restoration project. I had been accumulating X1/9 parts for a few years and felt the best way to utilize this stash was to eventually restore a car. A good friend, Jon Padden from New Jersey sent me an email alerting me to a car that was for sale. I followed up and drove to NJ to look at the car. It was a two tone (highline) 1986 model with AC, and an original red over grey paint job and a burgundy interior. The owner had intentions of making it look like a 74 with the small bumpers and a beige and black interior. To this end the owner had cut the four sockets for the bumper shocks off the car. I looked at it and it had doors from his 79 mounted on it. And as best I could see the car did not have much rust. That was the magic opportunity for me so I agreed to buy the car and all the parts he had assembled from his old 79 and for this car.
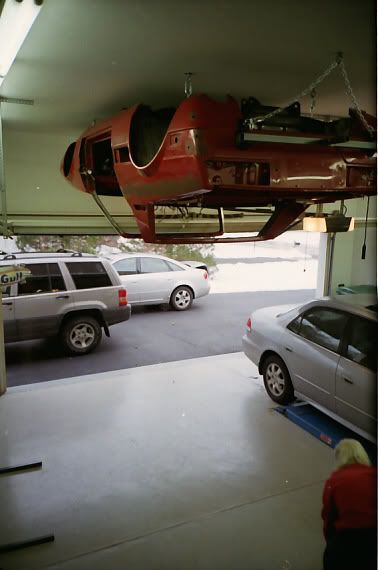
I had prepared for the car by taking advantage of the load capacity I had designed into my garage ceiling by flipping the stripped body (only hydraulic lines, speedo cable and wiring harness remained) and hanging it from the ceiling. I also prepared by securing the capacity to powder coat smaller items that could fit in a standard oven and a capacity to zinc plate smaller items. Also in 2002 I took advantage of relationships I had with Bertone and secured parts that they still had in stock that I thought I would need. Since we were traveling to Italy, this was smaller items that could be transported easily,
Nine years passed with the start of a new business with my trusted former partner and a tiny bit of travel. In March of 2011 I started to notice some symptoms that eventually I thought may be ALS. When my speech started to get slurred I went to a neurologist and eventually the diagnosis came back that I would have 2 to 5 years to live with ALS.
When I bought the car in 2002 I was thinking it would be a retirement project. Well life does not go the way we always want it to and with my illness I had to decide if the car would remain in parts or if I should tackle the task of restoration. I figured in retirement I would mostly work alone. With my disease I figured I would need help as the disease destroys (in my case) the fine motor skills in my hands. That meant it was getting more and more difficult for even simple things like starting a bolt in the threads. That concerned me a bit as I was not sure how that would work. I knew my various friends had busy lives and I was concerned that I would get stopped at a critical point when I needed help.
Well in the end I would say it worked out fantastic. I managed to get a lot done by myself but when I ran into a big task, I would send out a help message and sure enough someone would show up. The other part that makes this project so fantastic was plain and simple…I had a lot of fun working with all of my friends. Some friends were clueless about X1/9’s others were even clueless about cars, but everyone helped in very critical way. Every moment, even when I got tired and frustrated, was really a joy for me. This is something that probably would not have happened if I were well.
So the people who helped me are the following:
1. Lou Teresi, X web member, Flu Member and long time friend
2. Daniel Forest, X web member, Flu Member and long time friend….from Canada!
3. Mike DeWane, a Miata friend and car guru. Always at my beck and call.
4. Kevin Stein, the wonderful body shop guru who prepared and painted the car.
5. John Hunt, a Miata friend who had restored MG’s in the past. Full of fantastic ideas.
6. Lee Niner, a Miata friend who is not much into car work but was a great help.
7. John Padden, who helped me find the car originally, a long time friend and great X1/9 resource.
8. Kevin Griffith, a Flu member who is not into X1/9s but was a great help.
9. Ken Croswell, a Miata friend who loved to help with the finish work.
10. Shaun Folkerts, a Flu member who has a fantastic collection of cars, and helped transport the car to and from the body shop for painting.
11. Gene Gagliano, a Miata friend with an eye for sports cars.
12. David Schwartz, not a car guy, a former co-worker and former engineer, who brought that engineering thinking to some fussy tough tasks.
13. Joe Morris, my neighbor, not a car guy but when in desperate need of help, he was there.
14. Jeff Riley, a contact from my work as an architect, a true car guy with a powerful Corvette.
15. Bill Andersen, a contact from my work, another true car guy with a classic Camaro.
The Commercial Places that were valuable to me were
1. Advance Auto Parts in Lansdale, belts, fluids and other parts. Really great guys.
2. Hamilton Machine Shop in West Point PA. He fabricated parts for me.
3. Bonehead Performance, they beautifully powered coated the bumpers for me.
4. Ambler Auto Upholstery, they rebuilt my seats beautifully.
5. GT Radiator Repairs, also in Ambler, they cleaned and tested and painted the radiator and heater core.
What a wonderful group of friends. The job would not have gotten done without the wonderful companionship and assistance all provided.
The first part of the job was to get the car down from the supports on the ceiling. I had built a rotisserie based on dimensions of a similar unit I saw in a Scottish X1/9 friend’s garage years ago. I took a class at a local tech school to learn to weld and that was very useful in working with the car. So I brought the car down and mounted it onto the rotisserie. The car only had maybe 5 or 6 rust holes. So my first task was to repair these. I still had some function in my hands so I was able to fabricate parts, cut parts off of salvaged parts, and weld them into place. The one challenge I had was a damaged jacking bracket on the underside of the car. It had been bolted into place after being torn off. I had purchased new bracket years ago, but discovered that Bertone had changed the floor configuration in the later cars and the bracket did not work. Lou Teresi came to the rescue with a section of floor from a wrecked car that had the bracket in place. I trimmed the part and used a plasma cutter to cut the hole for the new part and welded it in place.
When the various repair jobs were done, I wanted to get the car off to Kevin Stein to prep the body and paint the engine compartment, trunks, door edges and door jambs. The idea was to not have the car fully painted and risk damaging the paint with the reassembly work. Since the car did not have any suspension on it, I needed to build a dolly to move the car around. Fortunately there were 4 points on the body that the factory used and I took advantage of that. I purchased four 12 inch pneumatic casters and got busy with the welder to make a frame. It worked great, and the car was towed on a flatbed to the shop of Kevin Stein. I was worried about the ratchets securing the car onto the flatbed, I thought the tires might blow out. They did not and Kevin was very appreciative of the flexibility the dolly provided him in his shop.
While he was working on the body, I started to get busy with preparing parts to go back on the car. For no particular reason I started with the wheels. Affectionately called “Tron” wheels in the X1/9 community, these were original to the car and I wanted to bring them back to life. I started by bead blasting the wheels and correcting the minor damage to the wheels with files and fillers. I wanted to powder coat the wheels, but they have plastic covers that are the same color as the wheels, so I had to paint them. I went to the auto parts store and took one of the covers with me and found a very close color match. I got busy with the spray cans and clear acrylic coating. As it turned out the wheels got done first, but the covers were the last thing I painted.
I had also purchased years before a zinc plating kit. I started with nuts and bolts and plated them with the kit, giving the parts the chromate look with an acid bath at the end of the process. The kit worked great and I would do small batches of bits as I dealt with a particular part. The smallest parts were nuts and bolts, the largest part (that I could still fit in the tank) was the air duct for the fuel injectors that fits between the intake runners. It took a great deal of time but it turned out great. All the parts that were plated I coated with a satin clear acrylic coating for bare metal. This was cheap insurance to keep the parts looking good as long as possible.
I also started on the suspension parts. The struts were new by the previous owner, so I focused attention on the various control arms and prepared and painted them with POR-15.
The car only had 40,000 miles on it, so I did not see a strong need to rebuild the engine. I did undertake extensive work to clean up the intake plenum, the cam box and other visible parts in the engine bay. Glass bead blasting worked very well with the aluminum parts, and all were clear coated same as the plated bits. I wanted to check the clearances on the cam shaft buckets. It was then that I discovered that the previous owner had fitted an aftermarket camshaft. I could not get any of my cam tools to work with this cam, so I decided to remove the cam box and replace the camshaft. One problem with X1/9’s is the paper gasket that goes between the head and the cam box is fragile and often breaks and lets oil leak out. I found that gasket maker works very well, so that was another motivation to remove the cam box. In the end I used a European cam that was given to me by a Scottish friend years before. I did not have the time to rebuild the fuel injection rails, so I left these off. This is easy to get to when the engine is installed. I sent the injectors off to a California company to be cleaned. I did not think they would be in bad shape, but I was surprised at the before and after testing results.
I prepared the brake/Clutch master assembly by fully disassembling it, powder coating the pedals. Both master cylinders were bad so I had expected to replace them. I cleaned up the bracket and repainted it, lubed all the pivot points and reassembled it. Attached the new masters and went on line to find fabric covered brake lines similar to the ordinals. The only source I could find (at a friend’s recommendation) was a company that marketed parts for Ferraris. Ouch, were they expensive.
The car came back from the shop and was fully primed and all the interior parts were painted. It looked great. All the patches that I had made were filled and smoothed over. Now it was time to put the car back together. The majority of the tasks I had a friend to help. I started with the engine bay insulation, using bulk material and having to cut it into shape and apply it with spray adhesive. Then we installed the rear window. That would be difficult to reinstall later. Then a few days later, we installed the brake pedal assembly. Then it was onto steering rack, and then the engine went in. For the X1/9 this is a matter of dropping the body onto the engine. I had planned for this in the garage by designing in two lift points. That made the job very straight forward. Just a bit of tilting the engine on the floor jack and the engine popped into place. Then in went the suspension and brakes and new rotors on all four corners. The brake calipers were all rebuilt with new boots and seals. We managed to get the rear control arms reversed from side to side. We laughed at the mix up as there was no way the wheels would fit and corrected it easily.
I had to fabricate and install more insulation for the fuel taken compartment. Fortunately I had old pieces to give me an idea of where the insulation went. Then the Fuel tank went in. I used one fuel tank from my stock as the original was coated on the inside but the filler neck was rusty. It was so nice when I needed parts to be able to go to the basement and find most of what I needed. I was able to install the fuel injection components with new rail, cleaned injectors and new seals and hoses. It went in beautifully. I think the injectors were so dirty as a result of fuel sitting in them for 9 years. I tried to run the fuel system dry, but I suspect I left some fuel in each injector.
Around this time my good friend Daniel came to spend a week with me working on the car. We planned a party to celebrate his visit and also celebrate the 40th anniversary of the introduction of the X1/9. It was fun and I set the goal to get the engine started. We spend the week together preparing to start the engine. That included setting the timing belt (it was wrong when I put it on the first time, who knows why), installing a battery, and then we tried to start it…no luck. So we checked the ignition, it was OK. Then we tried to see if the Fuel Pump was working…no it was not, replaced that. Then we tried moving the flap in the air flow sensor to start the fuel pump, that did not work. Swapped out the double relay and tried again….and the engine started! Wow was that a major accomplishment. The last day of his visit, I took the Bertone around the block for the first time in nearly 10 years and it ran great. We also put in the heater fan box.
So it was full bore onto to fitting the glass, the interior components and getting ready for exterior paint. Lou Teresi and John Padden came and helped install the windshield. That went in well, and it was a new piece of glass I had bought many years before. Unfortunately later after the car was done I managed to put a minor scratch into the windshield, god knows how I managed to do that! Work moved on to the interior, I had the seats recovered in new old stock covers, the carpet I dyed with spray on dye to deal with fading. The dash went in with no issues. We assembled the instrument cluster and heater controls. My good friend Dave Schwartz came by to help me assemble the glove box. Strange issue arose that the anchor points for the lids did not align with the hinges on the cover. That is where the machine shop came in handy, I had a small boss made to extend the hinge and it worked great.
FI then fitted the components to the front and rear trunks and the windshield wiper assembly. I went into my stash to find the best engine cover. All were in various states of rust. I took the best one and cleaned it up in preparation for painting by the body shop. I also drilled all the holes for the side trim. I used templates and hoped all were correct. Then the car went off to the paint shop. I cleaned up the various exterior pieces that mount to the body. One great item is plastic friendly spray paint. That helped me clean up all the exterior parts, the only issue that I discovered was gasoline will dissolve the paint. So do not use it on the gas filler trim.
The car came back and I was stunned at how good the car looked. Over the next couple of weeks all the exterior trim went on. The non-original side trim fit perfectly. The bumpers went on, the lights went on the trim went on Jeff Riley helped with the trim. It was coming together and looking better every day.
When it all came together, I invited all of my friends to join me in an inaugural run with the car. Many who helped could join us and we used a new route that we were planning for the Miata club. The car ran great.
What a wonderful experience it was working with friends and seeing the car come back to life. I had the car photographed by a semi-pro named Phuong Tao, and his photos are included. What a wonderful time I enjoyed while I still could with friends.


Back in 2002 I thought it would be nice to capture a nice X (straight and not too rusty) for a future retirement restoration project. I had been accumulating X1/9 parts for a few years and felt the best way to utilize this stash was to eventually restore a car. A good friend, Jon Padden from New Jersey sent me an email alerting me to a car that was for sale. I followed up and drove to NJ to look at the car. It was a two tone (highline) 1986 model with AC, and an original red over grey paint job and a burgundy interior. The owner had intentions of making it look like a 74 with the small bumpers and a beige and black interior. To this end the owner had cut the four sockets for the bumper shocks off the car. I looked at it and it had doors from his 79 mounted on it. And as best I could see the car did not have much rust. That was the magic opportunity for me so I agreed to buy the car and all the parts he had assembled from his old 79 and for this car.
I had prepared for the car by taking advantage of the load capacity I had designed into my garage ceiling by flipping the stripped body (only hydraulic lines, speedo cable and wiring harness remained) and hanging it from the ceiling. I also prepared by securing the capacity to powder coat smaller items that could fit in a standard oven and a capacity to zinc plate smaller items. Also in 2002 I took advantage of relationships I had with Bertone and secured parts that they still had in stock that I thought I would need. Since we were traveling to Italy, this was smaller items that could be transported easily,
Nine years passed with the start of a new business with my trusted former partner and a tiny bit of travel. In March of 2011 I started to notice some symptoms that eventually I thought may be ALS. When my speech started to get slurred I went to a neurologist and eventually the diagnosis came back that I would have 2 to 5 years to live with ALS.
When I bought the car in 2002 I was thinking it would be a retirement project. Well life does not go the way we always want it to and with my illness I had to decide if the car would remain in parts or if I should tackle the task of restoration. I figured in retirement I would mostly work alone. With my disease I figured I would need help as the disease destroys (in my case) the fine motor skills in my hands. That meant it was getting more and more difficult for even simple things like starting a bolt in the threads. That concerned me a bit as I was not sure how that would work. I knew my various friends had busy lives and I was concerned that I would get stopped at a critical point when I needed help.
Well in the end I would say it worked out fantastic. I managed to get a lot done by myself but when I ran into a big task, I would send out a help message and sure enough someone would show up. The other part that makes this project so fantastic was plain and simple…I had a lot of fun working with all of my friends. Some friends were clueless about X1/9’s others were even clueless about cars, but everyone helped in very critical way. Every moment, even when I got tired and frustrated, was really a joy for me. This is something that probably would not have happened if I were well.
So the people who helped me are the following:
1. Lou Teresi, X web member, Flu Member and long time friend
2. Daniel Forest, X web member, Flu Member and long time friend….from Canada!
3. Mike DeWane, a Miata friend and car guru. Always at my beck and call.
4. Kevin Stein, the wonderful body shop guru who prepared and painted the car.
5. John Hunt, a Miata friend who had restored MG’s in the past. Full of fantastic ideas.
6. Lee Niner, a Miata friend who is not much into car work but was a great help.
7. John Padden, who helped me find the car originally, a long time friend and great X1/9 resource.
8. Kevin Griffith, a Flu member who is not into X1/9s but was a great help.
9. Ken Croswell, a Miata friend who loved to help with the finish work.
10. Shaun Folkerts, a Flu member who has a fantastic collection of cars, and helped transport the car to and from the body shop for painting.
11. Gene Gagliano, a Miata friend with an eye for sports cars.
12. David Schwartz, not a car guy, a former co-worker and former engineer, who brought that engineering thinking to some fussy tough tasks.
13. Joe Morris, my neighbor, not a car guy but when in desperate need of help, he was there.
14. Jeff Riley, a contact from my work as an architect, a true car guy with a powerful Corvette.
15. Bill Andersen, a contact from my work, another true car guy with a classic Camaro.
The Commercial Places that were valuable to me were
1. Advance Auto Parts in Lansdale, belts, fluids and other parts. Really great guys.
2. Hamilton Machine Shop in West Point PA. He fabricated parts for me.
3. Bonehead Performance, they beautifully powered coated the bumpers for me.
4. Ambler Auto Upholstery, they rebuilt my seats beautifully.
5. GT Radiator Repairs, also in Ambler, they cleaned and tested and painted the radiator and heater core.
What a wonderful group of friends. The job would not have gotten done without the wonderful companionship and assistance all provided.
The first part of the job was to get the car down from the supports on the ceiling. I had built a rotisserie based on dimensions of a similar unit I saw in a Scottish X1/9 friend’s garage years ago. I took a class at a local tech school to learn to weld and that was very useful in working with the car. So I brought the car down and mounted it onto the rotisserie. The car only had maybe 5 or 6 rust holes. So my first task was to repair these. I still had some function in my hands so I was able to fabricate parts, cut parts off of salvaged parts, and weld them into place. The one challenge I had was a damaged jacking bracket on the underside of the car. It had been bolted into place after being torn off. I had purchased new bracket years ago, but discovered that Bertone had changed the floor configuration in the later cars and the bracket did not work. Lou Teresi came to the rescue with a section of floor from a wrecked car that had the bracket in place. I trimmed the part and used a plasma cutter to cut the hole for the new part and welded it in place.
When the various repair jobs were done, I wanted to get the car off to Kevin Stein to prep the body and paint the engine compartment, trunks, door edges and door jambs. The idea was to not have the car fully painted and risk damaging the paint with the reassembly work. Since the car did not have any suspension on it, I needed to build a dolly to move the car around. Fortunately there were 4 points on the body that the factory used and I took advantage of that. I purchased four 12 inch pneumatic casters and got busy with the welder to make a frame. It worked great, and the car was towed on a flatbed to the shop of Kevin Stein. I was worried about the ratchets securing the car onto the flatbed, I thought the tires might blow out. They did not and Kevin was very appreciative of the flexibility the dolly provided him in his shop.
While he was working on the body, I started to get busy with preparing parts to go back on the car. For no particular reason I started with the wheels. Affectionately called “Tron” wheels in the X1/9 community, these were original to the car and I wanted to bring them back to life. I started by bead blasting the wheels and correcting the minor damage to the wheels with files and fillers. I wanted to powder coat the wheels, but they have plastic covers that are the same color as the wheels, so I had to paint them. I went to the auto parts store and took one of the covers with me and found a very close color match. I got busy with the spray cans and clear acrylic coating. As it turned out the wheels got done first, but the covers were the last thing I painted.
I had also purchased years before a zinc plating kit. I started with nuts and bolts and plated them with the kit, giving the parts the chromate look with an acid bath at the end of the process. The kit worked great and I would do small batches of bits as I dealt with a particular part. The smallest parts were nuts and bolts, the largest part (that I could still fit in the tank) was the air duct for the fuel injectors that fits between the intake runners. It took a great deal of time but it turned out great. All the parts that were plated I coated with a satin clear acrylic coating for bare metal. This was cheap insurance to keep the parts looking good as long as possible.
I also started on the suspension parts. The struts were new by the previous owner, so I focused attention on the various control arms and prepared and painted them with POR-15.
The car only had 40,000 miles on it, so I did not see a strong need to rebuild the engine. I did undertake extensive work to clean up the intake plenum, the cam box and other visible parts in the engine bay. Glass bead blasting worked very well with the aluminum parts, and all were clear coated same as the plated bits. I wanted to check the clearances on the cam shaft buckets. It was then that I discovered that the previous owner had fitted an aftermarket camshaft. I could not get any of my cam tools to work with this cam, so I decided to remove the cam box and replace the camshaft. One problem with X1/9’s is the paper gasket that goes between the head and the cam box is fragile and often breaks and lets oil leak out. I found that gasket maker works very well, so that was another motivation to remove the cam box. In the end I used a European cam that was given to me by a Scottish friend years before. I did not have the time to rebuild the fuel injection rails, so I left these off. This is easy to get to when the engine is installed. I sent the injectors off to a California company to be cleaned. I did not think they would be in bad shape, but I was surprised at the before and after testing results.
I prepared the brake/Clutch master assembly by fully disassembling it, powder coating the pedals. Both master cylinders were bad so I had expected to replace them. I cleaned up the bracket and repainted it, lubed all the pivot points and reassembled it. Attached the new masters and went on line to find fabric covered brake lines similar to the ordinals. The only source I could find (at a friend’s recommendation) was a company that marketed parts for Ferraris. Ouch, were they expensive.
The car came back from the shop and was fully primed and all the interior parts were painted. It looked great. All the patches that I had made were filled and smoothed over. Now it was time to put the car back together. The majority of the tasks I had a friend to help. I started with the engine bay insulation, using bulk material and having to cut it into shape and apply it with spray adhesive. Then we installed the rear window. That would be difficult to reinstall later. Then a few days later, we installed the brake pedal assembly. Then it was onto steering rack, and then the engine went in. For the X1/9 this is a matter of dropping the body onto the engine. I had planned for this in the garage by designing in two lift points. That made the job very straight forward. Just a bit of tilting the engine on the floor jack and the engine popped into place. Then in went the suspension and brakes and new rotors on all four corners. The brake calipers were all rebuilt with new boots and seals. We managed to get the rear control arms reversed from side to side. We laughed at the mix up as there was no way the wheels would fit and corrected it easily.
I had to fabricate and install more insulation for the fuel taken compartment. Fortunately I had old pieces to give me an idea of where the insulation went. Then the Fuel tank went in. I used one fuel tank from my stock as the original was coated on the inside but the filler neck was rusty. It was so nice when I needed parts to be able to go to the basement and find most of what I needed. I was able to install the fuel injection components with new rail, cleaned injectors and new seals and hoses. It went in beautifully. I think the injectors were so dirty as a result of fuel sitting in them for 9 years. I tried to run the fuel system dry, but I suspect I left some fuel in each injector.
Around this time my good friend Daniel came to spend a week with me working on the car. We planned a party to celebrate his visit and also celebrate the 40th anniversary of the introduction of the X1/9. It was fun and I set the goal to get the engine started. We spend the week together preparing to start the engine. That included setting the timing belt (it was wrong when I put it on the first time, who knows why), installing a battery, and then we tried to start it…no luck. So we checked the ignition, it was OK. Then we tried to see if the Fuel Pump was working…no it was not, replaced that. Then we tried moving the flap in the air flow sensor to start the fuel pump, that did not work. Swapped out the double relay and tried again….and the engine started! Wow was that a major accomplishment. The last day of his visit, I took the Bertone around the block for the first time in nearly 10 years and it ran great. We also put in the heater fan box.
So it was full bore onto to fitting the glass, the interior components and getting ready for exterior paint. Lou Teresi and John Padden came and helped install the windshield. That went in well, and it was a new piece of glass I had bought many years before. Unfortunately later after the car was done I managed to put a minor scratch into the windshield, god knows how I managed to do that! Work moved on to the interior, I had the seats recovered in new old stock covers, the carpet I dyed with spray on dye to deal with fading. The dash went in with no issues. We assembled the instrument cluster and heater controls. My good friend Dave Schwartz came by to help me assemble the glove box. Strange issue arose that the anchor points for the lids did not align with the hinges on the cover. That is where the machine shop came in handy, I had a small boss made to extend the hinge and it worked great.
FI then fitted the components to the front and rear trunks and the windshield wiper assembly. I went into my stash to find the best engine cover. All were in various states of rust. I took the best one and cleaned it up in preparation for painting by the body shop. I also drilled all the holes for the side trim. I used templates and hoped all were correct. Then the car went off to the paint shop. I cleaned up the various exterior pieces that mount to the body. One great item is plastic friendly spray paint. That helped me clean up all the exterior parts, the only issue that I discovered was gasoline will dissolve the paint. So do not use it on the gas filler trim.
The car came back and I was stunned at how good the car looked. Over the next couple of weeks all the exterior trim went on. The non-original side trim fit perfectly. The bumpers went on, the lights went on the trim went on Jeff Riley helped with the trim. It was coming together and looking better every day.
When it all came together, I invited all of my friends to join me in an inaugural run with the car. Many who helped could join us and we used a new route that we were planning for the Miata club. The car ran great.
What a wonderful experience it was working with friends and seeing the car come back to life. I had the car photographed by a semi-pro named Phuong Tao, and his photos are included. What a wonderful time I enjoyed while I still could with friends.
Last edited:
")