Upgrade for Clock? This could be great!

Hi Hussein,

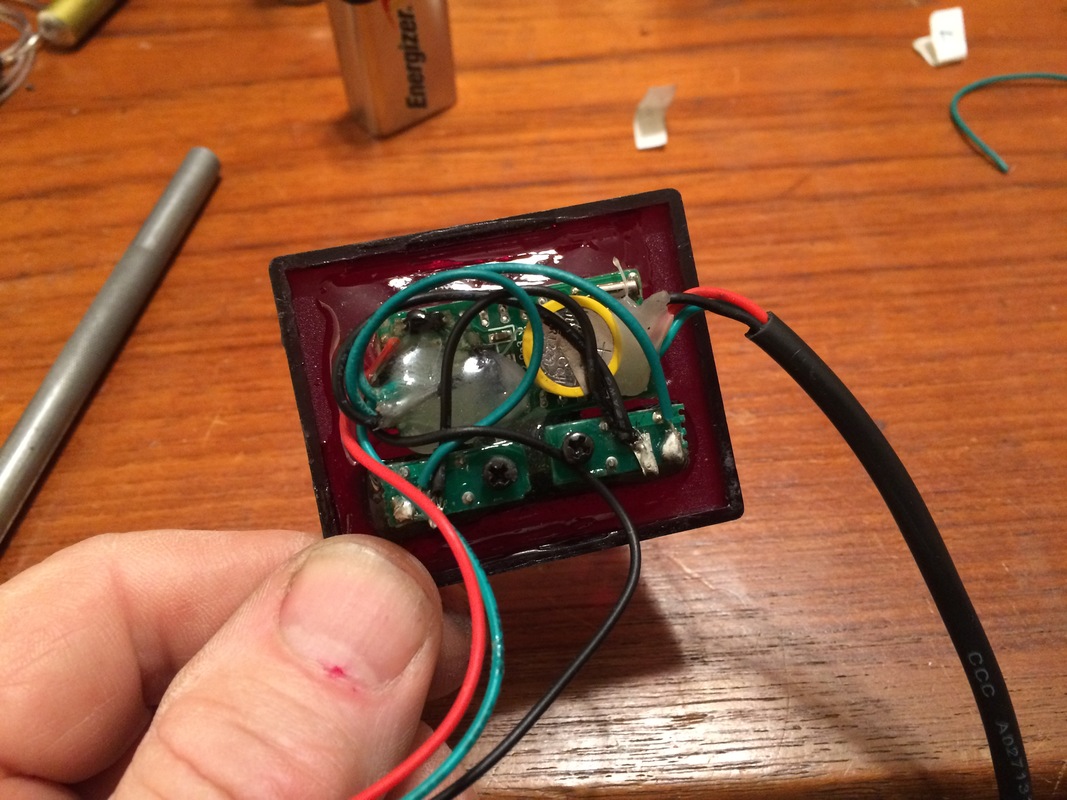
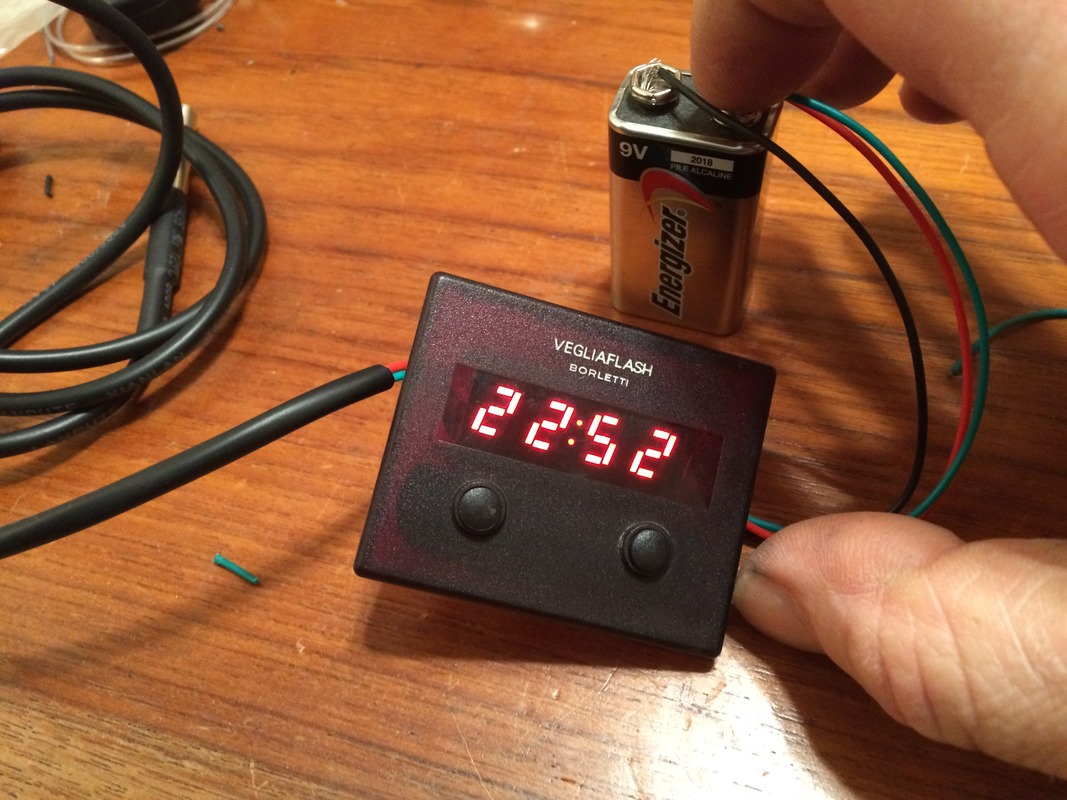
3 AAA 1.5 batteries is not enough to keep on the clock, after 8 hrs start to blinking so I use now on the test bench 9 volts battery.

I start with one 3Volts RS232 battery follow Bob Brown's project, but this clock looks like needs more than 7 volts to running good. (my target is AVOID TO CONNECT TO CAR BATTERY!!)

REGARDS.

Ricardo.

These are the directions they emailed me:

Screen%20Shot%202015-05-02%20at%2011.24.20%20PM_zpsosdoiu2d.png


Screen%20Shot%202015-05-02%20at%2011.23.58%20PM_zpslxzxohqv.png
 
Hey Ricky... why not use the car's 12v source with a...

voltage dropping resister for the 7 or 9 or 10 volts you want.

What was/is the correct operating voltage for this clock display anyway?

A lot of work there Ricky and well done...

I have never really had any problem with my car's battery because of this clock. The old one in my '69 Vette will kill the battery within a week! HA! There are also a few clocks out there for not much money and for six bucks, a trickle-charger from You-know-where can be easily hard-wired to the alternator and simply plugged into the wall when you go to store it for a while. I haven't done that yet myself as mine is on a lift and I just use the clamps... but I plan to... just makes it that much easier
 
I start with one 3Volts RS232 battery follow Bob Brown's project, but this clock looks like needs more than 7 volts to running good. (my target is AVOID TO CONNECT TO CAR BATTERY!!)
The LED display on that module will draw enough current that running the clock off a 9V battery will not be practical. Looking at your photos, and checking with the eBay listing, the module has a battery to keep the clock alive when it is not otherwise powered. You could connect the module to ignition switched power from the car. With the ignition off, the display would be off and you would draw no current from the car battery. With the ignition on, the display would turn on as well.
 
Ricardo, not sure what you mean

If you ordered the clock with the built-in (3V) battery, this will keep the clock timer alive for 2 to 3 years.
You will only draw power from the car when the ignition is turned on, and the amount of power to light up the display is almost negligible. (like 25Ma). When the car is off, this clock will draw zero current. (which is what you want.)
 
Bad English...

If you ordered the clock with the built-in (3V) battery, this will keep the clock timer alive for 2 to 3 years.
You will only draw power from the car when the ignition is turned on, and the amount of power to light up the display is almost negligible. (like 25Ma). When the car is off, this clock will draw zero current. (which is what you want.)

Hi Bob,

Since the beginning I thought you'll use a 3 volt battery to keep the clock "ON" all the time, and the battery incorporated to the clock just to keep the memory, following your instructions and the battery holder adapter to install inside the wallet box. I guess my bad English make me follow this direction but after all test I found the real point on this project.

Many thanks for sharing your project, you paved the way on the right direction.

Regards

Ricardo.
 
finally done...

Hi Bob,

Since the beginning I thought you'll use a 3 volt battery to keep the clock "ON" all the time, and the battery incorporated to the clock just to keep the memory, following your instructions and the battery holder adapter to install inside the wallet box. I guess my bad English make me follow this direction but after all test I found the real point on this project.

Many thanks for sharing your project, you paved the way on the right direction.

Regards

Ricardo.

After my little mistake on the last part on this project (power source) I made the correct wire connector.
I use from some original wiring the spade connector and original socket housing from the clock.
marking the colors wiring and remove the spade connectors, and install the new wire, (in this case black on the new wire will be gray following original pattern) testing with a 12 volts battery and ready to install.
Sorry, I understood wrong, hope this little mistake don't confuse to anybody.


11188498_981790148511437_325114651455150755_n.jpg


11000427_981790155178103_8113861408101147018_o.jpg


11181884_981790151844770_4071104954797349600_o.jpg


11182762_980616901962095_4136241355818479918_o.jpg


11212780_981790185178100_3906790584241250622_n.jpg


thanks for watching
 
Last edited:
clock

wait......WHAT????
no clock I have ever seen in a U.S. fiat ever had a temp sensing embellishing option.
was that cabin temp, or outside temp??
clue me in.
first temp sensor was in late 1994 in American cars.
I think that as much as fiat was on the cutting edge of most things that a spirited driver would want, who is going to look at the clock and tell his passenger.... oh look lovey.."it's a brisk 72 outside"
really??
mikemo
.....papa?:worship:
 
Nice work.

What is the proper name for the 2 pole connector for the clock? I don't know the proper search term.
 
Well done Ricardo!

Now, if you take that small black battery box and mount it somewhere (like your glove box) and run the + and - leads to the small battery mounted onto the clock, you can replace the battery easily without having to dig the clock out of the dash each time.
Might also be a good idea to remove the battery on the clock board so that it does not drag down the battery in the battery box.

Then you will have exactly what I was talking about. :D

Finally got around to installing my digital clock/temp gauge in the Veglia housing.

It seems that the battery on the back is glued in place? Certainly not able to slide it out - the top tab seems to be bonded to the battery. Before I damage the board, I take it you have been able to remove the batteries on these without issue? The smaller clock/board appears to be the same in terms of the tab not being able to be lifted off the battery...

X19-0113.jpg


X19-0176.jpg
 
Last edited:
Had to come in from the cold I presume?

Congrats on another step along the way.

I was wondering if the clock battery could be a rechargeable and thus stay within the clock body. I know this might mean it would eventually lose time during an extended storage cycle but not having to worry about replacing the battery until my dotage would be nice
 
Had to come in from the cold I presume?

Congrats on another step along the way.

I was wondering if the clock battery could be a rechargeable and thus stay within the clock body.

Yes, too cold and wet outside :(

That would certainly explain the way it is attached, I did try prying the top tab upwards to release the battery, and it certainly seems permanent. The info from these sellers is spartan at best.
 
Got a reply from the vendor on eBay - the batteries are rechargeable. The listing says "battery available /2 years" so presumably they mean if not recharged, will last that long, otherwise the unit would also be useless after that interval, since the battery is not removeable...
 
Back
Top