making parts 3D printing

jvandyke

True Classic
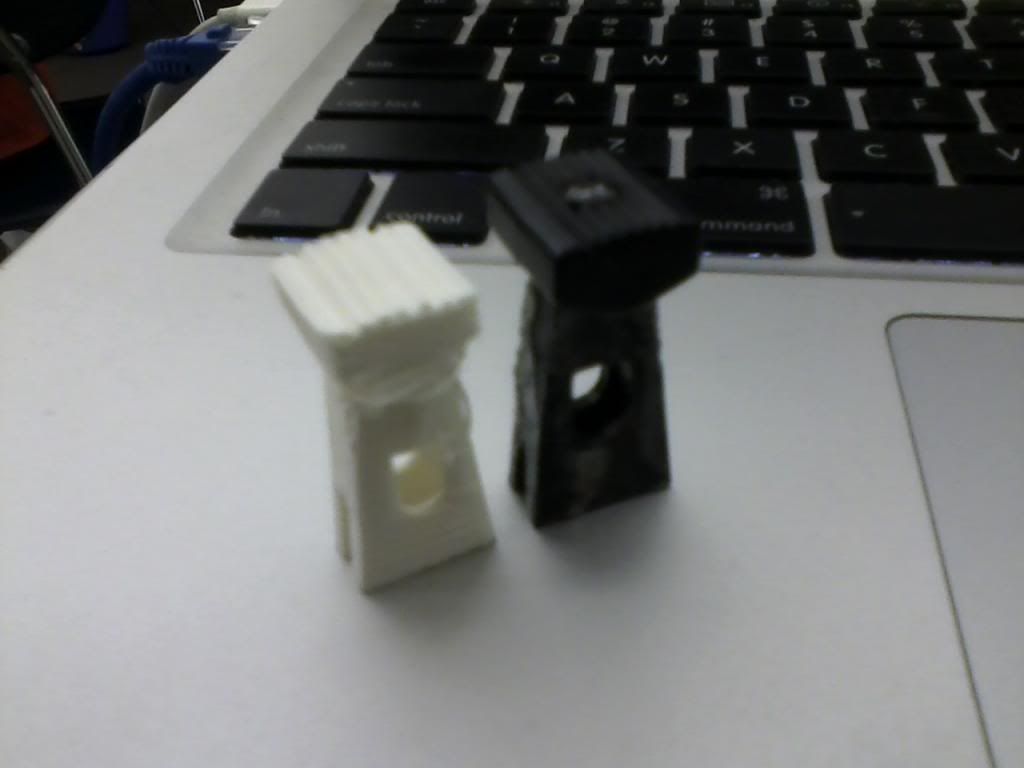
Going to try printing a heater knob.
Not much confidence as the part is small and detail is fine and I don't know what I'm doing. Used Sketchup to model the part. I've used sketch up a little and taught it to some of my elementary students but until you have a concrete goal, the motivation to dig deep wasn't there. I've learned a ton in a couple days tinkering. I thought a thread on it would be fun.
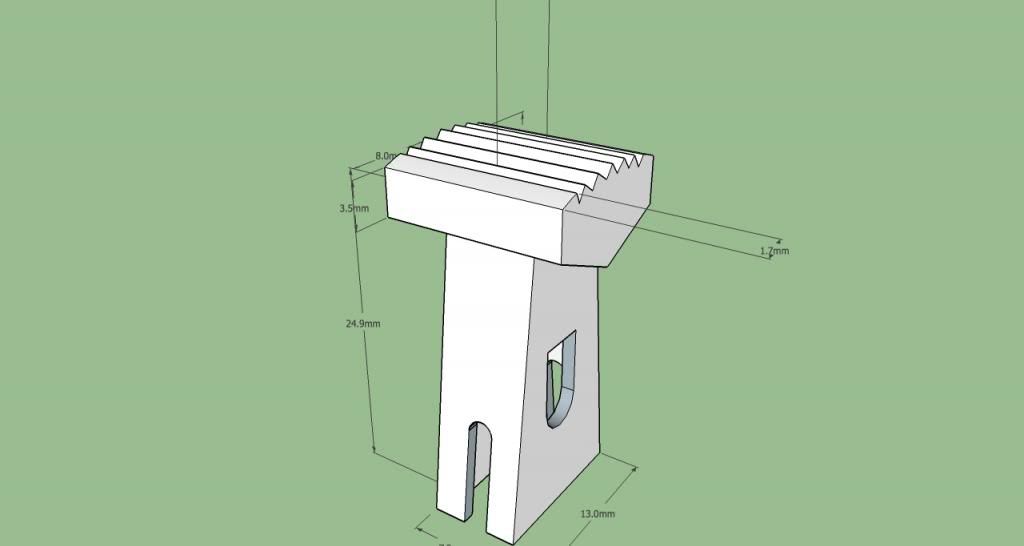
Here's the latest version. Accurate on "paper".
knob_zps5f019e9c.jpg
 
So you have the 3d & printer files for it?

Jeff if you can share the 3d and printer file models, I can try to get some help from the local Maker community about the best way to print it.

Assume you're using a makerbot? That's what we have.
 
yes have printer, making my own models, not Maker Bot but can export STL files so should transfer?
Going to try to print one up tomorrow.
Here's one with a recess for embedded LED, maybe printed in clear.
knobrecess_zps762296b0.jpg
 
Jeff if you can share the 3d and printer file models, I can try to get some help from the local Maker community about the best way to print it.

Assume you're using a makerbot? That's what we have.

Modeling in sketch up, Printer is a xyz DaVinci with it's own software. I convinced my school department to get one and I'll use it with kids but I have to test it out y'know? I'll gladly share the .stl file if that will do you any good. PM me or something to email to you or I can upload to my public dropbox or something. 'supos I could put in on thing verse. Should see if it's any good first though. We could get a collection of such things/files on and if you need a part, download and print! Molten metal printers might be a bit down the road yet though, no printing full cars anytime soon.
 
You should model things that are small at 10X scale in SU. By this I mean 1mm is modeled at 1cm and so on.

I often model at 100X to get fine details which SU doesn't like to make proper surfaces on.

Send me the model I would like to have a look at it.

Thanks

Karl
 
An early try was done "big" and scaled down. This one I just started on scale. The .stl file looks okay imported into my printer software, it's hollow as intended, my cute little cut out for the LED didn't survive but that's no big deal. I will email it to you Karl as long as you promise not to laugh at me. :eyepop:
 
first print; fail

did a print, came out pretty crappy! proportions are off, too short, bit too narrow and interior too big, doesn't grab the shaft like it should, going to rebuild with new measurements and try again, it had a really hard time printing the lower edge of the knob, where it goes down to a point, hard to print I'm sure, might just rework that edge into a flat or a bevel, should end up with a usable one in the end but not nearly as nice as injection molded of course, crappy cell phone picture
0523140916_zps1504bccc.jpg
 
#2 printing as I type! If nothing else I'll eventually make some that are good enough for me! Whether anyone else wants them, I don't know. I need to get some clear filament.

A few minutes later….
better one
increased height and width of knob, increased wall thickness, could go a tad thicker there yet so it "grabs" the shaft a bit tighter, it's supposed to have a tapered interior to match the tapered shaft, doesn't really come out that way but even so it slides on and controls the lever, pulls off a tad too easy but I filed down my shafts a bit since I kept breaking the OEM knobs. No doubt these will work. the overhang on the knob can't really be printed I guess, despite adding a bevel there. Could clean it up with a hot solder iron or trim off. Next step is to try some in black and clear.
So, yep, it's doable, if your not uber picky.
The awesome thing is you can tweak it and print another in minutes and will eventually get something pretty darn decent. The ABS flexes enough to release without breaking (unlike OEM) and I can make the slots longer to allow even more flex. Pretty darn fun.
 
Last edited:
Do you print it upside down? The tech guy at school today was showing me a mini con rod they printed, nice detail - but he said it can't print wider at the top, so they print upside down, for things like the heater knob that have a shoulder & top that is wider than the base...
 
Higher end printers add a scaffold of a soluble material to support overhangs. I have a version of Jeff's part printing at work, when I get back to the office I will post some pics

Karl
 
Do you print it upside down? The tech guy at school today was showing me a mini con rod they printed, nice detail - but he said it can't print wider at the top, so they print upside down, for things like the heater knob that have a shoulder & top that is wider than the base...

I thought about that but the knob is actually slightly arched, now that I see how much detail I'm losing I think I'll make if flat and try one upside down. The last one I did I let it make some supports under the overhangs but it didn't help much. They fit pretty good though. Certianly usable, and customizable too, could make the top one in the shape of an X, then a 1 than a 9…..or not.
 
Great start Jeff!

If there's on thing I've learned about 3d printing, is that it's not easy with the currently available low-end (under $3K) printers. I've watched the guys at the my local maker community print a lot of projects that go bad. Takes time, experimentation, and some experience/BKMs.

After you get the dimensions dialed-in, changing the part orientation, layer density, and other factors will get it right.

Based on this, I think your first pass was quite good. Very impressive!
 
I'm pretty happy with the results so far. Here's two of the better ones, I'll try again next week. The printer is the cheapest one you can get and quality is iffy, not knowing how to tweak it doesn't help.
file_zps4658712f.jpg
 
WOW Jeff... Who's to say a bit of clean-up on...

a bench grinder or Dremel Tool is not called for. Like most "cast" parts, they are machined a bit, or a lot, after their "raw" castings are complete... Then thrown in a "tumbler" for final polishing.

I would also agree with others that you should be able to clean these up "digitally" with some more effort.

Great work... and keep it up!
 
I have a lot of engine parts heads, intakes, exhaust manifolds, blocks, other parts done in 3 D models. Some were full size some scaled down some were done in plastic, paper, corn starch. Think only one was ever done in some metal that I know of. Think the accuracy of the part depended on the number of sections. Didnt like the plastic ones much as the resin or what ever in the mixture irritated my skin.
 
Back
Top