
You are using an out of date browser. It may not display this or other websites correctly.
You should upgrade or use an alternative browser.
You should upgrade or use an alternative browser.
making parts 3D printing
- Thread starter jvandyke
- Start date
Dan Sarandrea (Phila)
Waitin' On Parts...
I would guess that the flexibility without breaking characteristic of the material being laid down by the printer would determine how much reinforcement is needed on the prongs with the Dolly Parton nubs.
Dan Sarandrea (Phila)
Waitin' On Parts...
In some of the pix I sent you should see one or more where I had the calipers measuring the gap between the wheel and the lug bolts.
jvandyke
True Classic
Could you send me the Sketchup file? I would like to look at it and compare it to a OE stainless cap I have.
I can likely clean up a few things for you.
Karl
I will send it over, it's a pretty messy file though so once again, NO LAUGHING!
Not sure if those fillets will help or hurt, the ABS is pretty flexible but it could just be i haven't gotten my printer settings nailed down yet either, layer bonding doesn't seem to be the greatest which would certainly effect how those tabs crack off too easily, maybe it just needs to be printed on a "good" machine
Last edited:
Greg (in Conn)
Bertone curator - X driver
CD-27s
similar caps were on the CD27s but had the iconic b.
Easy glue on and would be a nice touch for the CD58 caps which is a stamped Bertone wheel...:nod:
something about those Cromodora script caps though...


Did logo as a separate inset, have a solid plain version, could do Cromodora/Bertone, custom, whatever.
similar caps were on the CD27s but had the iconic b.
Easy glue on and would be a nice touch for the CD58 caps which is a stamped Bertone wheel...:nod:
something about those Cromodora script caps though...


jvandyke
True Classic
That would be better. I made a bertone b for my little badge but then found this
http://www.thingiverse.com/thing:135090
Maybe just return to a solid face and people can attach Bs or FIATS or nothing. I think I'll try to print this one up tonight and see how it comes out.
http://www.thingiverse.com/thing:135090
Maybe just return to a solid face and people can attach Bs or FIATS or nothing. I think I'll try to print this one up tonight and see how it comes out.
kmead
Old enough to know better
One of the problems with most of these machines is that they apply the material in a way that ends up having a grain. The bummer about cylindrical parts is that the grain will tend to follow the cylinder outline which means that it will crack along the grain which in this case is right from fillet to fillet.
Your reinforcements will help but not prevent this cracking. As it is ABS one might consider using some ABS solvent to blend the material on the surface of the part.
I will fiddle around with the part hopefully tomorrow night. I wasn't able to get out to the garage to find one of my spun stainless caps. Hopefully on Saturday...
kmead
Old enough to know better
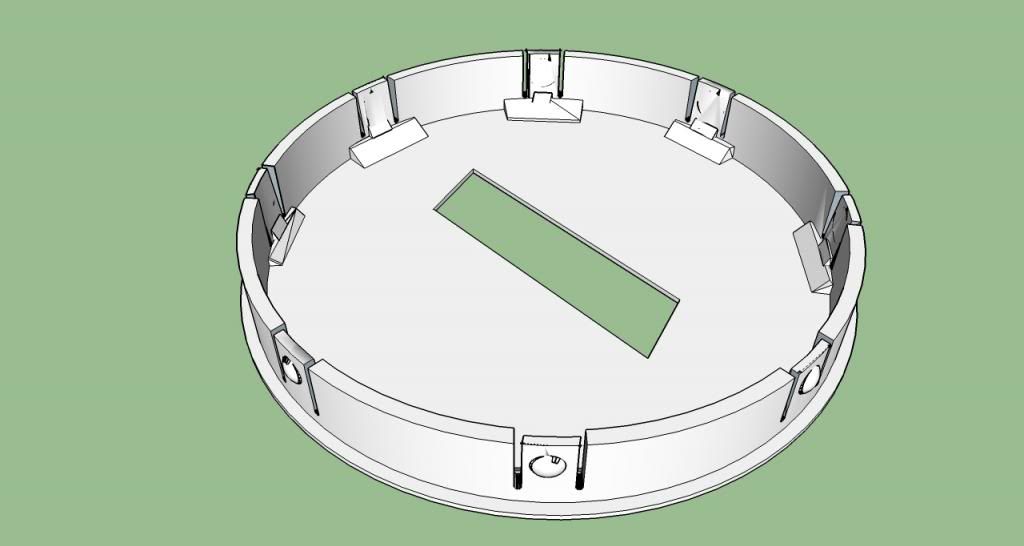
Updated Cromodora Cap
This is my iteration of the cap (I haven't located one of my real SS caps yet but will look in the morning).
I changed the domed retention features to an alternative variation. The OE feature is likely the result of an easy to maintain punch and die which isn't related to what a plastic part would be.
I am sure there will still be problems with cracking, we will likely need to ease some of the features back a bit.


https://dl.dropboxusercontent.com/u/3359580/Cromodora Cap.skp
https://dl.dropboxusercontent.com/u/3359580/Cromodora Cap.stl
This is my iteration of the cap (I haven't located one of my real SS caps yet but will look in the morning).
I changed the domed retention features to an alternative variation. The OE feature is likely the result of an easy to maintain punch and die which isn't related to what a plastic part would be.
I am sure there will still be problems with cracking, we will likely need to ease some of the features back a bit.
https://dl.dropboxusercontent.com/u/3359580/Cromodora Cap.skp
https://dl.dropboxusercontent.com/u/3359580/Cromodora Cap.stl
Last edited:
kmead
Old enough to know better
In lieu of heat, a solvent applied to the faces of the part hopefully will strengthen the part and better bond the layers. A light sanding with 320 can make all the difference with this material. We make full on appearance models with these as the basis of the finished part. We do have excellent model makers
Red Bull 78
True Classic
I'll Take 4 of These
To cover this ugly "fix" on my Cromodora CD3's.

PO stripped most of the hubs. Had to go to Studs to torque nuts to 65 f lb, just to hold them on.
Come to think of it, a variable depth might also be an option. I got some longer studs, so your "stock" version may not fit my application, unless I add more "spacers".
I have no idea "what" or "if" anything was ever supposed to be there, I just want something to cover that mess.
You give me a plastic part, I can make it look any way I want.
I've got a set of chrome Trim Rings from another application I'd like to try on the cromo's but I don't want to scratch them up when it doesn't even look like the rings will fit, anyway.
Brain Flatulence Idea!
Last edited:
Dan Sarandrea (Phila)
Waitin' On Parts...
Red, I think this is the OEM hubcap for those wheels:
http://www.ebay.com/itm/Fiat-124-Co...Parts_Accessories&hash=item4844d00b26&vxp=mtr
Probably available in good used condition from a member for much less than the new ones on eBay.
http://www.ebay.com/itm/Fiat-124-Co...Parts_Accessories&hash=item4844d00b26&vxp=mtr
Probably available in good used condition from a member for much less than the new ones on eBay.
Last edited:
kmead
Old enough to know better
Yes thats one version, there is another with a plastic center that says Fiat and another with a plastic center that says Cromodora.
Red, I think this is the OEM hubcap for those wheels:
http://www.ebay.com/itm/Fiat-124-Co...Parts_Accessories&hash=item4844d00b26&vxp=mtr
Probably available in good used condition from a member for much less than the new ones on eBay.
jvandyke
True Classic
Turned out nice. I haven't dared try to force it on the wheel yet though.
Here you can see the Z stepping I believe it's called, the layers, force on there and splits along the layers quite readily. There's also little voids in between the layers. I might try a acetone wash of some type, light wiping or a vapor treatment, not sure. I think I'll make a thin FIAT plate to on it, a Bertone B and maybe that Cromodora logo. Just for fun.
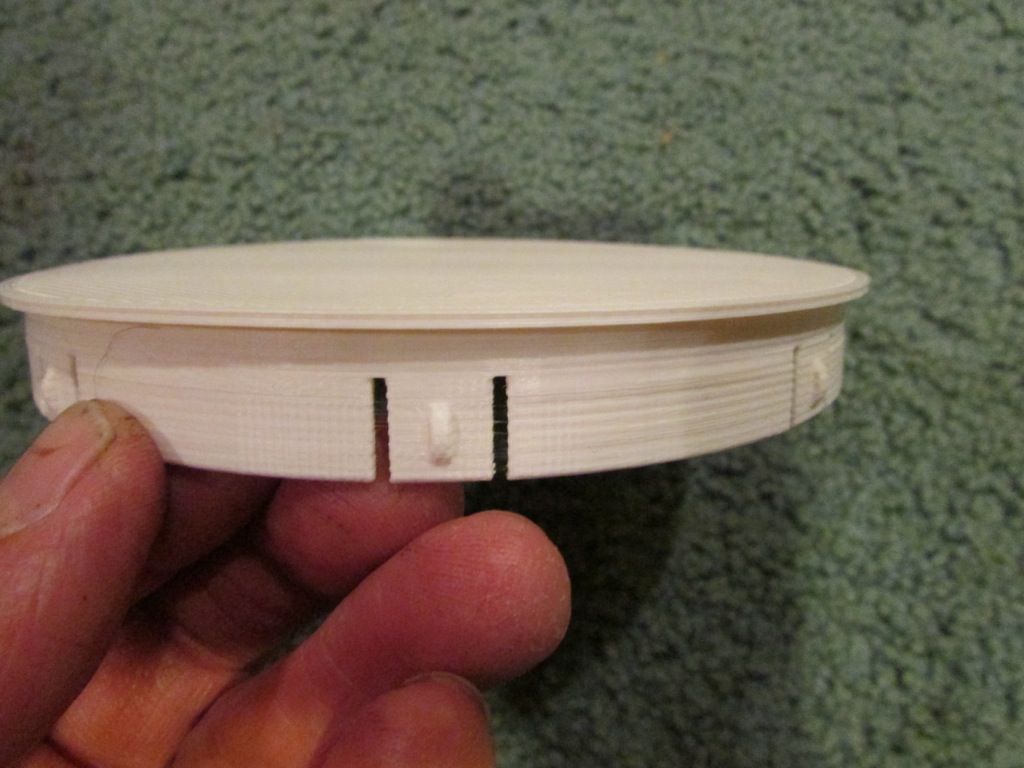
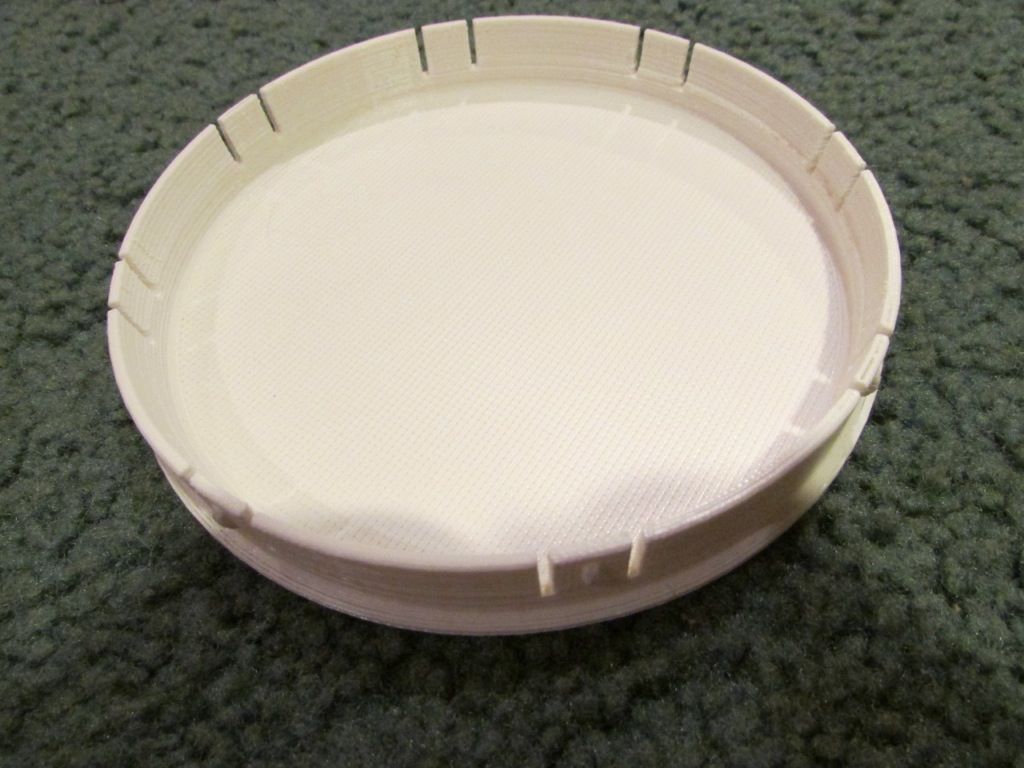

Here you can see the Z stepping I believe it's called, the layers, force on there and splits along the layers quite readily. There's also little voids in between the layers. I might try a acetone wash of some type, light wiping or a vapor treatment, not sure. I think I'll make a thin FIAT plate to on it, a Bertone B and maybe that Cromodora logo. Just for fun.
kmead
Old enough to know better
Nice.
Hopefully it won't just snap apart.
You might try to find some ABS glue for piping at Menards etc to sort of bath it with to unify the disparate layers and fill the voids. There are different versions, some are more viscous than others.
You might choose to sand down the bumps to reduce the interference between the part and the wheel to reduce the force on the layers. I should have thinned the legs the bumps are on so they might have flexed but I worried they would just snap.
Last edited: