
You are using an out of date browser. It may not display this or other websites correctly.
You should upgrade or use an alternative browser.
You should upgrade or use an alternative browser.
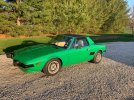
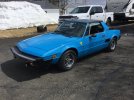
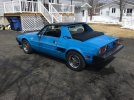
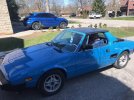
What did you do to your X1/9 today ?
- Thread starter Eastep
- Start date
DanielForest
True Classic
I maybe wrong, I'm no expert on 1974 bumpers. And from some of the pictures I have seen, you maybe wright. I just that they seems to sit too high.
tvmaster
True Classic
Can you tell me the brand of primer? Is that Eastwood 2K? I’d like to do something similar, and the dash is partly original, sanded vinyl, and padded dash filler by Polyvance. I was going to use some very light texture after that, and then a SEM paint. But it’s the base/primer I’m most concerned about due to adhesion, heat, cold, etc. Thanks.The X1/9 dash had the typical 2 cracks in the top running to the defroster vent. It was badly warped. I had to remove the foam from the underside so I could correct the warpage. I used epoxy resin, fiberglass cloth and milled glass fibers to reinforce the cracked areas. I also repaired the radio cutout in the same manner. Body filler was used where needed to flatten the surfaces. I used a black 2K primer surfacer to fill in the vinyl grain texture. I then applied a splatter finish with the 2K and finished it off with a urethane matte black. Month long project
View attachment 52269
View attachment 52270
Last edited:
RoyS
True Classic
The North American '74 bumper pads do sit higher then the Euro. And they look to be longer (stick out further) than the Euro.I maybe wrong, I'm no expert on 1974 bumpers. And from some of the pictures I have seen, you maybe wright. I just that they seems to sit too high.
Roy
Figured out front turn signals mounting problem. Someone earlier posted about rubber tubing split to make a gasket/cushion between the chrome piece and the X body. I used some leftover silicone windshield washer tubing, it fit perfectly and looks fine. They look quite a bit like the Triumph TR7 turn signals.
No rubber boot behind the assembly but I can live with that. They're pretty hard to find.
All new spade lug connectors while I was in there.
No rubber boot behind the assembly but I can live with that. They're pretty hard to find.
All new spade lug connectors while I was in there.
tvmaster
True Classic
Forgot to ask, what kind of body filler - there are so many….The X1/9 dash had the typical 2 cracks in the top running to the defroster vent. It was badly warped. I had to remove the foam from the underside so I could correct the warpage. I used epoxy resin, fiberglass cloth and milled glass fibers to reinforce the cracked areas. I also repaired the radio cutout in the same manner. Body filler was used where needed to flatten the surfaces. I used a black 2K primer surfacer to fill in the vinyl grain texture. I then applied a splatter finish with the 2K and finished it off with a urethane matte black. Month long project
View attachment 52269
View attachment 52270
Bia
True Classic

Jonohhh
True Classic
Took it out for a drive today and...well, I had to make the decision to park it until I'm able to do the cooling system upgrade I've been wanting to do. The performance of the factory water pump is somehow further degrading to the point that it doesn't pump much of anything until 3000rpm, and with the weather heating up it's making matters worse. I'd rather not replace the head gasket until it gets a trick head 
HI why not pull out pump and see what is going on, not a big job ,Took it out for a drive today and...well, I had to make the decision to park it until I'm able to do the cooling system upgrade I've been wanting to do. The performance of the factory water pump is somehow further degrading to the point that it doesn't pump much of anything until 3000rpm, and with the weather heating up it's making matters worse. I'd rather not replace the head gasket until it gets a trick head
Jonohhh
True Classic
85' with Air Conditioning....becomes quite an ordeal as far as I understand. I figure I'll pull it once....to gut its internals and replace the bearings, and then never look at it again because its job will be taken over by an electric pumpHI why not pull out pump and see what is going on, not a big job ,
")
Last edited:
Do not have air on mine so not sure how much harder it would be , with no air was quite easy,85' with Air Conditioning....becomes quite an ordeal as far as I understand. I figure I'll pull it once....to gut its internals and replace the bearings, and then never look at it again because its job will be taken over by an electric pump
Alain - The Red Scorpion
True Classic
Shipments received. Next, reassembly of the 5-speed gearbox.


Bjorn Nilson
True Classic
Looking good. I currently have mine on painting. I hope it will be ready until next weekend as I will go to a Italian car meet. Just like yours, my lid+wing is a little bit lighter than the stock metal lid.Finished up molding the wing onto the fiberglass decklid. Good enough for summer! Will work on it more next winter. Wing and deck weigh less than the original metal deck
View attachment 60838View attachment 60839
Odie
KBabcock
True Classic
Finished the compressor piping and electrical, 100% operational and no leaks. I was shocked with the number of connections I had made, I thought something would leak. Well as the Irish say "The good lord looks after the fools, the drunks and the children" I checked each and everyone of those boxes this weekend. 
Also started to remove the AC hardware from the car, it did not work and I'm not a big AC guy especially when I have a targa top so, off it goes. I also did my first Fiat cursing of the year trying to get at one of the bolts for the AC pump, the Italians know just what to do to make something as difficult as possible to remove. Next up is replacing rubber coolant hoses.

Also started to remove the AC hardware from the car, it did not work and I'm not a big AC guy especially when I have a targa top so, off it goes. I also did my first Fiat cursing of the year trying to get at one of the bolts for the AC pump, the Italians know just what to do to make something as difficult as possible to remove. Next up is replacing rubber coolant hoses.
Yves
True Classic
Deep work project Alain!Shipments received. Next, reassembly of the 5-speed gearbox.
View attachment 60810
