
You are using an out of date browser. It may not display this or other websites correctly.
You should upgrade or use an alternative browser.
You should upgrade or use an alternative browser.
What did you do to your X1/9 today ?
- Thread starter Eastep
- Start date
Alain - The Red Scorpion
True Classic
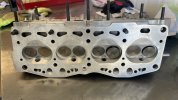
The wheel in pic 2 is a valuable Cromodora (could be magnesium).I picked at a scab.
I knew Dominick had a bunch of bondo in the nose and fender. Now I have a better understanding of just how bad it is. Both these panels will need to be cut off and replaced. The inner panels will be straightened a bit more and will be fine. Still not too bad for a 50 year old $200 car.
View attachment 81094
I also had the opportunity to install the side vents and one of the tail lightes that Brett sent. Makes a big difference not having broken plastic on the side and the old tail lights were so sun faded! Plus I have a thing for amber turn indicators.
View attachment 81095
View attachment 81096
Lastly, i loaded al seven of the 13" wheels that came with the car into Buford (my truck). Only one held air, and it has a slow leak. I'll get the rotten tires demounted, work the best of the rims with a hammer to get them "straight" and then mount the cheapest 13" tires I can find. I'm not sure i'm going to stay with the small wheels and really just need something to roll it around the barn for now.
Pretty good weekend - expecially since I'm "not workng on this one until the Alfetta is finished"
Mark_Toro
True Classic
Alain,
They are pretty cool wheels, but they are modern replicas that I got from Fiat Madness. Not expensive at all. I think I have less than $1200 in the wheels and tires and mounting. They are 4 on 98 and have the right backspacing for the Alfetta. They are a modern Fiat 500 fitment. They fit the Alfetta really well, but don't fit the X. The inner sidewall fouls the front strut. I'm using them right now just to hold up the back end of the car.
Current state of the Alfetta, so they are not needed there right now!
Mark_Toro
True Classic
I straightened and painted the best 5 out of the 7 wheels I have. I need to get decent tires on it just to be able to move it around the barn.
Cost $105 to pull the old tires off and dispose of them (seven total) and $30 for the paint.
Whoever had this before must have hit every curb around. A little work with the vice grips and they are looking a lot more round!
Recommendations on cheap but reasonable tires? Been eyeing stuff at ~$40 each.

I also got the rear trunk hinges to move and welded them back together. And just for fun hit the quarter panel with a little compound. I think the paint will come around "good enough".")
Cost $105 to pull the old tires off and dispose of them (seven total) and $30 for the paint.
Whoever had this before must have hit every curb around. A little work with the vice grips and they are looking a lot more round!
Recommendations on cheap but reasonable tires? Been eyeing stuff at ~$40 each.
I also got the rear trunk hinges to move and welded them back together. And just for fun hit the quarter panel with a little compound. I think the paint will come around "good enough".
Bjorn Nilson
True Classic
Take care of them, they are hard to find and I haven't seen any replacements that fit.Last bit of work from the weekend. Center caps. A little spray paint and then some scraping. They are far from perfect, but they are good enough for who it's for.
View attachment 81346
Tom Ginefra
True Classic
Me too! No photoToday I took her out for a drive on the warmest, driest February 8th in CT in my lifetime View attachment 81442
Tom Ginefra
True Classic
Took the wife for a quick drive to the famous Tops Diner in East Newark, to meet up with the FCA NJ group for breakfast, this morning.
Great group! Had an awesome meal, and it was nice enough out to pop the roof off for the trip home. Front end's getting hinky. Time to install all the suspension goodies I got from Doug (RX1900) and MWB, a while back.
Great group! Had an awesome meal, and it was nice enough out to pop the roof off for the trip home. Front end's getting hinky. Time to install all the suspension goodies I got from Doug (RX1900) and MWB, a while back.
Last edited:
nichol01
True Classic
Finished up a project started when I bought my new tires from Midwest Bayless. Painted the wheels with Rustolium wheel paint and clear coated. I never had center caps for my wheels. I found plastic pipe plugs on Amazon which fit nice and tight. Then purchased stick on decals I found on Etsy.com. I was surprised at the selection of Bertone emblems they have. Can be had in alot of sizes. I think it turned out pretty good.


Bjorn Nilson
True Classic
Yes plastic pipe plugs works well until you start breaking hard. Not recommended on track.

My1stCar
True Classic
Today I reprogrammed my headlights
Ever since I bought my X almost 40 years ago, switching on the headlights always was a bit funny. The side/parking plus tail lights were on with dash switch in position 1. To open the headlights I had to use the fog light switch on the center console that also turned on the high/low beams. That switch also worked when the ignition was off, but then only the headlights were raised/lowered (no lights on).
When I compared my wiring with the wiring diagram of my Haynes, it was uhm… different. For starters the original used only one relay under the dash instead of two as was the case in my X. But the Haynes’ version does not do what I want either.
I want to use the side + rear lights as daytime running lights (with 20w bulbs in the front side lights to increase visibility). Want to be able to run without any lights and want the headlights up (and dashlight on) only when I need high/low beam. All that with just the one dash switch.
The Haynes version does not do that, in position 1 all lights are off, in position 2 the headlights go up. What headlights are on depends on the high/low beam selector stalk on the steering column (none/low/high) but side lights with the headlights down is not possible and the green control light is on even if the low beams are off.
So I came up with the following modification, using a 5 pole switch-over relay:
.jpg")
It works as follows:
Turning the ignition on with the switch on the dash in position 1 switches on the side and tail lights through a relay. The commanding circuit of the relay also turns on the interior illumination (buttons etc.), the instrument panel illumination stays off.
Switching to position 2 raises the head lights. Which headlights are on depends again on the position of the high/low beam stalk:
- Up is headlights are off (side lights stay on)
- Flat is low beams plus green control light
- Down is high beams and blue control light
Similar to the other relay, the commanding circuit is now used to turn on the instrument panel illumination.
None of the high(er) currents are switched through the ignition.
Switching back to position 1 closes the lights and reverts to daytime running lights. In position 0 none of lights are on.
Turning the ignition off turns off both relays, kills all the lights and the 5th pole energizes the circuit to lower the headlights. So the headlights are lowered automatically when the ignition is turned off (and can’t be raised until the ignition is switched on again).
Now I can use the fog light switch to actually switch my rear fog light, for my safety.
Ever since I bought my X almost 40 years ago, switching on the headlights always was a bit funny. The side/parking plus tail lights were on with dash switch in position 1. To open the headlights I had to use the fog light switch on the center console that also turned on the high/low beams. That switch also worked when the ignition was off, but then only the headlights were raised/lowered (no lights on).
When I compared my wiring with the wiring diagram of my Haynes, it was uhm… different. For starters the original used only one relay under the dash instead of two as was the case in my X. But the Haynes’ version does not do what I want either.
I want to use the side + rear lights as daytime running lights (with 20w bulbs in the front side lights to increase visibility). Want to be able to run without any lights and want the headlights up (and dashlight on) only when I need high/low beam. All that with just the one dash switch.
The Haynes version does not do that, in position 1 all lights are off, in position 2 the headlights go up. What headlights are on depends on the high/low beam selector stalk on the steering column (none/low/high) but side lights with the headlights down is not possible and the green control light is on even if the low beams are off.
So I came up with the following modification, using a 5 pole switch-over relay:
It works as follows:
Turning the ignition on with the switch on the dash in position 1 switches on the side and tail lights through a relay. The commanding circuit of the relay also turns on the interior illumination (buttons etc.), the instrument panel illumination stays off.
Switching to position 2 raises the head lights. Which headlights are on depends again on the position of the high/low beam stalk:
- Up is headlights are off (side lights stay on)
- Flat is low beams plus green control light
- Down is high beams and blue control light
Similar to the other relay, the commanding circuit is now used to turn on the instrument panel illumination.
None of the high(er) currents are switched through the ignition.
Switching back to position 1 closes the lights and reverts to daytime running lights. In position 0 none of lights are on.
Turning the ignition off turns off both relays, kills all the lights and the 5th pole energizes the circuit to lower the headlights. So the headlights are lowered automatically when the ignition is turned off (and can’t be raised until the ignition is switched on again).
Now I can use the fog light switch to actually switch my rear fog light, for my safety.
Last edited:
Steve Thomas
True Classic
The Haynes manual is close to useless. I would go so far as to say dangerous too. Best to use FIAT docs and plenty of those in the wiki. Even then, you do need to look at a few simultaneously as year boundaries are permeable..wiring diagram of my Haynes,
kmead
Old enough to know better
I suspect your car was rewired by others prior to your purchase, however yours being an EU car could be quite different from what we would expect in the US.
A US car position 0 is all off, position 1 is headlights up with all side, front and rear marker/parking lights on, position 3 turns the headlights on, In position 3 if the ignition switch is shut off all lights go off, if in position 2 and the ignition switch is shut off the side, front and rear lights will stay on.
Have you considered putting relays between the fuse box and the headlights to take the load off the high/low beam switch?
Today I reprogrammed my headlights
Ever since I bought my X almost 40 years ago, switching on the headlights always was a bit funny. The side/parking plus tail lights were on with dash switch in position 1. To open the headlights I had to use the fog light switch on the center console that also turned on the high/low beams. That switch also worked when the ignition was off, but then only the headlights were raised/lowered (no lights on).
When I compared my wiring with the wiring diagram of my Haynes, it was uhm… different. For starters the original used only one relay under the dash instead of two as was the case in my X. But the Haynes’ version does not do what I want either.
I want to use the side + rear lights as daytime running lights (with 20w bulbs in the front side lights to increase visibility). Want to be able to run without any lights and want the headlights up (and dashlight on) only when I need high/low beam. All that with just the one dash switch.
The Haynes version does not do that, in position 1 all lights are off, in position 2 the headlights go up. What headlights are on depends on the high/low beam selector stalk on the steering column (none/low/high) but side lights with the headlights down is not possible and the green control light is on even if the low beams are off.
So I came up with the following modification, using a 5 pole switch-over relay:
View attachment 81592
It works as follows:
Turning the ignition on with the switch on the dash in position 1 switches on the side and tail lights through a relay. The commanding circuit of the relay also turns on the interior illumination (buttons etc.), the instrument panel illumination stays off.
Switching to position 2 raises the head lights. Which headlights are on depends again on the position of the high/low beam stalk:
- Up is headlights are off (side lights stay on)
- Flat is low beams plus green control light
- Down is high beams and blue control light
Similar to the other relay, the commanding circuit is now used to turn on the instrument panel illumination.
None of the high(er) currents are switched through the ignition.
Switching back to position 1 closes the lights and reverts to daytime running lights. In position 0 none of lights are on.
Turning the ignition off turns off both relays, kills all the lights and the 5th pole energizes the circuit to lower the headlights. So the headlights are lowered automatically when the ignition is turned off (and can’t be raised until the ignition is switched on again).
Now I can use the fog light switch to actually switch my rear fog light, for my safety.
My1stCar
True Classic
I suspect your car was rewired by others prior to your purchase, however yours being an EU car could be quite different from what we would expect in the US.
A US car position 0 is all off, position 1 is headlights up with all side, front and rear marker/parking lights on, position 3 turns the headlights on, In position 3 if the ignition switch is shut off all lights go off, if in position 2 and the ignition switch is shut off the side, front and rear lights will stay on.
Have you considered putting relays between the fuse box and the headlights to take the load off the high/low beam switch?
Challenge accepted. Since I bought two 5 pole relays I thought about how that could work, convinced it couldn't. Yet I found the following possibility:
Changes: Terminal 87 (verde) from the first 5 pole relay connects to terminal 30 of the (new) second 5 pole relay, to the high/low beam switch, and to fuse 12 (lights up). Terminal 87a still connects to fuse 11 (lights down). So position 2 still opens the headlights and position 1 still closes them.
The 2nd relay gets continuous 12v in position 2, through the 1st 5 pole relay. With the high/low beam switch on high, the return (blu) connected to terminal 85 of the 2nd relay in the new layout, energizes the 2nd relay that outputs the continuous current to terminal 87, connected to fuse 3: high beams on. Terminal 87a connects to fuse 5 (low beams on when high beams off). With the high/low beam switch not on high (low & off), the low beams are on in both cases.
Now with the stalk up, flashing switches from low to high, which is a function I didn't have anymore, as flash doesn't work in low beams at the moment (only with lights out/stalk up). So, in addition to the fact that now all high currents are switched through relays, I'll retrieve the flash function as a bonus (albeit with the stalk in the off position), nice!
Minor inconvenience is that I now have two different low beam positions, one with flash (up) and one without (flat).On the upside, headlights up means always high or low beams on, nice also as there is no use for headlights up and not on.
Like before, turning the ignition off lowers the headlights.
Thanks!
(diagaram will be posted)
Last edited:
86X
True Classic
Yesterday I thought I would try some of Jay Leno’s Radiant Ceramic Coating. I am sure it is not the best but it was very easy to apply and turned out ok. Last car I did I took two days prepping the paint before applying the ceramic coating. The coating was a little over $100. It turned out great and lasted a very long time. This stuff won’t last that long but that’s on.

Alex(Tenerife)
True Classic
Today I fitted my reupholstered renovated sun visor. Drivers done a while ago, passenger side just finished.
Working out how to fit the mirror was a fun challenge. As was polishing the VERY rusted hinge/corner cover. No chrome left at all, so its now just very polished mild steel. Came out great but you can feel its a little thinner.

Working out how to fit the mirror was a fun challenge. As was polishing the VERY rusted hinge/corner cover. No chrome left at all, so its now just very polished mild steel. Came out great but you can feel its a little thinner.
Alex(Tenerife)
True Classic
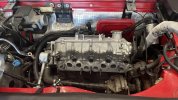
No photo today, as phone was on charge but today I emptied and cleaned my crank case vent catch can.
Took out quite a bit of sludge, so need to keep a close eye on that!
Took out quite a bit of sludge, so need to keep a close eye on that!
Tom Ginefra
True Classic
Cruising through my regular route this morning, and met up with these guys (5 Star Exotic Cars) as they were preparing to cruise to a private event. They invited me to tag along. Was a blast ripping around with these guys. This is a small sampling of the cars in attendance, this morning.