Blue Plate 1974 X1/9 Project

JTBernhardt

True Classic
I picked up a 1974 X1/9 from the original owner in December of 2016 with the intentions of saving it from being crushed. I found it on Sacramento Craigslist for $800 and it was in pretty rough shape. Apparently the car was purchased new and used until the previous owners went into the military and has sat ever since. It was maintained by Modern Classics in Sacramento at some point, and last registered in 1989. The original title was long-lost, and the car was no longer in the DMV system so it ended up being easier to do a lien sale to obtain a title for the car (this process could be a post all on it's own!). Included are some pictures of the original Craigslist ad.

IMG_2344.JPG
IMG_2343.JPG
IMG_2342.JPG
IMG_2345.JPG


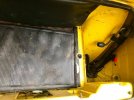
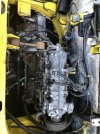
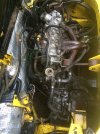
There were weeds growing out of the windshield wiper cowl area and the frunk was rusted shut. Every latch creaked like it hadn't been opened in 30 years. The front brake calipers were seized, and all four tires were flat and wouldn't hold air. Moss could be seen growing around the tail lights and in the carpet. The engine looked complete, and internally looked quite clean. All of the original smog equipment was present and the timing belt was attached still. The interior was littered with remnants of detailing supplies, a playing card, some McDonald's wrappers, and a condom from the mid-1980's. It was a disgusting time machine.

IMG_2403.JPG
IMG_2402.JPG


I installed some wheels with decent tires on them and removed the seized front brake calipers so the car would roll. The owner couldn't find the keys either, so we ended up having to drill out the ignition switch bolts and remove it to release the steering wheel lock. We used a friend's tow bar custom made for 1974 X1/9's to get the car home.

IMG_2400.JPG

IMG_2399.JPG


I wish I had taken more pictures, but I ended up stopping at a self-service car wash on the way home and power-washed all the gunk off the car. It ended up looking much better than I expected for an $800 car. It then sat in paper-work limbo until mid-2017 and I started cleaning the car up. I did a three-stage Meguiar's wax and the original paint came back to life nicely.

26166607_1667351493323647_7223311361985869356_n.jpg

26165720_1667351683323628_6176603942108115875_n.jpg

26166943_1667351623323634_6954261876393455791_n.jpg

26166460_1667351503323646_4638099372996525913_n.jpg
26167991_1667351496656980_5907428336055866743_n.jpg
26112189_1667351589990304_409461878835927222_n - Copy.jpg
26112458_1667351579990305_7196731387958622175_n - Copy.jpg

26167445_1667351499990313_8213194340573772950_n.jpg

26167388_1667351639990299_528116617939056992_n.jpg
 
Last edited:
The interior was mostly original aside from the hole cut-out where a radio was never installed, plaid-covered seats, and an AMCO aftermarket arm rest. The carpets were faded, but not in bad shape. The only missing component was the ever-illusive choke handle cover. The instrument cluster was faded over as they usually are and the driver's door mirror was de-glazed. The dash was fairly warped and cracked. The original seat belts were present and retracted nicely after some lubrication. I reinstalled the previously removed ignition switch after the owner sent me the keys after finding them.
26165288_1667352059990257_8296638760094250929_n - Copy.jpg
26165408_1667351843323612_2127298804795936478_n - Copy.jpg
26166544_1667351819990281_5211635909407133930_n.jpg
26168791_1667352009990262_3749983048949641590_n.jpg

26195953_1667352016656928_5047796033046672276_n.jpg


After some fiddling I was able to get the frunk latch to open for the first time and discovered the original floor mat, a battery cover, and some rather distressing rust where the battery box used to be along with some rust starting in the frunk floor. The rear trunk was rust free and still had the original floor mat, fire wall cover, partial tool kit, and jack.
26195373_1667351676656962_4873097696840758834_n.jpg

26169228_1667351693323627_4786863065238596344_n.jpg

26169712_1667351729990290_1382313168927628908_n.jpg

26196099_1667351956656934_1066946725161220862_n.jpg
26167460_1667351943323602_4630940856315374445_n.jpg
26166408_1667351969990266_8531107648120665934_n.jpg
 

Attachments

  • 26166408_1667351969990266_8531107648120665934_n.jpg
    26166408_1667351969990266_8531107648120665934_n.jpg
    96.3 KB · Views: 80
Last edited:
I carefully removed the carburetor and intake manifold anticipating needing to do a full carburetor rebuild and gasket refresh. Everything took about five times as long as usual due to the amount of rust I had to remove from each bolt to remove it without breaking anything. I also removed all the smog equipment at this time and since 1974 X1/9's don't require smog in California. I removed the side louvers to inspect for rust. They look good, but the shock strut top mount rubber is cracking. I sourced a new battery box cut from a 1976 parts car.
26166601_1667351853323611_370704544185890721_n.jpg

26166484_1667351926656937_7964828369751828555_n.jpg
26112044_1667351769990286_6436360746343768869_n.jpg
26195901_1667351759990287_5549890731887980152_n.jpg

IMG_3991.jpg

IMG_3992.jpg

IMG_3995.jpg


I tried to sell the car as a non-running project sometime near the end of 2018 without a whole lot of interest. Seeing as I wanted to save the car from being crushed, I needed to do more work on it to get it ready for the next owner. Here's a short summary of the work I did over the course of 2018.

I started by repainting everything I removed such as the engine, the air cleaner, a timing belt cover bracket, a bunch of other miscellaneous stuff as well (this is where I wish I would have taken more photos). The top engine mount had to be replaced, I plugged the emissions holes in the head. I sourced a euro 1300 timing belt cover and removed the dual-belt cam pulley, and replaced the cam seal and cam pulley with a single-belt pulley. I did a valve adjustment and then fitted a new timing belt and tensioner bearing along with a rebuilt internally regulated Bosch alternator, fresh water pump, and v-belt. The points, cap, rotor, spark plug wires, and spark plugs were replaced. The mechanical fuel pump was replaced and all the fuel lines were changed. I removed the evap container and still need to add a proper vent to prevent vapor lock. The exhaust was removed and ceramic coated with the bake-in-your-oven style ceramic coating. Some rust is present in the exhaust, but the original 4-2-1 manifold and down pipe exit through an original ANSA dual pipe exhaust. A new clamp needs to be fitted still and the dual tips have some rust that could potentially be repaired. I installed a new thermostat and painted a steel overflow tank to replace the cracked, plastic original. The carburetor was rebuilt.

IMG_4513.jpg
IMG_5051.jpg


IMG_4702.jpg

IMG_4553.jpg

IMG_4705.jpg

I removed the front grill and lower spoiler, straightened the spoiler a bit and cleaned everything up underneath. The old radiator was clogged and not usable, so I sourced a NOS replacement and installed it after painting the front bumper brackets, bumpers, and grill. I rebuilt the fan motor before reinstalling the radiator. I also painted the roof at this time. I manage to work the headlights back and forth paired with a LOT of lubrication to get the mechanisms moving again. I removed and restored the fuse box by cleaning all the connectors and fuse holders, tightening up the fuse holders, and replacing the fuses. I cleaned all the grounds and replaced the ground strap that goes from the transaxle to the body and this made all the lights work along with most of the other electrical. I changed out the front plastic on the instrument cluster by very carefully separating the clear front plastic from a late-model cluster and re-gluing it to the early cluster. Viola! Clear instruments!
IMG_4552.jpg

IMG_4554.jpg
IMG_4704.jpg

IMG_8633.jpg

After the electrical was done I moved onto the hydraulics. I had no working brakes or clutch, and given the car hadn't been registered since 1989 it seemed like a good idea to replace EVERYTHING! Removing the pedal box for the master cylinder job was a paint in the ASS! I love routing 13ft of soft brake line through the wiper cowl and firewall twice. Luckily this all came out without any broken clutch or brake lines. I then moved to the suspension. The shocks are okay, but could be replaced. I decided not to do it at that point. The wheel bearings were all still good, but the brakes needed a refresh. I installed rebuilt front calipers, new rotors, pads, and soft lines all around. The rear calipers were in good shape still and were not rebuilt or replaced. I did however power-wash the underside of the car at this point and didn't find any rust in the shock towers or wheel wells, just original yellow paint.
IMG_4522.jpg

IMG_4521.JPG

IMG_4523.jpg

IMG_4524.jpg
 

Attachments

  • IMG_4513.jpg
    IMG_4513.jpg
    271.1 KB · Views: 86
  • IMG_2454.JPG
    IMG_2454.JPG
    233.8 KB · Views: 82
Last edited:
The car sat for another few months, bringing us into 2019, but I finally managed to replace the clutch slave cylinder, install the overflow tank, and get the car started for the first time since 1989. With a huge puff of blue smoke the car roared to life. After setting the timing and some carburetor tuning and a coolant system bleed I took the car out for its inaugural drive to get gas, roof off. Aside from an exhaust leak due to a missing down-pipe to muffler clamp the car pulled hard and was responsive to drive, just as an X1/9 should be. I had my brother follow me around closely to avoid getting pulled over with tags that expired in '89. I dumped two containers of fuel system cleaner into the nearly-empty tank, fueled up, and gave it a good old Italian tune-up. An Italian tune-up, for those who don't know, is when you take the car on a tight back-road going 10/10ths with the car above 4,000RPM the whole time in an attempt to clear out the cobwebs sort-to-speak. This worked brilliantly and I had a HUGE smile across my face the whole time. The thrill of reviving something that hasn't been touched in three decades is invigorating! The plastic coolant overflow tank started leaking on the way home due to a crack I didn't see and was replaced with a repainted steel overflow shortly after.

IMG_5623(1).jpg

IMG_5622.jpg


Here's a video of the engine running:


Shortly after the Italian tune-up the water pump gasket started leaking and I noticed the heater wasn't blowing warm air and that the heater valve was stuck shut. I decided to dig into the interior at this point thinking I could get away with just replacing the heater valve, but every single bolt on the core snapped off due to rust. I had another complete heater box assembly so I started removing the existing one and both mounting studs for the heater box snapped off. I then removed the whole heater box and center console to start the tedious job of drilling and tapping new studs for the heater box. This is where the project stagnated a bit because I moved to San Francisco.
 
Last edited:
Inquiring minds want to know: was the condom still in its wrapper/unused?? (One hopes.)

But seriously, looks better already! You need to start a Fiat Museum or something.
 
Inquiring minds want to know: was the condom still in its wrapper/unused?? (One hopes.)

But seriously, looks better already! You need to start a Fiat Museum or something.
It wasn't used, but well past it's prime for sure...
 
For the benefit of non-California members, a "blue plate" refers to the original state issued plates from that era. They have long since been replaced a few times with newer designs. So finding a old car that still has those original plates is kinda neat.


The rear trunk was rust free
Have you lifted that false floor yet? :eek:

For some reason I kind if like those plaid seats. I like printed fabric upholstery, especially period stuff like that. Unfortunately it doesn't wear well, but fabric is the most comfortable material in my opinion.
 
For the benefit of non-California members, a "blue plate" refers to the original state issued plates from that era. They have long since been replaced a few times with newer designs. So finding a old car that still has those original plates is kinda neat.


Have you lifted that false floor yet? :eek:

For some reason I kind if like those plaid seats. I like printed fabric upholstery, especially period stuff like that. Unfortunately it doesn't wear well, but fabric is the most comfortable material in my opinion.
The false floor was removed and there was some surface rust starting from exhaust heat, but no rot.

I really like the plaid seats too, hopefully the next owner will reupholster them in a similar way.
 
Unfortunately due to a back injury and lack of workshop space in San Francisco, the car sat from mid 2019 until yesterday (3-16-2021). I've been fortunate to have picked up another very special pair of X1/9's from a close friend of mine mid-2020, a 1973 and a 1974, but that means that this car needs to find a new home soon. The car is located at my parents' house in Foresthill, CA, about two and a half hours from my house in San Francisco, so getting up there during the pandemic hasn't been a priority but I decided to make a trip up to try to get the car ready to pass on to it's next owner.

I replaced the wheels with a set of Iron Cross Cromodoras with new 185 70 13 tires. After a quick wash I was disappointed to find that the car didn't just start right up, but then again Fiats don't like sitting. The car wasn't getting any fuel, so I removed the top of the carburetor to find that the gas had oxidized the inside of the carburetor over the course of a year and a half. I blew out the carburetor, primed the float with fresh gas and expected the car to start. It started briefly and then shot a mixture of old gas and engine oil at me out of the engine vent. It would appear that the small amount of old gas left in the system hasn't aged well and has caused the internal diaphragm of the replaced-in-2019 fuel pump to fail causing gas to pump into the engine. This has happened to me once before with my first 124 Spider. I decided to call it quits for the day at that point due to disappointment. A new fuel pump and a good engine oil flush should be all that's needed to correct the issue.

Other things that need doing to the car include installing an exhaust clamp, replacing the battery box, and reinstalling the interior. I took some pictures of the car as is currently sits that will be posted here as well as cross-posted in the For-Sale forum. I wanted to give the car a proper restoration summary thus far before writing the for-sale add.

IMG_8615.jpg

IMG_8607.jpg
IMG_8608.jpg
IMG_8609.jpg

IMG_8610.jpg
IMG_8611.jpg

IMG_8637.jpg

IMG_8639.jpg

IMG_8614.jpg
IMG_8617.jpg
IMG_8618.jpg
IMG_8622.jpg
IMG_8619.jpg
IMG_8621.jpg
IMG_8625.jpg
IMG_8627.jpg
IMG_8641.jpg
IMG_8634.jpg


Here's the current areas of rust:
IMG_8626.jpg


IMG_8628.jpg
IMG_8629.jpg
IMG_8630.jpg
IMG_8631.jpg
IMG_8632.jpg

IMG_8624.jpg
 
Last edited:
I'm currently working on the For Sale add, I'd like to offer it up to people here before trying a place like Bring a Trailer or similar. If I can't sell it as-is perhaps I'll continue working on it again after I finish up the current phase of restoration on my 1973 X1/9 (thread coming eventually).
 
It makes sense to offer it here first to a known group of enthusiasts plus not having to deal with all the fees and admin stuff from BAT. Worst that happens is no one wants it and we can all sit back and watch what happens on BAT.
 
Hi JT! This is a great start on a nice '74 project. I hope this car gets the TLC it deserves. The main reason there have been no X1/9's on BAT in four months is that our market value is too low - except for near-perfect ones. BAT has limited slots and they are prioritizing listing higher value cars now. If your car does get a slot with BAT try to be polite and agree to a no reserve auction and any other thing they require. I've talked to two sellers that have had their low-value listing refused/disqualified for "reasons".
 
For sale add posted!

 
Hi JT! This is a great start on a nice '74 project. I hope this car gets the TLC it deserves. The main reason there have been no X1/9's on BAT in four months is that our market value is too low - except for near-perfect ones. BAT has limited slots and they are prioritizing listing higher value cars now. If your car does get a slot with BAT try to be polite and agree to a no reserve auction and any other thing they require. I've talked to two sellers that have had their low-value listing refused/disqualified for "reasons".
If the car doesn't find a home through X-web then I'll likely clean it up a bit better, get it running again and try a no-reserve auction on BaT. I interviewed for a job with them about two years ago and have a familiarity with their curation process.
 
With little interest in the car as-is I've resumed work on the car over the past few days with the aim of prepping it for Bring a Trailer or another similar service.

I've drained all the gas-infused oil out of the engine, flushed it out with some fresh oil, changed the oil filter and refilled the oil. I've also swapped out the fuel pump, which indeed had a diaphragm failure along with the carburetor top gasket. I added a pre-pump fuel filter to help mitigate this issue. I'm hoping the gas in the car is still potent enough to be burnt out by running the car as opposed to having to drop and drain the tank.

The water pump had a leak the last time I drove the car, so to address that I had to remove the alternator and water pump housing. It was pretty clear upon removal that the pump gasket had a small leak at the bottom of the pump. I'll be replacing the gaskets today and bypassing the heater.

Other random things that got done on the car include: installing an exhaust clamp (no more exhaust leak, yay!), I threw on a stock "bowtie" style gas cap and a NOS early X1/9 side mirror.
 
Great work JT, you are performing a valuable service to wayward X1/9’s.
It is nice to see them saved and cared for.
 
I spent most of yesterday wrenching on the car. I sanded down and painted the engine cover a semi-gloss black and removed the rear bumpers to prep them for the same treatment.

Mechanically the water pump and alternator were installed sucesfully. Everything seemed to be going well right up until I put coolant in the car. One of the freeze plugs has a hole in it now apparently.

How feasible is it to remove and replace the freeze plugs with the engine installed?

I think that the gas in the tank may be beyond burning out, I used a clear pre-pump filter and there's quite a bit of sediment that clogged the filter almost immediately. Does anyone have a trick for draining the gas out of an early X1/9? I was thinking of buying a cheap electric pump and use it to pump the gas out of the tank and into a gas can. I have no idea what to do with 6 gallons or so of bad fuel, but one issue at a time.
IMG_9175.jpg
 
I replaced the freeze out plugs on the back side of the block on my 1300 with the engine in the car. I removed the intake and exhaust and there was plenty of room to work.

I was able to siphon most of the gas out of the tank. However, to clean it well, it is easier to remove the tank. Had I known how easy it was to drop the tank, I would not have screwed around trying to clean it in place. OxiClean and hot water soaking overnight removed all the crud stuck to the inside of the tank.
 
Back
Top