Dashboard repairs

Dr.Jeff

True Classic
A while back I mentioned trying a different product to repair some large cracks in one of my dashes. Here's a little more on it. If you hate my long winded narratives, then skip to the last paragraph for a summary.

This dash had the typical two cracks, one on either side of the defrost vent - top center of the dash. Plus some smaller 'dents' and cracks where the brittle vinyl had been damaged. [I did not take any pics of it before or during the early stages.]

First I ground back the raised hardened vinyl that had curled up on either side of the cracks. I used a 3M "Roloc" disc to make quick easy work of that:
41mwXAfeITL.jpg


I had to grind back almost 2 inches on either side to get to where it was pretty flat again. Along with the vinyl came a lot of rotted foam padding that was under the covering. So by the time I had things ground back I was left with two huge "V" shaped valleys deep into the dash, from the front to the back, all the way down to the metal subframe.

The "filler" I was experimenting with is a flexible acrylic 'plastic' product you've seen advertised on TV. Think of that goofy guy making a boat out of chicken wire, called "FlexSeal".

hqdefault (1).jpg


They market it as a waterproofing or leak sealant and they call it "rubber", but in reality it is none of those things. A couple years ago at a trade show I was given some boxes of sample products from that company. There was aerosol cans of waterproofing, tubes of "glue", and other things I don't remember. At that time they did not offer the "paste" you now see advertised. I tried some of the spray 'sealant' on a couple applications and it is total garbage, doesn't work at all to seal anything. I also tried the 'glue' on a couple of things and it doesn't work at all to glue anything. So I had very little expectations for it and the rest of the samples just sat in a box.

But as I thought about filling these huge cracks in the dash, I did not want to go the common path of body filler. For one thing these voids were much too large to fill with bondo, and for another it dries hard and won't allow any movement of the dash pad without cracking again. Someone makes a filler product for repairing dashes but I'd need a dozen of those tiny cans and they aren't cheap. So I decided to try the FlexSeal I had left over. I think what they now call "Flex Paste" would be best.

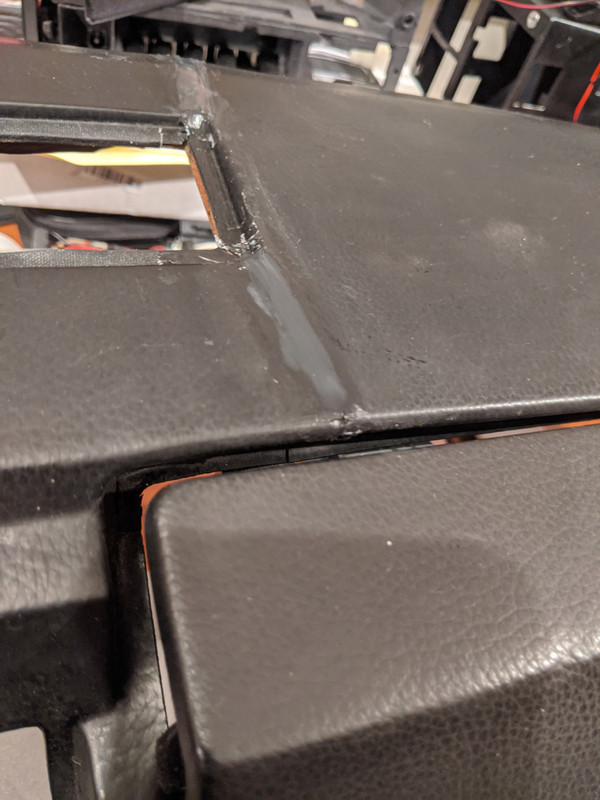
This stuff reminds me of a cross between acrylic calking (like DAP) and "Plasti Dip" (the stuff you can cover your car with and peel off later). It is viscous, creamy and sticky but not overly messy. It cleans up pretty easily before it cures - which takes a day or two. And best of all you can use it directly from the container as is - no catalyst to mix and no short window before it goes off. Honestly I just globbed it heavily into the huge cracks, filling them as much as possible with the first application. You can spread it sort of like you would body filler. And it can be lightly sanded after it cures, but only to a limit; if you get too aggressive with the sanding it will ball up and roll up and possibly even tear. But with fine grit paper and a fairly light touch it will shape and even feather pretty well. Therefore it is best to get it as close to your desired shape when you apply it, reducing the amount of sanding needed later. And it doesn't shrink like many products. I applied a couple of additional coats to get the surface flat. Here are some pics as I was sanding and building up the filler:

Looking down from above. The yellow lines represent where the major cracks were....
003.JPG


Closer view; still needs sanding and another layer here...
001.JPG
002.JPG


Eventually I filled all the way across the voids to their ends. As mentioned there were other spots that also got filled. Plus I decided to eliminate the headlight switch hole ('79 dash) and cigarette lighter hole by filling them the same way.

After filling everything I wanted to experiment more, this time with using a type of "truck bed liner" to cover the dash. I'd seen this done online a long time ago, then someone here (I think it was 'Look for Joe') mentioned it again. This dash was in rather poor shape all around. And it was the Fiat "turd" brown I hate. So I either needed to completely recover the surface in vinyl, or cover it with something heavy enough to hide all of its sins. There are a variety of truck bed liner (TBL) products with all sorts of different features and finishes. I chose to use a very inexpensive, commonly available product that comes in aerosol cans. This is a one-part (non-catalyzed) product that tends to go on thinner than most TBLs, has less "texture" than most others, and drys to a matte black finish. With the spray can type it is just like painting and no messy clean up.

I found that the more layers you build up the heavier the texture becomes. Actually I put on too much for my preference. Next time I would only put on one light coat. Then if needed I would use paint over that to provide better color coverage. But here is what it looks like with the TBL on:
050.JPG

053.JPG


Here's where the headlight switch was:
052.JPG


And where the lighter was (bad pic):
051.JPG


For a smoother surface it can be sanded or scuffed with a 3M "Scotch Brite" pad or fine paper. I will be recovering the dash, which was the plan all along, but it turned out much better looking than I expected. I may even keep part of it like this and only cover part.

Summary:
Use a Roloc disc to grind back the raised edges of the cracks until they are level with the rest of the dash.
Glob in a bunch of Flex Paste to fill the void and spread it as smooth and flat as possible.
Let it cure then sand any high spots with a fine grit paper.
Fill and sand again as needed to get the desired repair.
Paint one light coat of a spray can 'truck bed liner' product.
Lightly scuff the surface with a Scotch Pad to get the preferred finish/texture.
If desired you can paint over that to get the color you want.
 
Last edited:
I found the pictures from the web, showing what someone else did with the truck bed liner treatment:

IMG_20191222_153301-L.jpg


Here are the products they used:
IMG_20191222_153751-L.jpg


They painted the "trim black" over the liner. That's what you see in the first pic.

The dried color of the one I used (a different brand) already has the same matte black look as their "trim black", so I did not add any paint over the liner.
Compared to the example above mine came out slightly rougher - a bit more "granular" looking. However as I said, I also put on more coats than I should have (around three for the most part and four in places). And each coat made it more granular. But in a way it also gives a similar effect as a "flocked" or "velvet carpeted" dash - both of which I really like:
c342-gauges.jpg

avicb4tfauk21.jpg

b31i7224_0 - Copy.jpg


Early Alfas also have a similar texture finish on parts of their dash:
031 - Copy (2).JPG


There's another bed liner product that has a very smooth, yet textured finish. Almost a wrinkle look. It is a two-part catalyzed product, messier to do, and more costly, but I really like the finish it gives. It's from U-POL and looks like this:
U-POL Bed Liner finish.jpg


Excellent on firewalls, valve covers, etc, and it might work on some interior surfaces like we are discussing?
 
Got a perfect early dash from another member. 2 years later (sitting in the barn) and it has the dreaded cracks (identical to those above). This post is perfect, DJ. Thanks. This is the first interior project and the last big step to my current resto. I'm also going to do the final coat the cheesy, plastic radio cover...maybe it won't look so bad. BTW, what did you fill the light switch and lighter holes with? And what TBL did you use?
Thanks in advance
 
The filler of choice is what is used for flexible bumper covers. Grind out crack in a deep "V" until reaching "uncurled" vinyl on all sides of the crack. Fill, sand, and refinish. Filler is available at any body shop supply company. That will handle the cracks, refinishing the rest of the dash to look "right" - not so easy.
 
Got a perfect early dash from another member. 2 years later (sitting in the barn) and it has the dreaded cracks (identical to those above). This post is perfect, DJ. Thanks. This is the first interior project and the last big step to my current resto. I'm also going to do the final coat the cheesy, plastic radio cover...maybe it won't look so bad. BTW, what did you fill the light switch and lighter holes with? And what TBL did you use?
Thanks in advance
Shame the dash developed cracks just sitting on a shelf. I found that the foam material that's under the outer vinyl layer tends to rot away, leaving little to no support inside. And the covering vinyl isn't all that thick to begin with and it becomes very dry and brittle. So it doesn't take much to cause damage. Even after I removed the dash from the car it acquired a few new dings and small cracks just from handling it.

The holes for the light switch and lighter were filled with the same "Flex Seal" product as the cracks. I placed a thin bit of aluminum across the bottom of the openings (against the metal framework in the dash), then started dumping huge amounts of the filler into the hole. That's one thing I liked about using this product, you can apply it as heavy as you like and it doesn't shrink, crack, or do any of the usual things that almost every other filler does. It has enough 'stick' to it that it bonds in place when cured. It did not require any sort of prep work or any unusual application technique like most products do. Plus it is rather inexpensive compared to the products more commonly used for this type of repair; a 'squeeze tube' of it was more than enough to do everything seen on this dash with quite a bit left over....and I was very wasteful with it. I saw the same tube at Lowes for $12, hard to beat that.

Regarding using the bed liner over the radio box. Yesterday I took another look at the finished dash to decide how I want to cover it. Initially I was thinking of possibly a leather or faux suede material. But after viewing the result on the dash again I've decided not to recover everything and to also use it on the center console, instrument cluster surround/bezel, and glove box door just to make everything match. [Due to how brutal the sun damage is here I will cover the top of the dash with a custom "dash carpet" I had a friend make; it is a material similar to one of the pictures I showed in post #3.] So if you like the bed liner finish then it will work well on that radio surround. I will likely add many years to its life; this stuff is very tough and should make the plastic substrate much more resistant to cracking. But I realize this finish isn't for everyone and certainly not a "OEM" restoration look.

Honestly I'm not certain what the exact liner product I used was. I found it buried on a shelf from years ago and I can't even remember where I got it - most likely a free sample from one of the many automotive trade shows I go to every year. I almost expected it to have gone bad after sitting in this hot climate for so long. But it sprayed out very nicely, just like a can of spray paint. And that was something I liked about it, it did not go on heavy and thick. I didn't want a huge buildup that might make fitting everything back together difficult. The label on the can was a name I don't recognize offhand, something like "Bed Armor". But I will pick up one of the common ones found at any parts store or even places like WalMart for doing more of it. I'll report back if it gives any different results.
 
The filler of choice is what is used for flexible bumper covers. Grind out crack in a deep "V" until reaching "uncurled" vinyl on all sides of the crack. Fill, sand, and refinish. Filler is available at any body shop supply company. That will handle the cracks, refinishing the rest of the dash to look "right" - not so easy.
I've used that repair material in the past for urethane bumpers (actually for custom body kits made of urethane). SEM makes a good one that works great, but in this case there were several considerations. First, those bumper repair products are not intended for filling really deep voids like my dash had. They tend to not be as forgiving to work with if you try to lay it on thick. The foam inside my dash was completely rotted away and crumbled/fell out as I worked on the crack...all the way down to the metal frame. So I was left with a gap over an inch deep. Second, it is intended to mend damage like a adhesive glue. Urethane bumpers tend to tear rather than crack. So there isn't any voids left to fill. By the time I ground back the curled up vinyl around the cracks it was at least 3 or 4 inches wide. Not really a "crack" anymore. Third, they are more expensive and I already had the Flex Seal product on hand. Fourth, they tend to be messy to work with. While that's not a deal breaker, this other stuff is super easy to use. But those urethane glues are great for the more typical narrow dash cracks found in "normal" cars.

Likewise there are products specifically marketed for repairing dash cracks. But they have the same limitations as I just noted. And they are even more expensive than the bumper repair stuff, especially when you consider the small can it usually comes in - I would have needed a dozen of them. It might be difficult to imagine just how big the gaps were on my dash, I wish I had taken pictures. Honestly I almost threw the whole thing in the trash after I ground back the curled vinyl.

And the curled vinyl wasn't the only issue. The entire dash surface is wavy, bumpy, distorted, and uneven. I think a lot of that is due to what I described in my last post. The thick foam inside rots away leaving no support for the vinyl. As the vinyl dries out it shrinks and pulls in every direction. So over time the surface is anything but flat. And that is a major problem if you intend to do as you stated: "refinishing the rest of the dash to look "right" ". For example if it is covered with a new layer of vinyl, that will reveal and amplify all of those flaws. The first example that comes to mind was the result "Look for Joe" found. His cracks weren't nearly as bad as mine:
IMG_20201223_153531.jpg


After sanding, filling, etc, he covered the whole dash in new vinyl. This was the result:
IMG_20201226_164406.jpg


I'm certainly not criticizing his work or trying to pick on him at all; I've had the same results in the past as well. A new smooth covering tends to make even the slightest flaw show up. Furthermore in my case I wasn't interested in making the dash look stock or attempting to get a show car finish. In fact I wanted something that was quick and easy and did not look original. And given how wavy the dash was I wanted something that wouldn't bring attention to those flaws as much. Therefore a matte finish with some type of texture was needed. I strongly considered flocking it, but that doesn't tend to last very long - especially in a harsh environment like mine. I also considered using one of the textured coatings like is used on rocker panels or maybe a wrinkle finish paint. Although many of those products do not leave much texture and they still need to be finished over them. The durability of bed liner products was another attraction. I've used bed liners before for other applications and liked it. And I liked the example I saw online (as pictured in post #3). I've also seen it used in unconventional applications on show cars that I liked. So I decided to experiment with it here.

Again, it certainly isn't for everyone. Really the main reason for posting this repair project wasn't to highlight the bed liner finish, nor to show the steps involved in repairing dash cracks....that has been covered many times in the past, and with much better results than mine. I think it was Mark that showed us the absolutely gorgeous job he did on one of his dashes. But mostly I wanted to present the Flex Seal product as a alternative for filling the large cracks found in many X dashes. As I said before I did not expect the Flex Seal to work; I found their products to be total garbage for any other use. But it did seem like a easy product to use, it was free, and I wanted to experiment with it. I honestly think it is a decent choice for this job.
 
This is one of the better videos I've run across on dash crack repair.

Great video. It also illustrates what I have found in the past using these techniques, as I just described in my last post. The bumper repair product leaves a very uneven surface that must be covered with another filler to make flat. Then yet another filler is needed to be able to sand it smooth and even. While the bumper repair remains flexible (as he demonstrated), most of the fillers that are used over it do not. So the result may crack in the future. Don't get me wrong, I'm am not against these techniques, they work. But I've done them and it is a LOT more work, and time, and money, than I found with what I've described. I am certainly not saying what I tried is better, just that I was pleased with it. And the outcome was as nice as any other approach I've done in the past (every old car has cracks in the dash). This was nothing more than an experiment that came out quite well so I wanted to share it. ;)
 
Honestly I almost threw the whole thing in the trash after I ground back the curled vinyl.
That's just what I did with my '74 K20. Never have seen one done that wasn't apparent from 10 feet away. I'm just fabricating the dash from aluminum sheet on mine and will probably have it all powder coated in black wrinkle. On a project like this my last concern is originality, so anything goes, and at least it will never crack.
 
That's just what I did with my '74 K20. Never have seen one done that wasn't apparent from 10 feet away. I'm just fabricating the dash from aluminum sheet on mine and will probably have it all powder coated in black wrinkle. On a project like this my last concern is originality, so anything goes, and at least it will never crack.
That's exactly what I'll do if I ever get around to the "Outlaw" build I've mentioned before - basically a trackday car for the street.
 
Another thought just came to mind when I mentioned the potential future build of the "Outlaw". It will be on a '85 X that I bought mostly for parts. One of those parts that I was hoping to use is its dash; it is already black (I had to get rid of the '79s turd brown color), and being from a milder climate and several years newer I expected it would be in better shape than the one on my '79. So I figured I'd use the '79 dash to experiment with the techniques I've described in this thread.

However when I examined the two dashes closer and compared them, the '85 is actually in worse shape. Although the two "typical cracks" on the '85 aren't quite as bad as on the '79 (those cracks on the '85 look more like the pic I showed of 'Look for Joe's car), there are a bunch more cracks all over it. I decided repairing it would be a bigger project than the '79. So not everything from "Bertone" was an improvement.
 
Nice work DrJeff - can you switch out your pics for 'full image' instead of thumbnails? When you click on them, they are still small, can't really see detail. Still, looks good overall.

IMO, some things just aren't worth that much time & energy to resolve. The dash with the two cracks was the one from the parts car - I just used it as a support whilst working on the binnacle. My 87 dash only has one crack on the right. With the dash back in, the bump in the surface by the vent doesn't bother me. I didn't even fill that, I just used a silicone caulk.

IMG-20201225-182701.jpg


I also was cheap with the regard to the vinyl, it's in 3 parts as I didn't want to deal with the width that would have been required to cover the ends in one piece - seams are visible if you look - just don't bother me in the slightest

IMG-20201228-163300.jpg
Regarding the pics I posted, as far as I know they aren't thumbnails. They were posted the same way I always do and they show full size on my screen. Does anyone else only see them as thumbnails? Any suggestions how I should check to verify the size?

I hesitated to use your pics as an example of how flaws will show through....sorry and no criticism was intended. But they were the only ones that I could find and they served the purpose. I completely agree with this statement: "IMO, some things just aren't worth that much time & energy to resolve." In fact that's what led me to try the Flex Seal and bed liner approach, I did not want to go through a more involved process or spend a ton of money on it. Frankly I thought this dash might end up as scrap anyway. Plus I intended to cover over the results with another layer of material - however now I've decided not to.

After seeing your excellent work on the custom binnacle and dash mods I was tempted to try something more unique as well. I really like this style of gauge pod and dash:
b31i7224_0 - Copy.jpg


Another member started doing something like that (can't recall his username). But I came back to the sentiment..."some things just aren't worth that much time & energy". I have way too many other projects already started and need to get some things completed before jumping into more major jobs. So I figured the quick and easy dash repair job I did would get me by for now and I might do a custom one in the future.
 
Last edited:
Some additional data to add about using "truck bed liner" for a dash finish.

Not sure if I mentioned it before, but one can of aerosol bed liner will be enough to do an entire dash. However in my case I had been experimenting with it and wasted a lot. Therefore when it came time to use it again on the extra surfaces (center console, glove box lid and gauge binnacle) I wasn't sure if I still had enough in the original can. So yesterday while I was running errands I stopped by the Harbor Freight next door to my principle destination, just to see what they carry. HF has two brands; Rust-Oleum for about $10 and their 'house brand' for around $8. Looking at the label the house brand appeared very much the same as the first can I had - as described in prior posts. So I decided to get it hoping it would be a direct match to what I've already been using.

When I returned home I sprayed the new "HF" liner on those additional components. Unfortunately the environmental conditions were horrible; it was 110+ F degrees, heavy winds, and extremely dry. So the liner did not spray on very well. With this heat and lack of humidity it was drying even before reaching the surface. Furthermore the wind would blow it away requiring me to hold the can much closer to the surface than ideal. The result was bad - uneven coverage with some areas looking very "wet" with little texture and a high sheen, while other areas looked very "dry" with a ton of texture and very matte. I was sure I would have to remove all of it and start over.

After letting it cure overnight, today I tried scuffing the newly covered surfaces with a "Scotch Brite" pad as I'd done before. This helped a LOT. I highly recommend doing so regardless how your finish comes out. It makes the surface look much more consistent, reduces the "rough" effect that a bed liner can get, and gives it a matte finish. In areas where there might be a higher texture or more sheen you can scuff it more aggressively and bring it to match the surrounding areas. In my case it was a huge improvement but there were still one or two surfaces I wasn't happy with.

After scuffing the worst surfaces I wiped them down and sprayed another coat from the same can I used yesterday (the environmental conditions were much better today). It went down extremely well...maybe even better than my first attempt a few days ago on the bulk of the dash. I'm not sure if the improvement was mostly due to the better conditions (they weren't perfect the first time either) or from scuffing the first coat then shooting a second coat over it. But I like this result even better.

Here are a few tips I've learned. Several factors can influence the resultant finish using a spray can of bed liner. The temperature, the distance sprayed from the surface, how heavy you lay it on, how many coats are applied, how much you scuff it after it cures, and possibly doing one coat / let it dry then scuff it / then apply a second coat. All of this is similar to using spray paint, but it seems to be ten times more critical with the bed liner because it affects the texture as well as the coverage. And the texture can be made light or very heavy by altering the application techniques.

Here is an example of what a lighter coat looks like (compared to my earlier attempts shown previously). For the most part it was a very light spray followed by a medium spray - kind of 1 1/2 coats I guess:
057.JPG
058.JPG


Hard to get good pics, and these are very close up shots, so it looks even better from normal distances. It very much reminds me of the finish on some of the vintage German car dashes I've had in the past or possibly Alfa gauge pods (see the pic in post #3).
 
Last edited:
Ooops, just noticed your comment: "Maybe they are just too low resolution? When clicked on, they don't open to a larger image."

Is anyone else finding the same thing? Because these should be normal size and resolution pics. In fact my camera settings give much too great of resolution so I have to resize them and even crop them to make the size more appropriate for the forum. No different that what I've always done. Do any of my earlier pics look that way to you? Which specific ones that I posted are doing this...all of them? Possibly your browser or settings?

I seem to recall there were some internet connection difficulties around the date of my first post in this thread....that might have caused a glitch.

This is one example:

Screen Shot 2021-08-11 at 8.36.55 PM.png
 
Back
Top