Eurosport body, K20 power

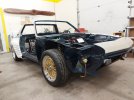
My wheels came today, so of course I had to do this:

Wheels Mockup.jpg
 
Been disabled with medical issues for the last number of months, but recently managed to get the wiring cleaned up. I made up a "Forest of Ground Tabs" as the primary termination point for most of the ground wires - I am not a fan of using the body as the ground in most cases. I also added a few relays, as suggested here on the forum, for lights and wipers. The box I used has provision for some fuses as well which was handy.

Ground Tabs:
Ground Tabs.jpg


Frunk Electrical:

Frunk Electrical.jpg
 
LOL, perhaps you misunderstand, good sir!

adjective: proof
  1. 1.
    able to withstand something damaging; resistant.
    "the battery is proof against the Canadian winter"

    Similar: resistant; impervious; repellent
 
LOL, perhaps you misunderstand, good sir!

adjective: proof
  1. 1.
    able to withstand something damaging; resistant.
    "the battery is proof against the Canadian winter"

    Similar: resistant; impervious; repellent

No, I get it. I was making a joke, as if the battery were resistant to or able to repel Canada itself.

At least in the states, "proof" and "resistant" make different suggestions to the reader. Something that can manage heat and fire would be advertised as "fire resistant" because "fireproof" suggests that it is utterly invulnerable to fire--something lawyers would not be keen on suggesting to the consumer.
 
Last edited:
My first thought was that it was filled with Whisky and I needed to get one!

But alas no, it's just a battery.

Roy
 
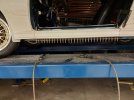
Coming along! Just noting the variations in your frame mods. I didn't need to cut the right skin back as much to get clearance off the pulley. Your frame kit is quite different than the version I have - curious if it's an older gen?

Sorry for the necropost. That subframe is definitely one of the earlier ones. Notable differences are the welded-together 1.5" square tube on the center mounting points instead of the later 1.5x3", the more prominent use of round tubing instead of square, and the additional triangular brace to the right of the front center mounting point. The square tubing was easier to work with, so I switched more and more to square tube until you see the final version that Brayden is welding these days.

It's fun to see some of my welds from 10+ years ago on current projects. Now get it done!
 
Last edited:
I'm wondering if the diffferences are all due to the subframe kit - perhaps your version set the drivetrain 1/2"-3/4" further to the right, I think that would explain it.

The subframes changed quite a lot over the first several kits, and the other mounts changed a little as well, but all parts were built from jigs that I created when @Pete Whitstone 's car was in the shop receiving its K20 conversion. I doubt that the subframe jig ever changed. Even 1/2" to the right probably would have been a major change.
 
While the car was on the rotisserie I turned it upside down and worked on the exhaust, basically a copy of what Rodger had done with his except I didn't bother with the cat. Had to re-learn how to tig weld, been about 20 years since I did any of that and wasn't all that good at it then. I will finish it when I have the rear fascia mounted and know just where the exhaust will exit.

Exhaust.jpg


And then today was the big day, she came off the rotisserie and is standing on her own 4 feet!
Car on ground 2 (1024x768).jpg


Car on ground 1 (1024x768).jpg
 

Attachments

  • Car on ground 2 (1024x768).jpg
    Car on ground 2 (1024x768).jpg
    405.4 KB · Views: 69
Getting back to doing a little work on the car, installed the headlights and frunk lid, painted the interior of the doors, and installed the manual window regulators.

I had read the posts about the issues others have had with these regulators and their cable, so I inhaled an extra load of patience and went to work. Well, I guess I got lucky because it was a relatively simple process. I put the regulator in a vise, used an awl to organize the cable into the correct grooves on the reel (turning the spindle back and forth by hand), and then stuffed a small piece of wood against the spindle to keep the cable in place. I just let the rest of the cable lay loose, installed the regulator onto the door, threaded the cable around the pulleys inside the door, and installed the adjustment pulley. Maybe took an hour to do both doors. FYI, the doors are off a '76.

Regulator with wood stuffed in:
Window Regulator with block.jpg


Regulator and cable, just prior to installing into the door:
Window Regulator with cable.jpg


Door with regulator installed:

Door with window regulator.jpg
 
Clamped on the fenders and drove it up and down the driveway a couple times. The speedo works, Yea! That was the only thing I haven't been able to test on the Acura bezel I am using.

It Runs!.jpg


Next on the agenda is to fit the front fiberglass piece. I previously noted that the wheel arch seems too far aft, but thought I should set the castor before deciding how to deal with that. So I set the toe first using the string method (front and rear) and then set the castor. The wheels did move a fair bit aft but not enough for my liking, so I trimmed about an inch off the front fender well and am glassing in a new lip.

I started with cutting some blue insulation foam about 1/8" thick and hot gluing it to the fender:
Front wheel lip styrofoam.jpg


I applied fiberglass to the front and rear sides of the foam, then covered that with an epoxy/glass bubbles/cabosil mix. Still a work in progress but getting close:I
Front wheel lip glassed.jpg


Next I decided to fit the fibreglass door sill mouldings. This involved setting the front and rear fenders in their proper place and cutting the moulding to length:
Sill Fitting.jpg


I needed a bracket for the bottom of the moulding as there is nowhere to attach this:
Sill Bracket.jpg


Now drill holes for the blind rivets that will attach the moulding to the bracket:
Sill  in place.jpg


And finally rivet the bottom and epoxy the top. I stripped the paint off where I would apply the epoxy and roughed up the metal with 80 grit. I used a mix of epoxy/flox/cabosil. The flox adds strength to the mix, cabosil prevents the mixture from sagging.
Sill permantly attached 2.jpg


Sill permantly attached.jpg


The first piece of fibreglass is permanently attached! Now go do the other side......
 

Attachments

  • Sill  in place.jpg
    Sill in place.jpg
    385.3 KB · Views: 56
Last edited:
Headlights, horns, and front signal lights are now connected and working.

Installed the drivers door - wanted to see how it looked. I removed the reveal along the front fender and the door as I didn't like how it flowed into the side scoop. I think it looks much better (and it is my car!). The rear fenders and rear fascia/bumper are only temporarily attached at this point. Also, a lot of work to do to sort out the door gaps - the pic does not tell the whole story there. Passenger door next and then on to the rear fenders.

20230723_154236.jpg
 
I removed the reveal along the front fender and the door as I didn't like how it flowed into the side scoop. I think it looks much better
I completely agree, it looks much cleaner without it.

To be honest I'm not that fond of it on a stock X. I also think the stock X needed a larger side scoop, which could have been styled without the side reveal.

There was a car made in Brazil or South Africa (or somewhere - I don't recall) that copied the X, called the Dardo. I believe it had a fiberglass body, and no reveal. Instead just a straight line along the full length:
DARDO X19 body.jpg

I like that more than the X's recessed panels.

Even better are some of the prototype concepts for a modern X, with completely smooth sides...similar to yours. This example also has the correct size side scoops...also similar to yours:
34685532e18a6be5ea1afc02949aacf9.jpg


How did you go about removing the reveal from the doors?
 
How did you go about removing the reveal from the doors?

For the doors I had a bodyman do those for me - he just welded in a slightly curved panel. For the reveal in the front fenders (these are fibreglass) I put epoxied in a thin piece of blue construction foam and covered that with an epoxy/glass bubbles mix. I cut a little metal template that matched the curve of the doors and used that to get the curve right on the fenders
 
For the doors I had a bodyman do those for me - he just welded in a slightly curved panel. For the reveal in the front fenders (these are fibreglass) I put epoxied in a thin piece of blue construction foam and covered that with an epoxy/glass bubbles mix. I cut a little metal template that matched the curve of the doors and used that to get the curve right on the fenders
Both of you did a nice job. I'd hate to tackle removing all of the recessed reveal on a stock body, it's a lot of metal work and plenty of opportunity to cause warpage or other problems. I'd also like to see the "V" recess in the middle of the hood go away on mine.
 
Been a while, but got back to work on the car this week.

Finished the exhaust:
Exhaust complete.jpg


Also permanently attached the rear fiberglass piece, body kit now all in place:
Rear fiberglass attached.jpg


Just cause everyone likes pictures, while the car was on the hoist I took a few shots underneath.

From the front looking aft:

Bottom from front.jpg


From the middle looking aft:
Bottom looking aft.jpg


From the rear looking forward:
Bottom looking forward.jpg


Next step is to deal with the dashboard. I am using the Acura bezel and not sure yet exactly how I am going to deal with this. I do like the approach taken by @homegrown32, however considering using a lot of the original dash combined with some fabrication and fiberglass work. Experimentation required. I have a couple original dashboards to work with, both in rough shape.
 
Back
Top