
Dan Sarandrea (Phila)
Waitin' On Parts...
Here's how I installed my Bob Brown© No-Cut Headlight Relays™")
Got two Radio Shack project boxes, and started on the passenger side.

Upgraded the power lead wiring to the relays and drilled holes to pass the wiring thru.

Spliced the power leads.

Velcroed the project box to the fender/pod bulkhead.

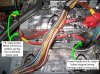
Power lead follows original wiring harness. There was an extra hole in the rubber plug that was perfect for passing thru the #10 wire. Relays ground to the existing ground bloom.

Here's a close-up of the 2-into-1 butt splice, hard to find in small quantities (I ordered from www.sherco-auto.com).

Driver's side same as passenger side.
(Photo omitted to stay within 10 pic limit per post).
Grommets to protect wiring.

Power feeds have inline fuses located in the frunk.

Power feed originates at thru-the-bulkhead power post (has since been revised---see http://xwebforums.com/forum/index.php?threads/21450/)

Got two Radio Shack project boxes, and started on the passenger side.
Upgraded the power lead wiring to the relays and drilled holes to pass the wiring thru.
Spliced the power leads.
Velcroed the project box to the fender/pod bulkhead.
Power lead follows original wiring harness. There was an extra hole in the rubber plug that was perfect for passing thru the #10 wire. Relays ground to the existing ground bloom.
Here's a close-up of the 2-into-1 butt splice, hard to find in small quantities (I ordered from www.sherco-auto.com).
Driver's side same as passenger side.
(Photo omitted to stay within 10 pic limit per post).
Grommets to protect wiring.
Power feeds have inline fuses located in the frunk.
Power feed originates at thru-the-bulkhead power post (has since been revised---see http://xwebforums.com/forum/index.php?threads/21450/)
Attachments
Last edited: