new '82 X owner (after 30 years without) general questions

The new formulation starts to rapidly cure when opened and any residue on the edge of the lid or can rim will virtually weld it shut.
Sounds like POR-15. I only buy the tiny little cans these days, for single or maybe 2 uses if I'm super careful not to get any on the can's lip.
I vividly remember wire wheeling, cutting, and welding new floor pans in my first x1/9 back in the 80s. Thankfully the current one is practically rust free in comparison.
Thanks for the good tips!
 
About getting paint on the lip of the can... I've started using strips of blue painters tape to cover the lip. It comes out sort of octagon shaped. Gives me an edge to wick off some paint and keeps the top of the can clean.

For example, I have a gallon can of bed liner stuff that's more than 5 years old. I use it now and again to water proof various things. The can and lip are still plenty clean.
 
Had a hectic last month so cooling, fuel and exhaust system overhaul went slowly but yesterday got the MWB HD radiator and hoses in, with cleaned-up fan and new switch. Also installed new water pump, thermostat and water temp gauge sender in block.
Next is replacement of injector plugs, new heat shielding around muffler and finally Vick's header and NOS factory muffler.

side note: I tried Rustoleum 2000F Ceramic primer and paint on the cooling tube, exhaust spring hangers and alternator bracket. Baked at 250F, 450F and 600F (had hacked my kitchen oven for pizza making to allow opening during clean cycle, goes up to ~850F) per instructions and after the 600F bake the paint started peeling off. Great.
Stripped it off and used silver Rustoleum "high heat" grill paint, supposedly good for 1000F. Only baked it to 400F we'll see how it holds up.


image_50734081.JPG
image_50417665.JPG
image_67231489.JPG
image_50457601.JPG
 
Last edited:
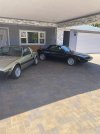
hi all - my first car in 1989 was a '79 X (bought for $400 then rebuilt the motor, trans, repainted in father's garage) and after a looooong hiatus finally got back into the game with the Rosso Arancio '82 from BaT a few weeks ago. It made the 220 mile trip from San Antonio to Houston this week without issue, just plenty of grins!
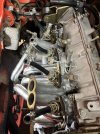
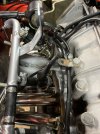
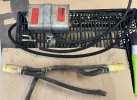
Solid car: strong motor, smooth suspension, good steering, but sketchy shifting (have a new lollipop and wavy washer on order), jittery/clicking speedo, a few inop electrical things and misc cosmetics so enough things to do to keep me and my son occupied while we enjoy driving her.
She'll be a fair weather runabout, with a time or two exercised at a local kart track for "Track Casual" fun. Don't plan to mod the drivetrain or suspension for higher performance (unless a VTECH engine swap somehow falls into my lap).

I'm now putting together a to-do list, and would greatly appreciate any wisdom from the group to supplement various threads here (some of course a number of years old).

1) Tires. Has a ~8yr old set of "Joyroad" 175/60R13s, which feel fine but while I'm redoing the Campagnolo wheels figure might as well replace them with fresh rubber.
a) I see stock size is 165/70 (skinny/tall). Searching here shows 185/60 is also done. What's the current size and model (availability) y'all are going with for "period" grip at reasonable price? Anyone try Waterfall Eco Dynamics? Stock size: https://www.walmart.com/ip/Waterfall-Eco-Dynamic-165-70R13-79-T-Tire/986034974
Or would you go for Achilles 185/60 (same diameter, 20mm more tread width): https://www.performanceplustire.com...zi5w8zeVrOSvOG2plWPmAhgG0KpyD37RoC87YQAvD_BwE
NOTE: PP Tires is OUT OF STOCK on these as of 12/30/22, even though website shows in stock.
or something else right now?
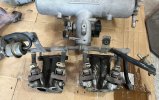
2) Whats the preffered product(s) for redoing stock Campanolas? Figure I'd sandblast these to bare aluminum then spray paint with some kind of aluminum-look rattle can, then clear. Anyone have tips/recommendations on paint type/brand/color for stock appearance? VHT, Rust-o-leum, Eastwood etc?
3) Plan is to take the seats and sunvisors to a local upholsterer for firm quote of new replacement covers. Budget quote was $550 for both seats, backs and bottoms for new, custom-made vinyl covers which seems super reasonable assuming I'm happy with the work! Based on lessons-learned by y'all, anything in particular I should know/ask/demand of the upholster to get the best results? NOTE actual cost is $1000, for exact same panels/stitching as original, but with a black/white checked fabric on center sections.
4) bouncing/clicking speedometer. Haven't yet gotten to searching here yet but anyone have a link saved to a "definitive" thread, or just easy advice to diagnose/fix?

Thanks much for input/help on the above. I'll definitely be investing lots of time searching further here for undoubtably great intel.
salud!
Kurt
Cypress TX

View attachment 69179View attachment 69180View attachment 69181
If you're thinking Campagnolo & Cromodora
 

Attachments

  • IMG_1404.jpeg
    IMG_1404.jpeg
    203 KB · Views: 60
Had a hectic last month so cooling, fuel and exhaust system overhaul went slowly but yesterday got the MWB HD radiator and hoses in, with cleaned-up fan and new switch. Also installed new water pump, thermostat and water temp gauge sender in block.
Next is replacement of injector plugs, new heat shielding around muffler and finally Vick's header and NOS factory muffler.

side note: I tried Rustoleum 2000F Ceramic primer and paint on the cooling tube, exhaust spring hangers and alternator bracket. Baked at 250F, 450F and 600F (had hacked my kitchen oven for pizza making to allow opening during clean cycle, goes up to ~850F) per instructions and after the 600F bake the paint started peeling off. Great.
Stripped it off and used silver Rustoleum "high heat" grill paint, supposedly good for 1000F. Only baked it to 400F we'll see how it holds up.


View attachment 78428View attachment 78429View attachment 78432View attachment 78433
For my future reference, is that a good jacking point for the front of the car?
 
Had a hectic last month so cooling, fuel and exhaust system overhaul went slowly but yesterday got the MWB HD radiator and hoses in, with cleaned-up fan and new switch. Also installed new water pump, thermostat and water temp gauge sender in block.
Next is replacement of injector plugs, new heat shielding around muffler and finally Vick's header and NOS factory muffler.

side note: I tried Rustoleum 2000F Ceramic primer and paint on the cooling tube, exhaust spring hangers and alternator bracket. Baked at 250F, 450F and 600F (had hacked my kitchen oven for pizza making to allow opening during clean cycle, goes up to ~850F) per instructions and after the 600F bake the paint started peeling off. Great.
Stripped it off and used silver Rustoleum "high heat" grill paint, supposedly good for 1000F. Only baked it to 400F we'll see how it holds up.
I used the 2000F Rustoleum paint on my headers and it worked great. I had a spare oven in my basement and the headers just fit in by about a quarter inch. I used the specified heat cycle with no issues. That paint seems to work a bit like powder coating except that no electric charge is used to attach the paint. Like powder coating, the sprayed on paint appears to reflow during the heat cycle.
 
Right, sorry, me two. I meant the jack stands...
oh - I don't know for sure but they seemed like solid places to only support ~500lb each.

I used the 2000F Rustoleum paint on my headers and it worked great. I had a spare oven in my basement and the headers just fit in by about a quarter inch. I used the specified heat cycle with no issues. That paint seems to work a bit like powder coating except that no electric charge is used to attach the paint. Like powder coating, the sprayed on paint appears to reflow during the heat cycle.
yeah I was hoping for good results too, this is what happened after cooling from final bake. It maybe went to 650-700F instead of the 600F in instructions for 3rd bake cycle, in which case it's pretty damn sensitive for "2000F" coating.
I prepped the hell out of the bare metal and used the special primer.
The 1000F grill paint should be plenty for the parts I did.
thumbnail (2).jpeg
 
oh - I don't know for sure but they seemed like solid places to only support ~500lb each.


yeah I was hoping for good results too, this is what happened after cooling from final bake. It maybe went to 650-700F instead of the 600F in instructions for 3rd bake cycle, in which case it's pretty damn sensitive for "2000F" coating.
I prepped the hell out of the bare metal and used the special primer.
The 1000F grill paint should be plenty for the parts I did.
View attachment 78444
For all the non exhaust stuff, I used the Rustoleum Engine Primer and Rustoleum Engine Enamel. Seems like typical spray paint but it has held up well on engine and suspension parts.
 
Sexy stainless pipes and rebuilt injectors in. Tomorrow is soldering day for new push-clip plugs.
Put a short weld bead on 2 of the thick washes to take up the ~1mm difference in thickness between Vic's header flange and intake runner.
One washer needed a bit of grinding to clear the exhaust tube.
Otherwise great fit. Pretty much perfectly located with nothing touching the down tubes.

image_67505921.JPG

image_50457345.JPG

image_67539969.JPG

image_50451457.JPG
 

Attachments

  • image_67532801.JPG
    image_67532801.JPG
    260.5 KB · Views: 43
Sexy stainless pipes and rebuilt injectors in. Tomorrow is soldering day for new push-clip plugs.
Put a short weld bead on 2 of the thick washes to take up the ~1mm difference in thickness between Vic's header flange and intake runner.
One washer needed a bit of grinding to clear the exhaust tube.
Otherwise great fit. Pretty much perfectly located with nothing touching the down tubes.

View attachment 78567
View attachment 78572
View attachment 78569
View attachment 78571
Sexy.
 
oh yeah. Always a fun stage in the project when shiny/new/clean parts are going back on.
I love to get a cup of coffee, wine or beer and just stare at it.
Here's the fuel rail and lines, before and after.

I'd originally bought this plug kit: https://www.amazon.com/Injector-Con...d=1699719591&sprefix=ev1+boots,aps,120&sr=8-2

But wasn't happy with the crimping/pin installing, so ordered these ready to go pigtails: https://www.amazon.com/dp/B07H75K959?psc=1&ref=ppx_yo2ov_dt_b_product_details

At least used the new boots from 1st kit.
 

Attachments

  • image_50443521.JPG
    image_50443521.JPG
    397.7 KB · Views: 56
  • thumbnail (3).jpeg
    thumbnail (3).jpeg
    159.4 KB · Views: 54
  • image_50727425.JPG
    image_50727425.JPG
    430 KB · Views: 53
  • image_67234561.JPG
    image_67234561.JPG
    227.4 KB · Views: 54
  • image_50452737.JPG
    image_50452737.JPG
    457.5 KB · Views: 56
I would want to perfect the craft of crimping the connections as I would trust that more than an inline connection but that is me.
oh yeah. Always a fun stage in the project when shiny/new/clean parts are going back on.
I love to get a cup of coffee, wine or beer and just stare at it.
Here's the fuel rail and lines, before and after.

I'd originally bought this plug kit: https://www.amazon.com/Injector-Connector-Waterproof-Connectors-Harness/dp/B07C7QSQBY/ref=sr_1_2?crid=2HD331M4Z3VWY&keywords=EV1+boots&qid=1699719591&sprefix=ev1+boots,aps,120&sr=8-2

But wasn't happy with the crimping/pin installing, so ordered these ready to go pigtails: https://www.amazon.com/dp/B07H75K959?psc=1&ref=ppx_yo2ov_dt_b_product_details

At least used the new boots from 1st kit.
 
I would want to perfect the craft of crimping the connections as I would trust that more than an inline connection but that is me.
the "pigtail" connectors come pre-crimped. Not sure what you mean by "inline"?
I soldered the 2 new ignition wires to old.
These are the "crimped" pins:

1699758383805.png
 
Back
Top