Selling the X & Bought an 75 Datsun 280Z

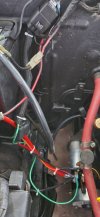
The old bracket for the hard line to the caliper looks to be extraneous, I presume there is no chance of the new line contacting the bracket?

Looks like a nice set up. Congrats.

Yes, it is no longer required. I considered removing them, however if I ever wanted to return to stock, that would be needed. It also does not come close to the new hose. Also, the struts are absolutely mint for 48 year old parts. I couldn't bring myself to cut it off 🤣

Got the brakes bled, then worked on the fender liners & the wheel well coating.

Did some plastic weld repairs to the cracks around the mount points

PXL_20230530_141336333.jpg

Added closed cell foam to the inner rear panels, they are not exactly a snug fit by any means

PXL_20230530_151356344.jpg

PXL_20230530_152253060.jpg

added a foam lip for the main panels, they also don't seal against the fender as supplied. I looked for an EPDM lip, but the ones I have are too bulky. I've since found one online, so I'll revisit that when I remove the fenders in the future

PXL_20230530_194720704.jpg

PXL_20230530_195322019.jpg


reinforced the forward sections with plastic washers. Also using Volvo M6 hardware with large heads, to spread the load

PXL_20230530_193551342.jpg

Shouldered hardware - prevents crushing the liner

PXL_20230530_193601659.jpg

Scrubbed the wheel arches with a wire brush, then prepped the undercoat with lacquer thinners to help the Rocker Shutz adhere

PXL_20230530_173914365.jpg

PXL_20230530_173921013.jpg

PXL_20230530_181312642.jpg

PXL_20230530_181323474.jpg

wait 45 mins then apply undercoat

PXL_20230530_185826470.jpg

PXL_20230530_185833336.jpg

PXL_20230530_185843926.jpg

PXL_20230530_185847415.jpg

PXL_20230530_190047143.jpg

PXL_20230530_191439869.jpg

Put the Konig on to find that the backside of the hub doesn't clear the Toyota S12 calipers. Had to add a 1/8" spacer to each side

PXL_20230531_002954846.jpg

PXL_20230531_003612449.jpg

PXL_20230531_003629838.jpg
 
Last edited:
Finally got back to the valve adjustment, now the car is back on all 4 wheels. I just bump the motor with it in 4th gear. the car is so light I can push it forward with one hand on a tire - went 1, 5, 3, 6, 2, 4.

I also bought the silicone VC gasket, but didn't read the install directions until I was ready to put it all back together. I found that it has to be "glued" to the cover with RTV. SO, It's not going to be finished until tomorrow

One of the locknuts was so tight I took a chunk of skin off my finger on the metal cover next to the battery. Most of the rest were barely tight. No valves were within cold spec, all too tight. couldn't even get the .008" in the exhaust rockers. They were all at least 1/2 a flat too tight. I set all intake @ a snug .008" and exhaust @ .010". I did torque the lock nuts to 36ft/lb, based on the range given in the FSM. Definitely fiddly, as I found it very easy to end up with the valve too tight again, when snugging the lock nut.

PXL_20230531_220228682.jpg
 
Hey Hussein. Looooking good......

I think I asked this before...with no answer.......but it almost looks like that Datsun valve wrench....just might work on an X1/9's head bolts ??

17mm ? Right ? You still got an X1/9 engine there to try it on ??
 
Hey Hussein. Looooking good......

I think I asked this before...with no answer.......but it almost looks like that Datsun valve wrench....just might work on an X1/9's head bolts ??

17mm ? Right ? You still got an X1/9 engine there to try it on ??

I don't have stock head bolts in my (Karl's) 1600 motor. I'll check anyway. It is open ended though. Don't think I'd trust it not to stretch if torquing head bolts.
 
Drove the car today to get the NY state inspection done. It still needs all the rear suspension work, but at least the front end has integrity. After that, I stopped at the local Nissan dealership. The Parts Dept has a key cutter that is programmed with the original key codes - since I have the original keys, with the codes stamped on them, they were able to cut the new key blanks I bought (from Asia, via eBay) by code instead of mirroring the very worn cuts of the originals. The first set worked perfectly, so they cut the 2nd pair as well, no charge. I think they were happy to see a Datsun outside the showroom?

Also found that the starter solenoid is flaky - having driven it around & got it hot, the starter won't catch without playing with cycling the key.
 
Last edited:
Drove the car today to get the NY state inspection done. It still needs all the rear suspension work, but at least the front end has integrity. After that, I stopped at the local Nissan dealership. The Parts Dept has a key cutter that is programmed with the original key codes - since I have the original keys, with the codes stamped on them, they were able to cut the new key blanks I bought (from Asia, via eBay) by code instead of mirroring the very worn cuts of the originals. The first set worked perfectly, so they cut the 2nd pair as well, no charge. I think they were happy to see a Datsun outside the showroom?

Also found that the starter solenoid is flaky - having driven it around & got it hot, the starter won't catch without playing with cycling the key.
I have the same problem with my Z. I've heard they suffer the same problem the X does & added a starter relay based on the discussions here. I haven't had any clicks since, but I haven't driven it much either.
 

Attachments

  • 20230518_193725.jpg
    20230518_193725.jpg
    107.6 KB · Views: 60
I have the same problem with my Z. I've heard they suffer the same problem the X does & added a starter relay based on the discussions here. I haven't had any clicks since, but I haven't driven it much either.

Thank you - That's interesting to note. I still have the VW relay kit I bought for the X1/9 when it had the 1600 - I'll look at adding that in.
 
Thank you - That's interesting to note. I still have the VW relay kit I bought for the X1/9 when it had the 1600 - I'll look at adding that in.
I changed the starter initially as they had a Delco on Rock Auto for under 30 bucks, but the clicking continued.... Easier than the X as everything is within 15 inches of each other & full access. Plus I used a male spade connector on the trigger wire & heat shrieked over it so it's undoable in seconds.
 
So, the ambient temps dropped back into the 60's today, and I could not duplicate the problem. I did look at the wiring & tighten the spade. Not sure how much that matters when it's relying on the round pins on the bridge connector. I took that apart & cleaned both sides with contact cleaner. I'd really like to replace these pins. Does anyone know what series/brand they are (Yakazi, Furukawa, etc.,)? The oil pressure gauge worked again after this, so I have to consider that these contacts are less than ideal now. EDIT - Yazaki YPC series.

PXL_20230603_202307703.jpg

PXL_20230603_202304586.jpg

I could see that there were issues with the hanrness along the frame rail, so I stripped out the ground wire to the alternator, which had clearly overheated at some point. Thankfully it hadn't shorted or melted through the insulation of any other wires besides the smaller grounds that splice into it. The connector at the inner fender was not tight at all. One of the heavy gauge black wires goes/comes from inside the cabin, not sure offhand what circuit it is grounding, but the connection was not good at all.

PXL_20230603_191128972.jpg

made a new ground cable for the alternator, and tied in the 2 smaller ground wires that were previously connected into a separate ground. At the other end, I separated the grounds that came from the cabin & added a separate eyelet

PXL_20230603_200959055.jpg

PXL_20230603_201234548.jpg

Alternator end

PXL_20230603_201239941.jpg

wrapping that up, I ran the engine & immediately smelled gas - #3 injector hose clamp was not fully tight at the rail. I will need to redo all those at some point. I hate the open slot hose clamps, they are not appropriate and always cut into the hose

PXL_20230603_203012106.jpg

Warmup idle seems smoother since valve adjustment

 
Last edited:
I
So, the ambient temps dropped back into the 60's today, and I could not duplicate the problem. I did look at the wiring & tighten the spade. Not sure how much that matters when it's relying on the round pins on the bridge connector. I took that apart & cleaned both sides with contact cleaner. I'd really like to replace these pins. Does anyone know what series/brand they are (Yakazi, Furukawa, etc.,)? The oil pressure gauge worked again after this, so I have to consider that these contacts are less than ideal now.

PXL_20230603_202307703.jpg

PXL_20230603_202304586.jpg

I could see that there were issues with the hanrness along the frame rail, so I stripped out the ground wire to the alternator, which had clearly overheated at some point. Thankfully it hadn't shorted or melted through the insulation of any other wires besides the smaller grounds that splice into it. The connector at the inner fender was not tight at all. One of the heavy gauge black wires goes/comes from inside the cabin, not sure offhand what circuit it is grounding, but the connection was not good at all.

PXL_20230603_191128972.jpg

made a new ground cable for the alternator, and tied in the 2 smaller ground wires that were previously connected into a separate ground. At the other end, I separated the grounds that came from the cabin & added a separate eyelet

PXL_20230603_200959055.jpg

PXL_20230603_201234548.jpg

Alternator end

PXL_20230603_201239941.jpg

wrapping that up, I ran the engine & immediately smelled gas - #3 injector hose clamp was not fully tight at the rail. I will need to redo all those at some point. I hate the open slot hose clamps, they are not appropriate and always cut into the hose

PXL_20230603_203012106.jpg

Warmup idle seems smoother since valve adjustment

I could easily see the round grouped bullet type connectors going away. There are much better solutions, like what Volvo uses for example, or another modern connector.

Reliable electricals make a car so much more enjoyable.

I was sure you would be on Oetiker clamps for the injection system by now…
 
Now that I've driven the Z around some, I have found that I really dislike the seats. They are flat, and not particularly supportive, and have zero height adjustment. Sliding around in the seat is no bueno for my lower back. I have found that ppl have adapted the 350Z seats, so that's likely what I will do. The driver's seat does need work. I'll attempt to re-stitch the this, but worst case I'll get new leather from CanadaSeatSkins

IMG_20230605_082801.jpg

IMG_20230605_082756.jpg


sample installed pic from ClassicZ
image.thumb.jpeg.9bfcf2bf8835a5fe50095fd912de95c9.jpeg
 
Drove the car about 35 miles today, there is still a vibration in the steering wheel - The only thing I hadn't changed yet was the column rubber joint, so I did that after work. The u-joint still feels nice & tight.

PXL_20230605_192542800.jpg

PXL_20230605_194037231.jpg

Also swapped out the 1/8" wheel spacers for 1/4" to get a better safety margin on the caliper clearance off the wheel hub

PXL_20230605_212152071.jpg

I also put a Delco Reman starter in after work.

PXL_20230605_213341063.jpg

There was already a reman in there

PXL_20230605_213325391.jpg

Needless to say the problem still exists. I don't understand why the ammeter shows a heavy draw when it clicks if the problem lies in the wiring. I'll put a new spade I=on the solenoid trigger next.

Another question - I can't figure out how the clutch MC cap comes off, it won't turn no matter if I try just turning, push down & turn, lift & turn. I don't want to break it. Seems to have tabs on the sides, but I don't see how they retain it

PXL_20230605_195158305.jpg


Also a Gearing question - I can't figure out what the speed in gear will end up as with the 6 speed CD009 vs. the 4 speed F4W71B

Can anyone help with figuring it out? This type of math makes my brain hurt. Currently, in 4th 60 mph = 3K rpm. I can map each gear @ 3K rpm if that helps, I don't know :( I'm assuming 5th will be like 4th now - 3K rpm @ 60mph. Based on that, I'd expect 6th to be around 70mph @ 3K rpm?

FD: 3.54:1

CD009 F4W71B

1st 3.78 3.321
2nd 2.32 2.077
3rd 1.62 1.415
4th 1.27 1.00
5th 1.00
6th .79
 
Last edited:
Drove the car about 35 miles today, there is still a vibration in the steering wheel - The only thing I hadn't changed yet was the column rubber joint, so I did that after work. The u-joint still feels nice & tight.

PXL_20230605_192542800.jpg

PXL_20230605_194037231.jpg

Also swapped out the 1/8" wheel spacers for 1/4" to get a better safety margin on the caliper clearance off the wheel hub

PXL_20230605_212152071.jpg

I also put a Delco Reman starter in after work.

PXL_20230605_213341063.jpg

There was already a reman in there

PXL_20230605_213325391.jpg

Needless to say the problem still exists. I don't understand why the ammeter shows a heavy draw when it clicks if the problem lies in the wiring. I'll put a new spade I=on the solenoid trigger next.

Another question - I can't figure out how the clutch MC cap comes off, it won't turn no matter if I try just turning, push down & turn, lift & turn. I don't want to break it. Seems to have tabs on the sides, but I don't see how they retain it

PXL_20230605_195158305.jpg


Also a Gearing question - I can't figure out what the speed in gear will end up as with the 6 speed CD009 vs. the 4 speed F4W71B

Can anyone help with figuring it out? This type of math makes my brain hurt. Currently, in 4th 60 mph = 3K rpm. I can map each gear @ 3K rpm if that helps, I don't know :( I'm assuming 5th will be like 4th now - 3K rpm @ 60mph. Based on that, I'd expect 6th to be around 70mph @ 3K rpm?

FD: 3.54:1

CD009 F4W71B

1st 3.78 3.321
2nd 2.32 2.077
3rd 1.62 1.415
4th 1.27 1.00
5th 1.00
6th .79
If fifth is 60 mph @ 3K rpm, then sixth would be 60/.79 = 75.95 mph @ 3k rpm.
 
No clue on the reservoir cap but you think it's like a medicine bottle cap where you have to push down and then turn?
 
No clue on the reservoir cap but you think it's like a medicine bottle cap where you have to push down and then turn?

I tried that to no avail. suggestions on ClassicZ are that it is clip on. There are two tangs 180 degrees apart, I tried squeezing & levering (gently) outward to no avail. I want to replace the slave cyl flex hose & T/O fork boot, but I can't do that if I can't get the cap off....
 
Wondering whether the fusible link is a factor in this equation - apparently the starter trigger does pass through one of them, even though it's not indicated in the diagrams. I was going to rewire these out, and add them to the fused battery unit

PXL_20230606_143527954.jpg

PXL_20230606_143613114.jpg


On my lunch 1/2 hour I swapped out the bullet mirrors (that were wobbly) for these chrome ones - I think they look more appropriate, however the pass side doesn't have the range of adjustment to make the rear quarter visible form the driver's seat
PXL_20230606_141833759.jpg


PXL_20230606_141941482.jpg


PXL_20230606_141954346.jpg


PXL_20230606_142438206.jpg


Also laminated the original cold start notice I found in the sun visor
PXL_20230606_100800182.jpg


Forgot to add a pic of the throttle cable boot - I put that on yesterday & lubed the ball seats
PXL_20230606_140000703.jpg
 
Video of the click/ammeter draw. This happened when I was sitting in queue for the pharmacy to pickup my Mum's prescription 😞

YT Video

So, I added the starter relay when I got home. I'll see if that resolves the symptom. I didn't eliminate the fusible links yet, I want to do one thing at a time

PXL_20230606_211936359.jpg


PXL_20230606_214439350.jpg


added riv-nuts to the top to secure the fuse panel that will replace the fusible links, and supply current for the headlamp relays, etc., moving forward

PXL_20230606_213337470.jpg


PXL_20230606_213342860.jpg


bridge wires routed

PXL_20230606_214436612.jpg


Ran into a thunderstorm on the way home - didn't diminish the smoke covering the area from the Canadian forest fires. The air smells heavily of burnt wood smoke. Possibly more rain than the car has seen the past 47 years

PXL_20230606_195745109.jpg
 
Back
Top