The Flood Survivor - 82 X1/9 Build

Whoo. That is one beautiful pedal box.
Nice work.

FWIW that looks like the factory port job.
Mine was identical.
Some good room for improvement with a little time spent on the details.

I’m of the opinion a little skim cut on the head can give the head gasket a better chance not just from cleaning scratches but also fine-tuning flatness that gets compromised with heat cycling.
 
Frustrating weekend of little progress, sick kids, catch up after travelling all week for work, cancelled flights and then a nicely squished pinky finger on Sat morning getting rid of an old couch at the dump. I did get the rust in the scuttle repaired...

Spent far too long trying to dismantle the water pump to change the shaft seal, whats the secret here? All the parts look in great condition so i dont want to buy a new one unless absolutley necessary...

IMG_7279.jpg
Resized_20240211_220555_1707717971086.JPEG
 
Redeemed myself a little today, I reached out to a local restoration shop, Vintage Underground to ask if the could recommend a Eugene area machine shop. The owner Joe called me right back and pointed me towards Springer Performance & Machine, although he warned me that they often had a backlog. Popped over this afternoon and skimmed heads will be back to me cleaned up and washed by end of day tomorrow! They were working on a mix of interesting things including a Lotus 907 and a beautiful Maserati engine that was heading out following a complete overhaul.

IMG_7293.jpeg
 
Thats better! 4 thou (0.1016mm) later and she's looking much nicer! Now to order a new HG, the new one that came with the project has some rust spots and its just not worth risking!

cleaned heads.jpg
 
Not a lot of exciting progress but progress none the less.


IMG_7409.jpeg
IMG_7411.jpeg

IMG_7412.jpeg

A ton of other small incremental jobs done along the way, valves and ports cleaned up, front brakes off, brake shields stripped etc but not exciting!!
 
Last edited:
Looks very nice. What paint did you use? Some special or regular? And have you a plan for reinstating some sound insulation here?

Did someone jack your car up at some point front the floor pan or is it a trick of the light.angles? It just looks a little like mine when some oik at a tyre place did it many years ago when I was young and only recently had the car. I lived with it a while but when I was repairing my floor pan last year finally knocked it back into shape
I used Rustoleum Rust Reformer, based off of Project Farm’s review it seemed a good budget choice, going to give it a second layer of something a bit harder. A layer of 50mil Kilmat will be going back in. Do you think it’s worth adding more around the footwell? Strip and replace the underseat sound deadening or leave it be?

I haven’t jacked it off the pan but I was wondering what had pushed it up like that. The PO had stripped the flare nut on the drivers front hardline (and kindly already purchased an OEM replacement which came with the car!) so I’m guessing those two combined indicate some errors were made! Will knock it back before I move on.
 
I view Kilmat and other like products as having a secondary benefit of sound deadening. The primary reason I use it is to seal the floor pan against any water intrusion. You don't need to run it up the sills, but place it about an inch above the pan seams and use the roller to really get the edges pressed down tight. You can leave the rear pan stuff in place if everything looks okay. While rust can be anywhere, it's unusual for an X to have issues there. However, if there is any doubt, better to do it now while it's all apart then later.
 
I view Kilmat and other like products as having a secondary benefit of sound deadening. The primary reason I use it is to seal the floor pan against any water intrusion. You don't need to run it up the sills, but place it about an inch above the pan seams and use the roller to really get the edges pressed down tight. You can leave the rear pan stuff in place if everything looks okay. While rust can be anywhere, it's unusual for an X to have issues there. However, if there is any doubt, better to do it now while it's all apart then later.
Jimmy, the Kilmat i have is smaller sheets, for the water intrusion aspect presumably a continuous section that covers the footwell entirely would be optimal, any thoughts on a seam in the Kilmat?
 
any thoughts on a seam in the Kilmat?
This stuff sticks really well. Just overlap the sheets about an inch and hit it with the roller. If you want to make triple sure, you can cover the seam with aluminum tape, but I doubt it's necessary.
 
Feels like progress is dragging but i AM making progress. Pedal box back in, resevoirs and hoses in, steering column reinstalled, wiring getting tidied up, springs shot blasted, brakes going back together, starting "while i'm in there" electrical mods.

My limited time windows to work on the build mean i am shying away from getting the head reassembled. Need to reengage on the engine build to really kick start things!

In the process of getting the resevoir hoses back on i did end up braking two of the VERY brittle snap fingers on the speedo cable. I'd be loathed to pull the hoses back out to swap a new one in but i think i am going to have to. Will it work to use it as is or should i just bite the bullet and buy a replacement?

speedo.jpg
 
My experience with similar in the Alfa world is most are zip tied or baling wired in place. I'd give it a whirl with what you have before trying to replace it. You have 180° of clipage. :)
 
It will work, until you do something near it to knock it, and then it will annoyingly come undone and you end up with greasy fingers putting it back together.
I have run one like this for a while, until I got fed up with it doing this. Never came loose while driving.
 
It will work, until you do something near it to knock it, and then it will annoyingly come undone and you end up with greasy fingers putting it back together.
I have run one like this for a while, until I got fed up with it doing this. Never came loose while driving.
I might model up a quick splice clamp and 3D print it to hold it all together...
 
I modelled up and printed a small bracket for the speedo, could be better designed to snap into place but is nice and snug and with a ziptie it does a great job to lock things in place in a tidy manner.

Screenshot 2024-03-21 104304.png
IMG_7539.jpg
IMG_7546.jpg
IMG_7545.jpg


Also got the front brake shields stripped and repainted with rust encapuslator and caliper paint. Rear springs stripped and shotblasted, getting the Zeibart off them was a very unpleasant job. This clean up effort might have been completely redundant, i intended to spray paint them as i suspect at some point in the coming years i might want to upgrade or lower the car, however quote for powder coat (including bake and shot blast) was only $20 per spring so i figure i might as well just do the job right!

IMG_7559.jpg
IMG_7540.jpg


Parts for electrical mods arriving, relays, 12V bus, battery isolation switch etc. i might as well get those done since the interior is stripped!

Progress is progress!
 
Alright folks, since my car came disassembled I didn’t strip the interior. Can anyone give me the gross sequence of operations for reinstalling?! Can’t seem to find anything useful in all the usual places…
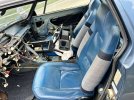
 
Alright folks, since my car came disassembled I didn’t strip the interior. Can anyone give me the gross sequence of operations for reinstalling?! Can’t seem to find anything useful in all the usual places…
IMG_3302.jpeg
Given this picture:

Remove the seats.
Clean all surfaces to get rid of residual material, grease etc.
Verify the hydraulics for brakes and clutch are working properly, if not then now’s the time.
Ensure all wiring is functional.
Run any wires you need to for speakers or other electrical repairs and upgrades. Highly recommend a starter relay in the spare tire well and I would add two relays with their own power supply wire to take the load off the ignition switch to feed switched loads. Install a second supply wire to the fuse box junction. You will never have as easy a time or access to run wires etc
Install heater box.
Install secondary ducting since you have AC. Verify the vacuum supply is intact. You could consider changing to manual controls for the AC system to get rid of the push button
Install any sound proofing you want around the interior.
Install rear bulkhead vinyl etc
Install carpet
Install dash
Install AC controls, it would be good to be able to run the engine or apply vacuum to verify function of the AC control buttons, actuators
Install center console, install switches etc
Install secondary trim around door openings, there are two metal trims that hold the carpet at the A pillar, door opening steel trim
Install instrument panel and verify all electrical works
Install secondary trim around the steering column
Install seats

Doors
Clean out any detritus and clean door face where you will be applying adhesive
Use @6 mil plastic to make up the moisture seal for doors. There is a secondary flap one adds to shield the winder and protect the door handle mechanism
Tape plastic down or apply double sided tape to door and then apply plastic
Poke holes in the plastic for the clips you have replaced on the door cards. The clips are delicate so ensure the the holes are all poked…buy extra clips. Please don’t screw it down.
Install door handle trims and window winders

Drive away with the knowledge of a job well done.

How hard could it be :)
 
Back
Top