The Flood Survivor - 82 X1/9 Build

View attachment 82882
Given this picture:

Remove the seats.
Clean all surfaces to get rid of residual material, grease etc.
Verify the hydraulics for brakes and clutch are working properly, if not then now’s the time.
Ensure all wiring is functional.
Run any wires you need to for speakers or other electrical repairs and upgrades. Highly recommend a starter relay in the spare tire well and I would add two relays with their own power supply wire to take the load off the ignition switch to feed switched loads. Install a second supply wire to the fuse box junction. You will never have as easy a time or access to run wires etc
Install heater box.
Install secondary ducting since you have AC. Verify the vacuum supply is intact. You could consider changing to manual controls for the AC system to get rid of the push button
Install any sound proofing you want around the interior.
Install rear bulkhead vinyl etc
Install carpet
Install dash
Install AC controls, it would be good to be able to run the engine or apply vacuum to verify function of the AC control buttons, actuators
Install center console, install switches etc
Install secondary trim around door openings, there are two metal trims that hold the carpet at the A pillar, door opening steel trim
Install instrument panel and verify all electrical works
Install secondary trim around the steering column
Install seats

Doors
Clean out any detritus and clean door face where you will be applying adhesive
Use @6 mil plastic to make up the moisture seal for doors. There is a secondary flap one adds to shield the winder and protect the door handle mechanism
Tape plastic down or apply double sided tape to door and then apply plastic
Poke holes in the plastic for the clips you have replaced on the door cards. The clips are delicate so ensure the the holes are all poked…buy extra clips. Please don’t screw it down.
Install door handle trims and window winders

Drive away with the knowledge of a job well done.

How hard could it be :)
check and replace heater control valve and hoses
 
Also check the heater itself for integrity. Much easier to replace this now if needed.
The heater core for the AC cars are in short supply so I hope yours is good.

Indeed, the heater assembly is something which if it isn’t out, needs to come out. While it is out, clean and rebuild everything as they take a real environmental beating.

Replacing the heater control valve is an excellent call given its location. I used a plastic replacement on my car that is common so I can replace it relatively easily.
check and replace heater control valve and hoses
 
One win this evening, I have spent more (work) hours than I care to admit trying to figure out a replacement for the washer fluid pump for the over sized plastic tank on my 82. Couldn’t find ANY size references for commonly available ones but found a post on a Lambo forum for a Diablo build that referenced the same OE part number. Turns out a ‘99 Jeep Cherokee pump appears to be a direct drop in replacement. Grabbed one at Napa for $16 or so…
IMG_7590.jpeg
IMG_7591.jpeg
IMG_7592.jpeg
 
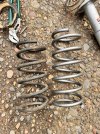
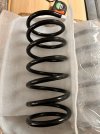
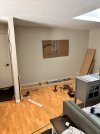
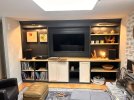
By no means the impressive sprint of @Clatter but making some progress in amongst the complete living room remodel my wife has launched me into the last couple of weeks! Springs back from powder coat, 22hr turn around for $15 a corner. Flywheel cleaned up and valves lapped in ready for assembly. Bonus photo of the nearly completed house project to ease my guilty conscience at not making more progress on the car!!
 

Attachments

  • IMG_7712.jpeg
    IMG_7712.jpeg
    479.1 KB · Views: 38
  • IMG_7716.jpeg
    IMG_7716.jpeg
    220.6 KB · Views: 33
  • IMG_7525.jpeg
    IMG_7525.jpeg
    153.5 KB · Views: 38
  • IMG_7685.jpeg
    IMG_7685.jpeg
    310.7 KB · Views: 38
I’m trying to get my car done before SWMBO uses her magic powers to get a kitchen.

Luckily, mine is “for the kids” so she hasn’t intervened just yet… 😜
 
Some progress today after buttoning us the built ins yesterday. Feels good to get back at it!!
  • Rear suspension cleaned up and rust encapsulated
  • Some parts top coated in Rustoleum Professional semi-gloss black
  • Rear brake shields stripped, etch primed and caliper painted black
  • Valves fully lapped in, all valve spring components cleaned and ready for the head build
  • Strut cleanup has begun, using plastic razor blades and block cleaner to good effect on the zeibart over spray.
  • I did spend $15 ordering OEM correct yellow cad nylocs for strut tops and strut to bearing carriers.
  • IMG_7730.jpeg
    IMG_7732.jpeg
    IMG_7751.jpeg
    IMG_7752.jpeg
    IMG_7755.jpeg
    IMG_7749.jpeg
    IMG_7740.jpeg
 
Back
Top