Volvo 745 Pickup + 4.8l V8 conversion

Forgot to ever update this - the pump was fine, it was the (new) Volvo 7mm ID fuel hose I used, QC clearly isn't what it used to be.
PXL-20230331-192409796.jpg


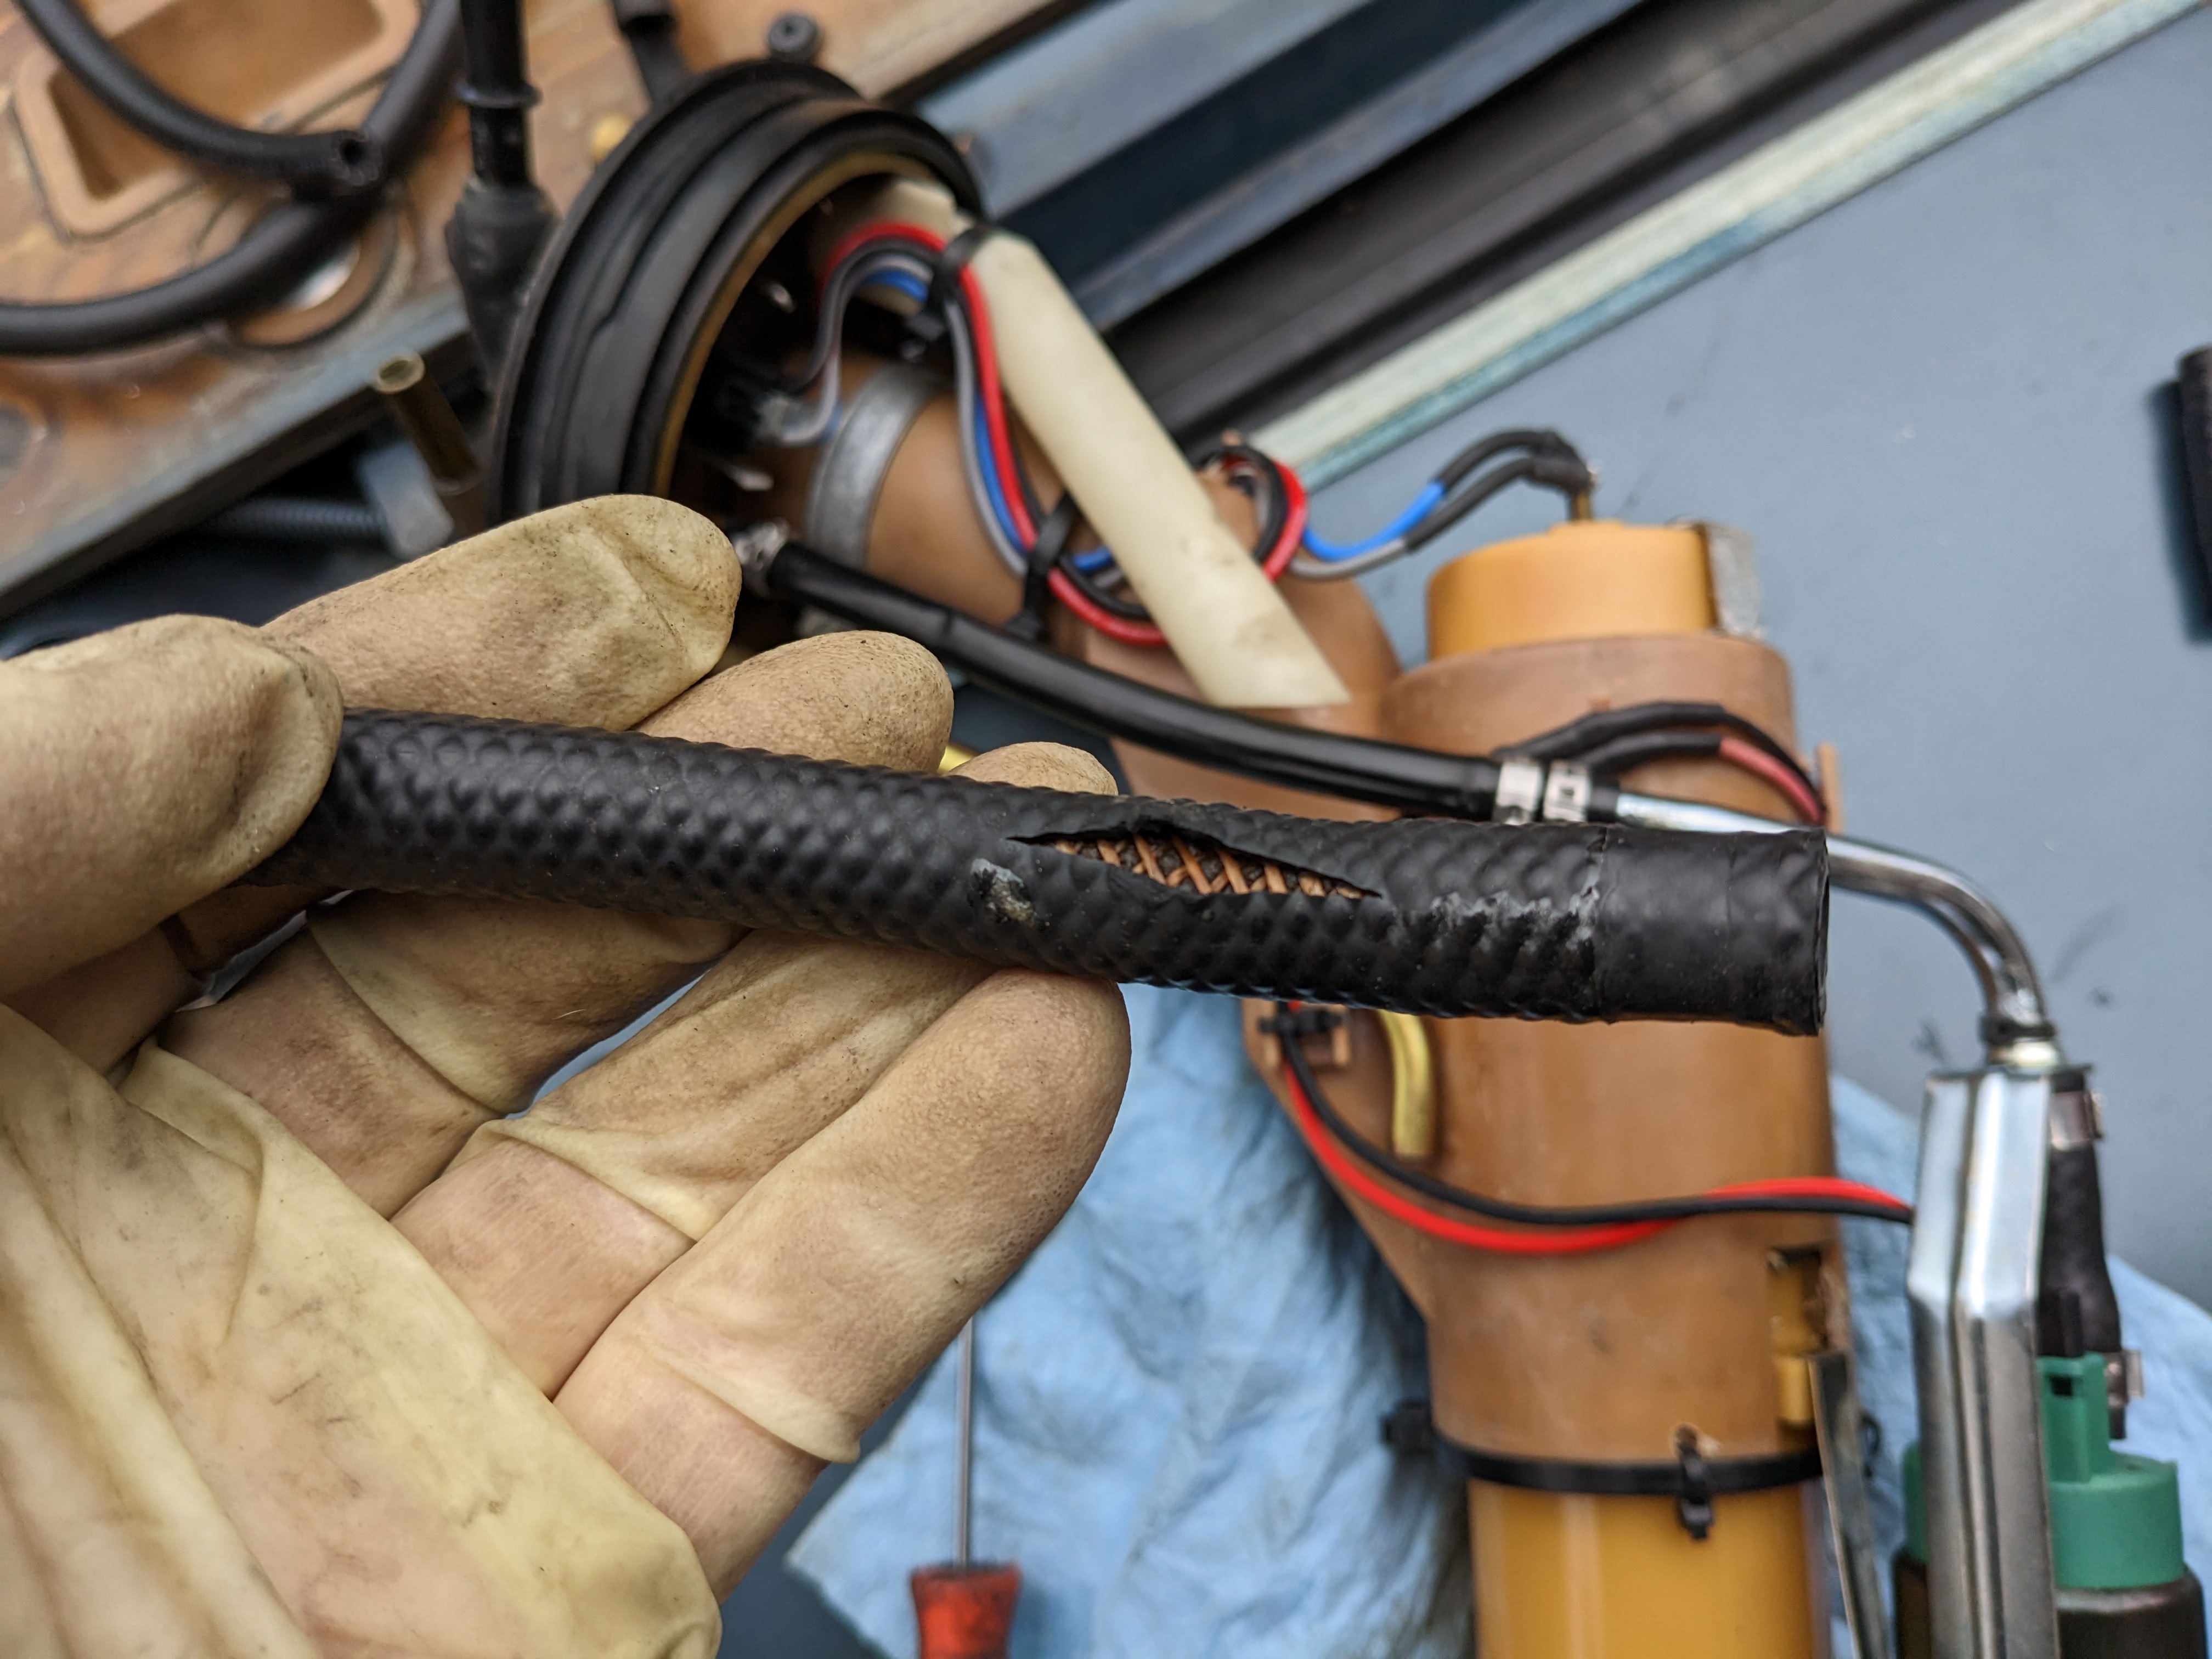
Replace with with a piece of nitrile line
PXL-20230331-192413120.jpg


Driving the pickup to Ithaca NY for a car show this weekend, so I changed the oil, checked over the engine bay - found the breather hose ruptured (again) . Can't get an OEM one anymore. I cut a length of stock Volvo breather hose (949701, still available) doesn't matter about the dogleg
PXL_20230621_212635708.jpg

PXL_20230621_212643279.jpg


The midgate had started to rattle over bumps, so I addressed the guide stops - middle left - the bumper was gone, I cut a piece of soft tubing & inserted that

PXL_20230621_183449100.jpg


same situation for the tailgate, not that that was rattling though
PXL_20230621_183446863.jpg


After that I decided to make the taillight bulb covers I never made, and deal with the fuel filler neck cover. I just used a scrap wheel arch liner.
Not pretty, but good enough
PXL_20230621_205845661.jpg


This what I had over the filler neck, a cut down section of the interior panelling
PXL_20230621_224827715.jpg


I cut some more sections of the wheel arch liner, plastic welded them togther
PXL_20230621_205836287.jpg


Much tidier
PXL_20230621_222225890.jpg

Then I covered it with vinyl
PXL_20230621_224720573.jpg

PXL_20230621_224730093.jpg

Finally, the spare tire rattles around sometimes, the anchor didn't work as it was intended for a steel wheel.
I sleeved two together with a piece of 1/2 copper & a 3/8 NPT section solder to the end so the taper was inboard. The point was I need the sections to hold together
PXL_20230621_224924796.jpg

PXL_20230621_224923119.jpg

now it retains the wheel
PXL_20230621_224912714.jpg
 
So, the AC had stopped working on the drive home from Ithaca - it worked for a few minutes, then just blew hot air. After playing around with a few things, and asking on TurboBricks it was suggested I check the AC fan. It turns out the High Pressure Fan Switch was cycling on/off, and as a result the high side pressures were climbing rapidly, resulting in no cooling. When I was testing it, the system actually discharged a bunch of freon (R134a) out the compressor relief valve - I didn't realize what it was at first - it was quite startling .

Anyhow, the switch doesn't seem to be available, and in testing, if I make the eFan run at low speed as long as the AC is on, the high side line out the evaporator never gets too hot to touch, and the system stays nice & cold. So, I wired a relay to bypass the pressure switch and ground the fan low speed circuit with the AC on.

relay tucked alongside harness as it passes under strut support
PXL_20230630_182920437.jpg


bridge connector next to high evaporator line, switch power to relay taken from AC compressor feed (comes via low pressure cutout switch, 'bullet' style connector on bulkhead)
PXL_20230630_191314116.jpg
 
Started on the front coilovers while I'm waiting on the machine work for the Z CV conversion

cut off spring seats
PXL_20230710_135752211.jpg


BNE Dynamics stut plates with pivot bearing & spring seat. Bicknell BRP9426 7" sleeves. Eibach 12" (forgot spring rate) 2.5" ID coil. Koni 8610-1437race dampers
PXL_20230710_201951975.jpg


BNE made me tube spacers for the Konis and weld rings for the sleeves
PXL_20230710_202107634.jpg


sleeve pressed onto tube after grinding down spring seat weld & removing all undercoating . Set 1" below tube top
PXL_20230710_221548154.jpg


PXL_20230710_221718040.jpg


problem - spacer sleeves are too long for 1437 strut to fit. I'll need to shorten them by 2" - I think...
PXL_20230711_190514141.jpg


cap nut sits 11/16 over strut, that needs to thread more than 1/2" into tube to get beyond (thinner wall of) inner recess for strut shoulder
PXL_20230711_192858097.jpg

PXL_20230711_192949294.MP.jpg
 
Last edited:
More work on the coilovers

grinding the 2nd spring seat weld down - have to be careful not to reduce the tube wall on either side
PXL_20230712_142101684.jpg

PXL_20230712_142107391.jpg


done
PXL_20230712_142823386.jpg


Koni Extended 5.25"
PXL_20230712_144411953.jpg

Cut down the insert spacer to 110mm, then the strut inserts fit perefctly. Welded the sleeve seat collar, cleaned, painted then assembled them. Old Volvo tool for remove/installing the insert
PXL_20230712_214542841.jpg


Energy suspension 6016 bump stops. Don't have protecter sleeves, not sure if I can find one. Needs to be small enough to fit inside a 2.5" spring, but over the 62mm tube sleeve
PXL_20230712_214548174.jpg
 
Finished the forward bar supports. Wood is true 2x4 (cut down), I saved several studs when I took a wall apart some years back. Got to use the router I bought years ago when I had to build the attic window.

soaked in Tung Oil
PXL_20230803_154247243.jpg


PXL_20230803_182344940.jpg


Checked it with two bikes before I took this pic
PXL_20230803_232024902.jpg
 
Finished up the front coil overs with bump stops & boots from a 98 V70. Took some fiddling to get it inside the spiring, as the first & last coils are smaller. Base is a snug fit over the 700 strut insert cap nut

PXL_20230810_173737145.MP.jpg

Meyle 514 640 0001 MSC0109
PXL_20230810_180601022.jpg

PXL_20230810_180621364.jpg
 
Last edited:
So, my son used the truck for the several days he was back East over Christmas break. As with every other time, something broke. This time it was the rear muffler hanger, rusted out (about 2 years old, maybe?). Unfortunately, he drove it about 40 miles that way, and that leveraged the back plate of the resonator, tearing the plate around the rolled edge crimp.
It was kinda stinky with the exhaust leak, so today I fixed it while I had the time to do it, and install the 4 wheels/snows.
I used a old (newish, in terms of miles in it) muffler that was given to me by a Volvo compatriot about 20 years ago 😁
I didn't replace any other pipes, so it took some work to get it apart without further damage to pieces I don't have. I don't want to buy any new exhaust, as I will be making one from scratch. Once I do the V8. That will hopefully start this spring into summer.
PXL_20240110_212749927.MP.jpg

PXL_20240110_214710361.jpg
 
Broke down and bought a brand new PS pump - don't want to trash the new rack with metal particles in the old pump. Brackets & pulley have to be transferred.
PXL_20240111_204040839.jpg


PXL_20240111_212534453.jpg
 
Back to figuring out wiring for the V8. 4L60E Range switch wiring

Found this snippet on a LS forum:
signals to the PCM when you are in Park/Neutral versus Drive/Reverse, and implements the Reverse lights. It DOES NOT tell the PCM/Trans whether you are in D1, D2, D3 or D4/OD; that is done internally and through the electrical harness to the trans."

So, those for PCM notification of park & neutral are actually all I need to find

Blk/Wht, Orange/black, Yellow & Lt Green, presumably

PNSWITCH2_zps4bdekzjs.jpg

RangeSwitch.png

PXL_20221207_223323423.jpg


Have to find the range switch wiring diagram to locate 4, 5, 6, 7, & 8
Screenshot 2024-01-11 at 8.39.48 PM.png
 
Last edited:
  • Like
Reactions: 86X
Got the new pump and rack installed this afternoon. Drained the lines of the old muck
PXL_20240112_204104950.jpg

Hard lines on rack had to be tweaked to fit it in the subframe - I couldn't fit the rack into the subframe cavity as supplied. Fortunately, it did take much to realign them - I gently levered the lines with a counter hold at the fittings. After that, it was pretty straightforward.
PXL_20240112_204717945.jpg


PXL_20240112_204948697.jpg

Adjusted here
PXL_20240112_204954334.jpg

Adjusted upper line out the rack off the subframe ear
PXL_20240112_205003563.jpg

Had to do the toe adjust single handed. I measured the length of the tie rod end stud to a constant on each side of the rack housing
That got me here, with a straight up steering wheel
PXL_20240112_210536226.jpg

Toed each side out about 1/2 turn, which made it neutral
PXL_20240112_212018317.jpg

Toed both sides back in several times, in 1/2 flats, and got it here before the light was failing. Probably better closer to 1/8" toe, however it feels ok for right now, won't wear out the newish snows in a hurry. I didn't take it out over roadways with a heavy crown, so if it's flighty, I'll toe it in some more.
PXL_20240112_212939708.MP.jpg
 
Last edited:
  • Like
Reactions: 86X
To maximize traction in ice and snow try as close to zero toe as you dare. Any toe (on either end) generates slip angle which you do not want on ice or snow. This does not work for high power cars on dry pavement, because in that case, other factors become more important.
 
To maximize traction in ice and snow try as close to zero toe as you dare. Any toe (on either end) generates slip angle which you do not want on ice or snow. This does not work for high power cars on dry pavement, because in that case, other factors become more important.
Thanks for the input - I think I'll call it done then. I've never owned a car spec'd for 0 toe (in), typically in the 3/32 - 1/8 range. I don't know if that's for my region, given the potential weather extremes. In any event, I have not experienced undue tire wear with spec in this range, and typically road feel is good. Maybe that just means good enough, but I think I'm going to leave it. This will of course be getting in the V8, which will mean substantially more horsepower / torque, to leave it as is, and possibly add a little more toe in if it seems necessary down the road
 
One of the Volvo V8 convertors on the FB group pointed out the revised PCV system used on later gen LS motors - early versions like mine have valve cover vents, which send much oil mist into the intake, generally causing oil consumption & gumming up of things. Later ones use a valley cover with a PCV box integrated, so I went ahead & bought one of those as a 'kit' with the adaptor hose, plugs, & gasket. Not cheap, however somethings are just not worth the time to make a DIY solution.

Underside of cover. Tubes are for the knock sensors


PXL_20240114_013540039.jpg
 
Back
Top