HeadlightSwitch
Alternative Headlight Switch
Bob Brown.
This was written for Late model X1/9's but can be applied to the early models by simply using the headlight switch's wire colors as a guide. Sorry for the big picture size, but I felt the detail was important.
Several have broached this subject in past but few have made any real sense regarding the headlight switch on our beloved X1/9's.
After digging into this a bit I discovered that this switch is truly unique to these cars. No one makes a switch like this, although there is one that is "close". Not close enough however. This switch was designed specifically for the X1/9 and thus becomes more rare as time passes.
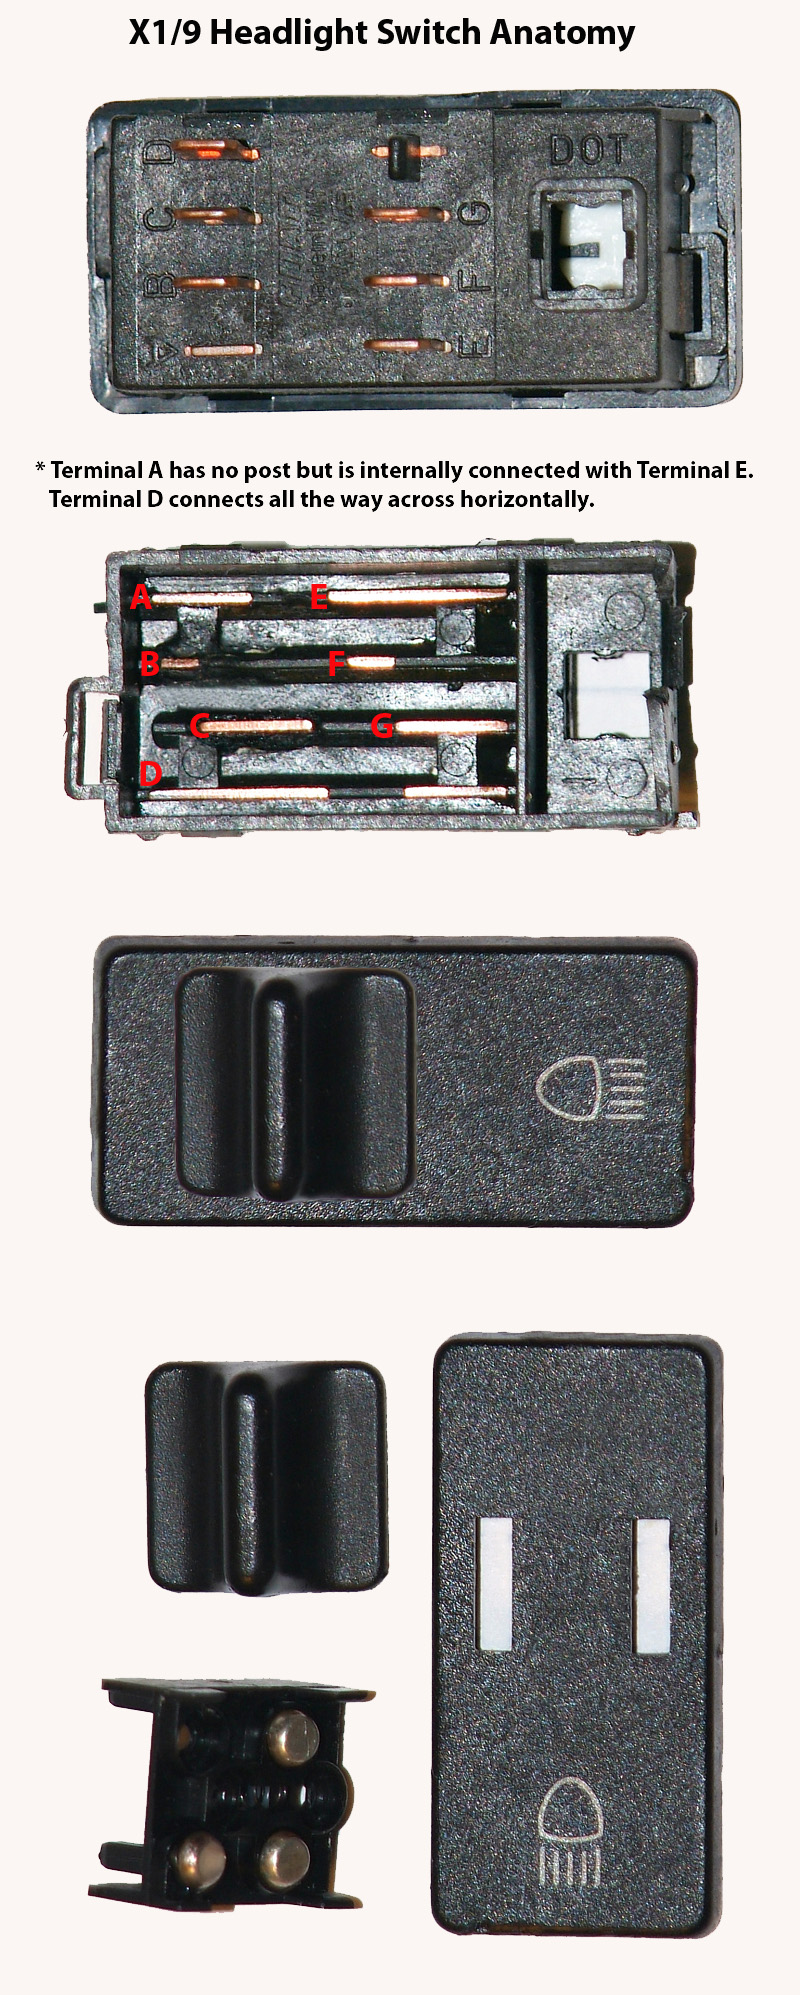
First thing I want to address is the actual physical switch. This thing uses 4 internal lines with spade terminals barely rated for the 10 amps they're required to handle. It's inevitable that the switch will fail IF you use a lamp that consumes more than the 4.5 amps (each) that FIAT spec's for the car. I have 2 examples that clearly show obvious signs of overload on the back of the switch.
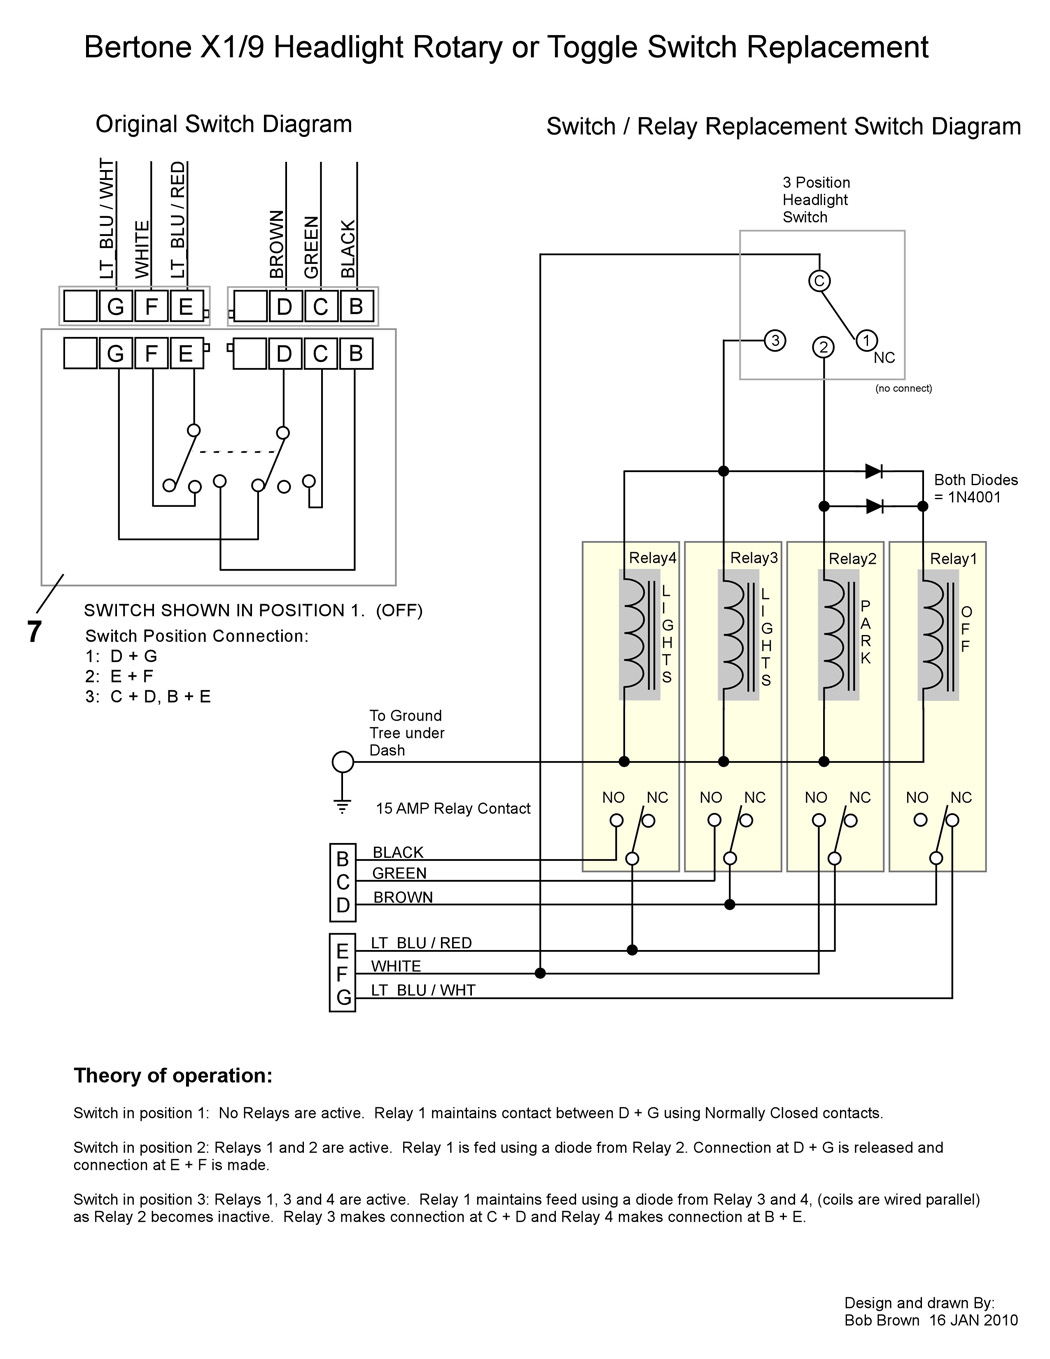
The next thing I want to mention is the schematic representation of the headlight switch. It's no wonder folks struggle to understand the logic of the switch, as the schematic shows no representation regarding the fact it has 3 positions. You almost have to guess by reading it. But you can get to the truth of it all once you trace the actual pins on the switch to the 3 positions they represent.
What I'm presenting here is a better understanding of the headlight switch. I'm not going to go into the wires that travel to the front headlights, but you will soon see that this will help make this section of the schematic easier to understand once you apply it to the original schematic.
What I've done is re-draw the headlight switch from the original X1/9 schematic to an improved, better described switch and called it (on my drawing, for no other reason) "original switch diagram".
Here is a physical description of what we're dealing with:
The switch has 3 positions: "Off", "Park lights", and "Headlights". Once I re-drew the switch to make better sense, I created a simple logic table to show the switch arrangement. To that end I discovered there are 4 circuits being switched. These can be easily replicated using relays. Technically, I could reduce the count of the relays down to 3, but DPDT relays are nearly twice as wide so I kept it simple by using separate devices.
The following shows a breakdown of the switch, the logic table, and an alternate method of re-creating this switch using 4 relays and a simple 3-position slide, rotary or toggle switch. This should be all the info you'll ever need if you want to re-create a headlight switch for your X1/9 to replace a worn or defective switch. It's designed to use zero energy when in the Off position. It's also designed to be a direct plug-in replacement to the original switch. (no cut wires!)
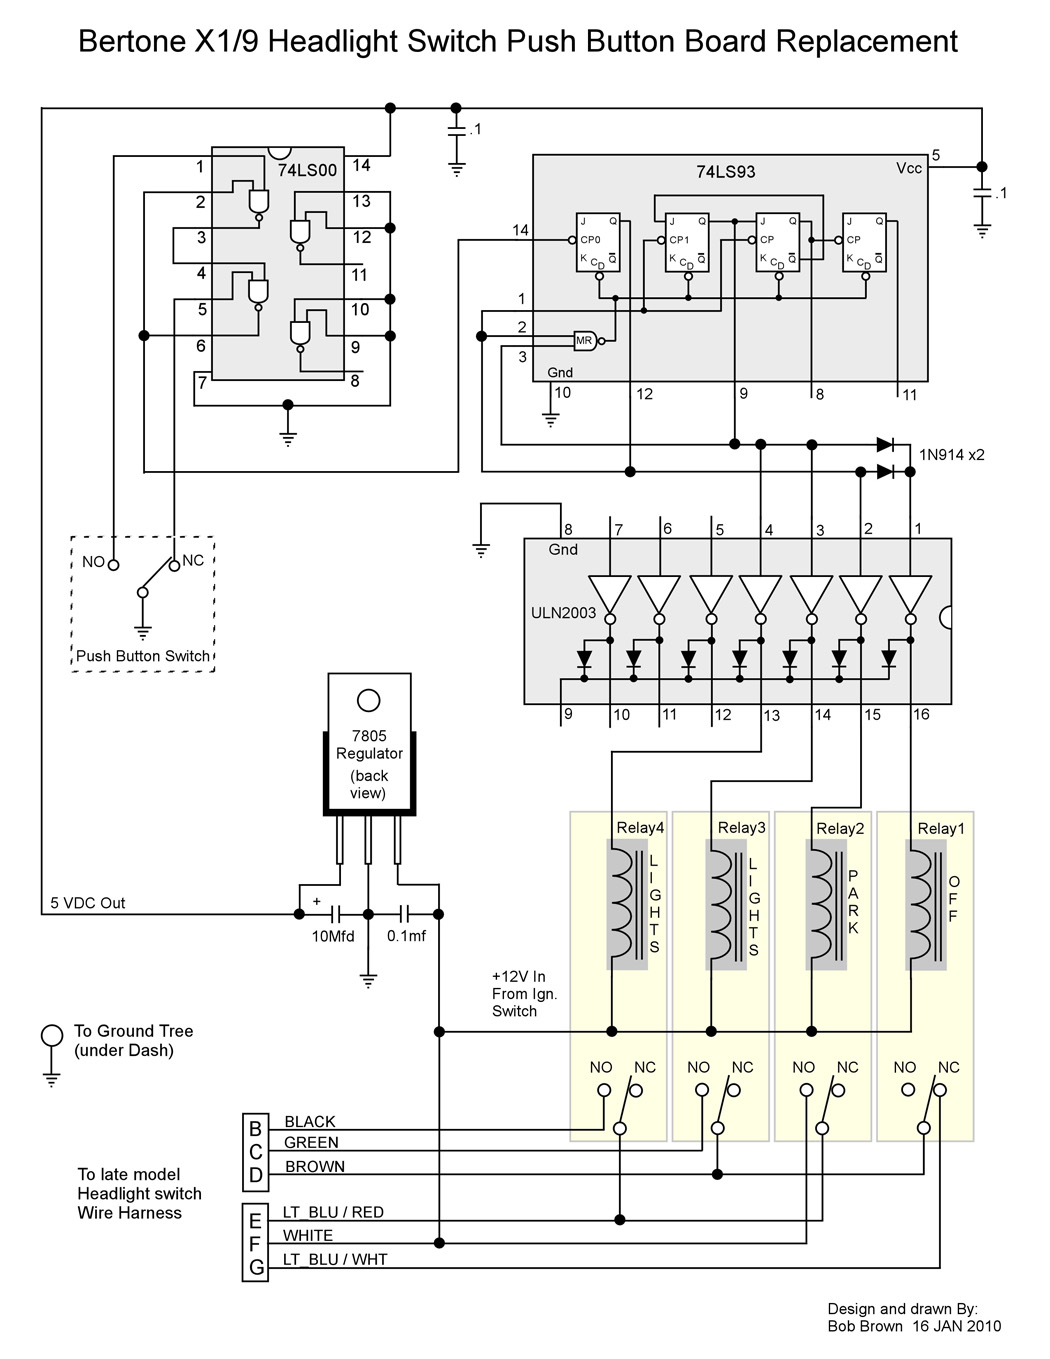
Taking it one step further, ('cause that's what I do!) I decided to build an electronic version that used a single "touch" button. Touch the button once, the headlights pop up and your park (running) lights come on. Touch it again and your headlights will illuminate. Touch it a third time and the headlights go down and parking lights go off.
The circuit is a lot simpler than it looks. There are a total of 4 IC's: The 7805 is a 12V to 5V regulator I.C. This drops the voltage down to TTL levels. The 74LS00 is configured as a debouncer for the push-button switch and guarantees bounce-free pulses. The 74LS93 is a BCD counter that's configured as a decade counter that counts 0,1,2 then resets to 0 again. And the ULN-2003 drives the relay coils from the output of the counter. Simple as that. When the car is Off, (position 1) it draws zero power from your battery. Just like the headlight switch. The circuit will activate (and function) when the car is in the "on" position, just like the original headlight switch.
I'll use this in place of the 3-position switch to drive the relays. Building this circuit requires some basic solder skills and PCB work, so don't bother building it unless your up to the challenge. It's pretty cool though... A touch of high tech to your pop-up lights.
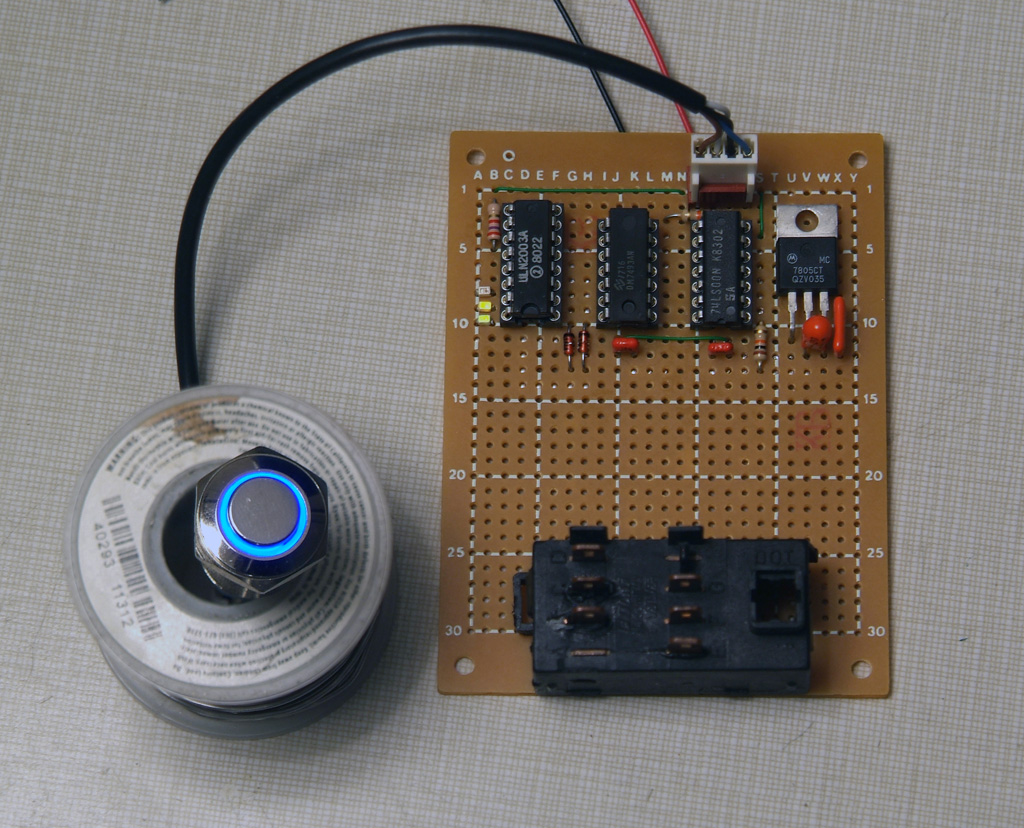
Below is a picture of a working prototype I built. I'm still waiting for the relays and will update the photo once they're installed. For now, all you'll see are tiny LED's I've installed on the board to show drive voltage to the relay coils. I'll be using the back side of an old switch mounted to the board as the connector to the wire harness.
The likelihood of me actually using this on my car is small, as I've already got good working original switches in the dash at this time. But if any of you are interested in it, I might consider selling the prototype. (guaranteed to work, of course) Just PM me.
Hope some of this will make sense to you and help troubleshoot your next failed headlight switch.
Enjoy!


