
You are using an out of date browser. It may not display this or other websites correctly.
You should upgrade or use an alternative browser.
You should upgrade or use an alternative browser.
Breathing Life Into a Neglected '75
- Thread starter jimmyx
- Start date
lookforjoe
True Classic
My current one is an 80 gal. vertical. `I've never lacked for air either with a conventional gun or HVLP, but for good performance I wouldn't go below 80 gallons. Compressors are one of those things you go as big as you can fit and afford, although a nice 2-stage unit has become very pricey unfortunately. The upside is if they are maintained they last virtually forever in a home environment.
Cool. Home Depot has a 2 stage 5HP Campbell Hausfeld on sale for $1200ish. What do you use for moisture control in the line? Anything more than a water trap?
I too have an 80 gal vertical unit. I have done bodywork on several cars with it but it requires 220v. I haven't used it since I moved as I don't have 220 in my garage now. That may be a consideration for you.
I will need to add 240 service. I've been meaning to do that anyway, as I cannot use the TIG or MIG for heavier work with only the 120V I have. Hasn't been a significant issue, really, however I have wanted to run a 240v line. Now I'm retiring this summer, I will have more time for such projects.
Last edited:
jimmyx
True Classic
I use a 2-stage water separator and if I'm using air to paint I screw on a small disposable separator on the gun for good measure. We don't have the same humidity levels here that you have. I drain the main tank every month and see less than an ounce of water; in NY you'll get a 1/2 pint. Since these things are stationary you might want to consider a wall mounted hose reel. I've had a similar unit from HF for 20 years, and other than replacing the hose every 5 years it's worked perfectly.What do you use for moisture control in the line?

3/8 in. x 50 ft. Premium Retractable Air Hose Reel
Amazing deals on this 3/8In X 50Ft Retractable Air Hose Reel at Harbor Freight. Quality tools & low prices.
 www.harborfreight.com
jimmyx
True Classic
Truer words never spoken! They are tedious at best and with all the surface imperfections and seam sealer the results don't exactly equal what you'd find on outer panels.the nooks and crannies are harder than the outside
jimmyx
True Classic
Have to finish this in two steps; doors forward, and whatever is left. Very much not optimal, but have absolutely no room to work. Interesting to see the contrast between the old and new. Same paint code (Golf Green) and the old paint wasen't in bad shape. On a prior 358 green '74 I ran into the same thing - the difference between old and new was stunning.
.jpg")

Alex(Tenerife)
True Classic
The new paint looks amazing tho. Shows how much paint fades. Are you thing of painting the rets of the car now? You have done all that hard work on the front, I am sure it would look amazing if you have time/finances to paint the other side of the car.Have to finish this in two steps; doors forward, and whatever is left. Very much not optimal, but have absolutely no room to work. Interesting to see the contrast between the old and new. Same paint code (Golf Green) and the old paint wasen't in bad shape. On a prior 358 green '74 I ran into the same thing - the difference between old and new was stunning.
View attachment 80673
View attachment 80674
jimmyx
True Classic
Yes, I had to pull it out of the garage and switch positions to finish the rest; need the back of the car closest to the door now. The paint looks amazing in pictures, but it is strickly a low budget, driver quality finish. Main objective was a decent 3-footer, all the same color. Cars that are a patchwork of colors and primer tend to attract too much police attention.paint the other side of the car.
")
tvmaster
True Classic
Ran into the same problem with 358 - new is so much brighter than 50-years ago. And you don’t really notice it as much on a small, test sampleHave to finish this in two steps; doors forward, and whatever is left. Very much not optimal, but have absolutely no room to work. Interesting to see the contrast between the old and new. Same paint code (Golf Green) and the old paint wasen't in bad shape. On a prior 358 green '74 I ran into the same thing - the difference between old and new was stunning.
View attachment 80673
View attachment 80674
tvmaster
True Classic
Lol, trust me, I didn’t. Still crying over the cost, but it looks good. Still, you’ve done great from three feetYes, but I don't recommend doing it that way if it can be avoided!
jimmyx
True Classic
Been trying to dodge wind gusts for days. Finally died down enough to do the rear. Only thing left is the deck lid. That's getting done off the car and it's still too windy. Tomorrow is another day. I have another project (non-Fiat) landing on Tues. so this needs to be finished and out of the garage. Can't tell from the pic because of plastic and shadows, but removed all the masking and I seem to have dodged a bullet.

jimmyx
True Classic
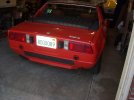
Final piece of the puzzle. Well, not really. Need to paint the rear lower valance and grill, but those are a different color so it doesn't count. Looks great in the pictures. It's the type of driver paint that nobody points and laughs until they get within 3 feet (2 feet if your prescription lenses are not recent), then they point and laugh. Total cost of paint and materials were right around $250. In 1976 Earl Scheib complete paint was $99. Adjusted for inflation that's around $533 today and those paint jobs were best viewed from an adjacent county.


Last edited:
johnph
True Classic
or you could paint the valence like on a 1976. In 1973, the cheapest Earl job was $29.95.Final piece of the puzzle. Well, not really. Need to paint the rear lower valance and grill, but those are a different color so it doesn't count. Looks great in the pictures. It's the type of driver paint that nobody points and laughs until they get within 3 feet (2 feet if your prescription lenses are not recent), then they point and laugh. Total cost of paint and materials were right around $250. In 1976 Earl Scheib complete paint was $99. Adjusted for inflation that's around $533 today and those paint jobs were best viewed from an adjacent county.
View attachment 81134
View attachment 81135
Attachments
jimmyx
True Classic
Ran out of green paint....satin black I have. Don't want to bust my budget buying more.or you could paint the valence like on a 1976.
Alex(Tenerife)
True Classic
Looks much improved, I don't think anyone will be pointing and laughing.
btw how did the join between the 2 paints come out? To which I am referring to the small part of the sill between first paint and second paint.
btw how did the join between the 2 paints come out? To which I am referring to the small part of the sill between first paint and second paint.
jimmyx
True Classic
We have too much sun right now to get a decent shot, but the camera lens never lies. The match is pretty much dead on. The car was never driven between paint sessions and stored in the garage. The paint was from the same can the front was done with, and the gun was cleaned by spraying gun wash through it. I normally disassemble the gun and soak it, but in this case it would have altered the settings and even a close match would be difficult. Pictures are the best way to see a match. Your eye and brain can be fooled easily, but a camera lens, not so much. That's why you'll often see cars listed on BaT with professional photography and the seller is shocked by paint match questions from the peanut gallery. The seller usually goes out, inspects the car, and reports back that the paint is fine. The seller's eye really doesn't see it, but the lens sure will. Sometimes the angle and lighting are to blame, but if you see the same issue in multiple shots at different angles in the same place something is off.btw how did the join between the 2 paints come out? To which I am referring to the small part of the sill between first paint and second paint.