Making Dallara Stripes

lookforjoe

True Classic
Cold & wet today, so I finally decided to make the Dallara stripe templates. I used a couple old pics for reference, as opposed to some of the other repro Dallara. Tagboard to make the templates. The duct area is going to be a nightmare to fit. Some panels are close enough that reversing the template will work, some not so much. Got all the decals cut from the 3M 1080 film. It's one of the new wrap films that are actually porous, so they claim it doesn't bubble when installed. I don't have a great track record with conventional decal material, so we'll see how this goes.

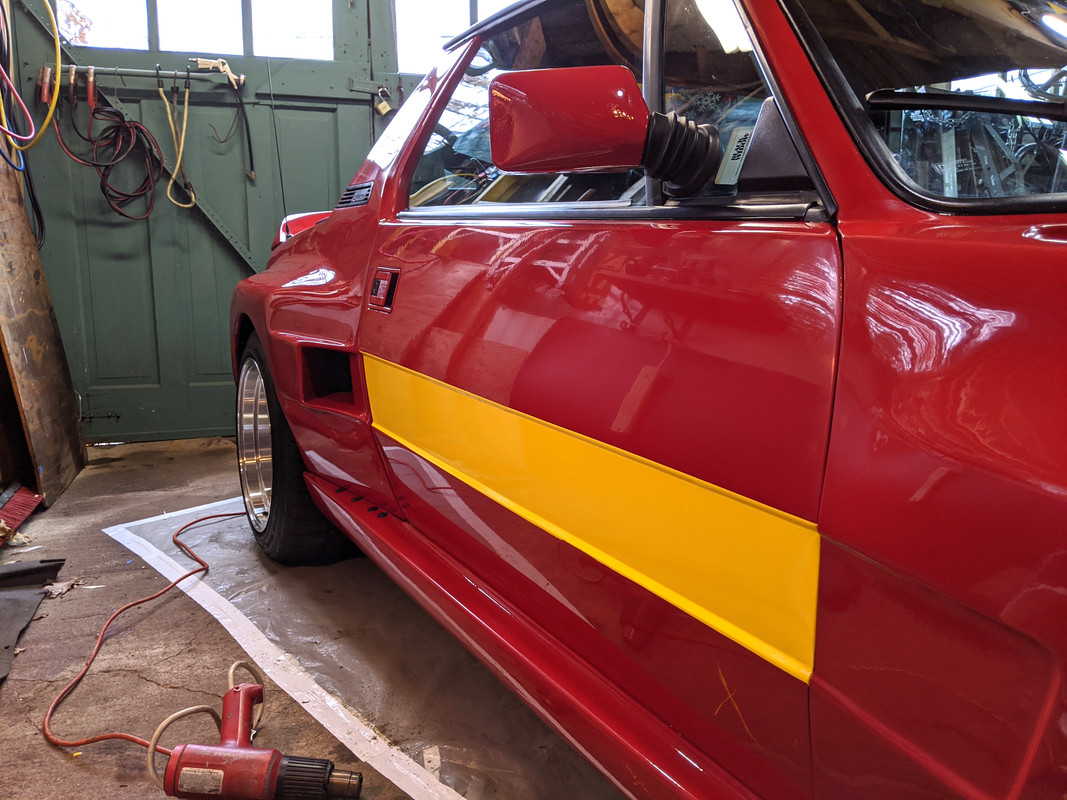
Panels are 5.125" deep. They need to ride just over the door crease, not within it, I've seen ones like that & it just looks wrong. Hard to tell if the line is really right - it's not actually straight from front ot back. The front fender forward section has to drop to the headlamp area, but on the actual Dallara it has a bulge in it that tapers in a way I don't like , so I had to make adjustments to the line. I used painters tape to add a slightly bow to the upper line where it comes forward of the wheel arch, then it drops. Hopefully it will look right in the decal. I can always make new ones if not.

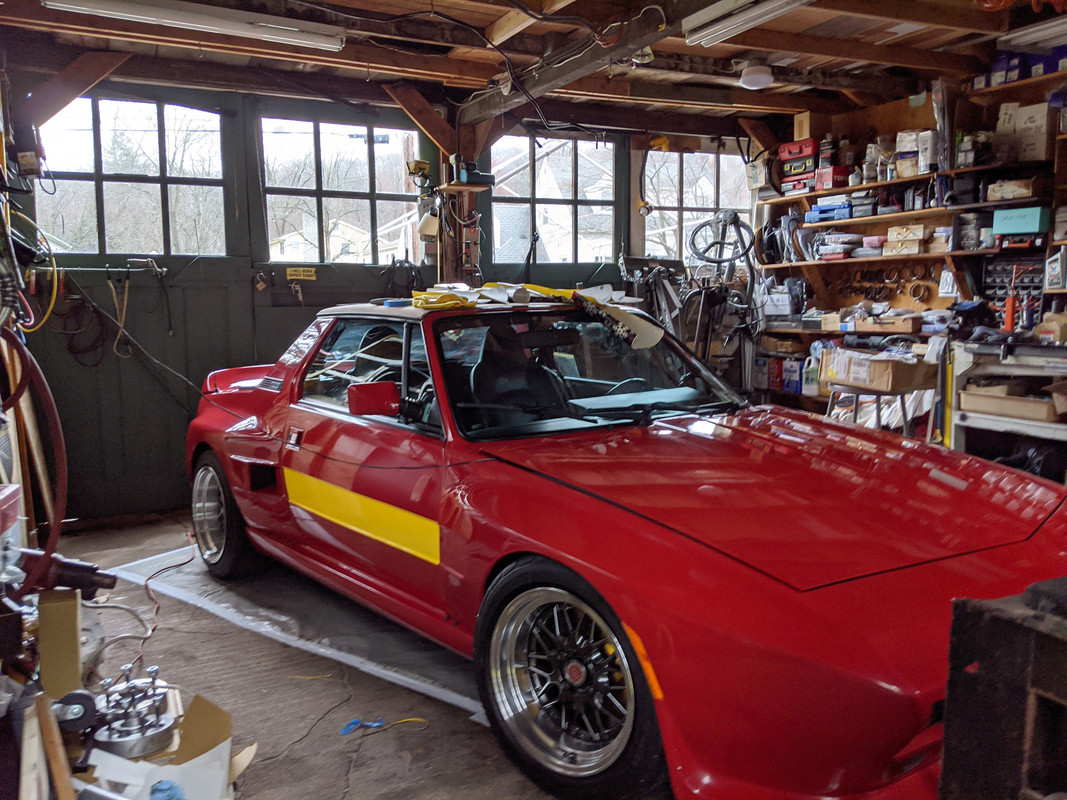
Deliberated on whether to try & either get the door sections manufactured with the ICSUNONOVE, or try & do it myself. In the end, I decided to not bother. May change my mind down the road, however I'm not racing this thing. Having the type on the sides is kinda like those "MAZDA" or "FORD" banners that ppl put across the windshield, etc., when it's already obvious what the car is. That may not be so true for X1/9's these days, but I still don't think it needs it.

IMG_20200328_131410.jpg

IMG_20200328_140149.jpg

IMG_20200328_140152.jpg

IMG_20200328_141801.jpg

IMG_20200328_143126.jpg

IMG_20200328_151259.jpg

IMG_20200328_153541.jpg

IMG_20200328_172258.jpg

IMG_20200328_184101.jpg
 
Last edited:
You may want to think about getting that thin area below the number plate made as well.

Looks great otherwise.
 
You may want to think about getting that thin area below the number plate made as well.

Looks great otherwise.

You know..... Karl, I can count on you to knit-pick the details! Just kidding - I always appreciate your comments and suggestions :D

I was looking at the pics on my phone while working on it, and missed that thin strip along the bottom - it looks like it actually runs along the ridge rather than in the 'recess'. I'll have to square off the ends of my formed decals & make a strip to connect them. In the rear, my decals may not ride down over the ridge as much - hard to contour that with heavy paper, so the outcome will be a surprise for me :D. I may have to remake them if they don't achieve that look, though.

Screen Shot 2020-03-28 at 10.05.24 PM.png


EDIT - looking at this pic from the car show in 75, I'm not sure there is a link. If there is, it may be the edging they used?

Screen Shot 2020-03-29 at 10.48.07 AM.png


Still have to figure out the upper stripes and ladder bars on the targa. I've seen some where there are only three stripes, and varying thickness stripes, all of which looked odd compared to the above, so I need to get that right. The trunk lid line will have to change significantly since I have the lip spoiler. Not going to have the large "b" at this time.
 
Last edited:
Sorry for being a pain. Imagine what I am like at work where they actually pay me to be this way :)

The originals certainly did not have the bar across the bottom as a part of the side to back stripe, so you are in fact faithful to the original. It looks like they had a smaller margin between the recess and the top of the bottom panel on some of the cars.

The originals do it just as you are, as seen here:
5DC032B2-AD88-4B94-AB47-B01673DCC75D.jpeg


This one has a nice secondary stripe that runs around they car top and bottom and runs in that small margin area.

EBD5DD5D-C9AA-447B-A386-D033741A19B7.jpeg


For you, who does all things to your level of taste and standards (which are very high), it is something you will likely make your own in any case.
 
Last edited:
I believe this is one of the original cars, note the secondary color they surrounded the primary strip in:

ACEEE823-7566-4273-858C-9C60F178C500.jpeg


The original colors look like Burnt Ochre and yellow

Clearly didn’t have a line going across the bottom.
95EDBE7F-5C2A-464A-8440-354630F331D9.jpeg

You can actually see the yellow line stopping or bumping up on the rear diffuser panel with the ochre in the field above it.
 
Last edited:
The originals certainly did not have the bar across the bottom as a part of the side to back stripe, so you are in fact faithful to the original. It looks like they had a smaller margin between the recess and the top of the bottom panel on some of the cars.

For you, who does all things to your level of taste and standards (which are very high), it is something you will likely make your own in any case.

Thank you, Karl.

I do need to remake the rear decals no matter what - I can see I won't have the dogleg off the quarter into the rear panel the way I cut them. That little step makes a big difference. I do like the blue/yellow one, and there is another grey/yellow one that I was looking at, that don't have that little step-up at the transition, and I find I miss that compared to the original example.
 
I believe this is one of the original cars, note the secondary color they surrounded the primary strip in:

View attachment 30321

The original colors look like Burnt Ochre and yellow

Clearly didn’t have a line going across the bottom.
View attachment 30322
You can actually see the yellow line stopping or bumping up on the rear diffuser panel with the ochre in the field above it.

I've looked at that car - I wasn't sure if that was an original or not - I like the lighter outer accent, I've pondered how I could achieve that. It also helps to fix any defects in the main decal :)

You can see the way the front fender forward decal bulges and drops to the headlamp - that is the part I'm not entirely liking as it looks odd from a 3/4 view, based on other pics of the same car. So even if the decals are almost 5.25-5.5" depth overall, they are not all straight cut lines that curve simply because of the panels...

This one I assume is a copy - the line from the rear edge of the front fender to the front edge by the headlamp is what bothers me from this angle

D90_28862.jpg
 
I've looked at that car - I wasn't sure if that was an original or not - I like the lighter outer accent, I've pondered how I could achieve that. It also helps to fix any defects in the main decal :)

You can see the way the front fender forward decal bulges and drops to the headlamp - that is the part I'm not entirely liking as it looks odd from a 3/4 view, based on other pics of the same car. So even if the decals are almost 5.25-5.5" depth overall, they are not all straight cut lines that curve simply because of the panels...

This one I assume is a copy - the line from the rear edge of the front fender to the front edge by the headlamp is what bothers me from this angle

View attachment 30324

Sorry no neither of those are the OE car.
https://xwebforums.com/forum/index....st5-6spd-conversion.37374/page-23#post-341676
The car in this post is an original. The BW is from the Paris auto show the color is from a series that I believe appeared in Car Styling or Auto Styl from back in the day.

This is the illegal archive from Car Styling: http://www.carstyling.ru/en/car/1975_fiat_x1_9_dallara/images/23921/

I remember looking at that issue when I was at ACCD as they had them all. I would give a lot to have the old Auto Styl books (they were hardcover) as they often had the original section drawings of the ‘new’ cars

I've been looking at the car styling pics, those I found. The other element to consider is the strip across the nose - some ppl only have the pinstripe, which looks OK - I don't want the "Dallara - Bertone" lettering, however I may make the wide strip, if for no ther reason than it affords some chip protection :) I think I also need it as my nose section feels overly drawn out compared to the actual Dallara - I guess becuase the Greenwood panels are added on the existing nose section, rather than replacing it.

Dallara-Nose00039.jpg


This car has what I would consider for the nose decal:

12063806_478690208958729_7701397636479919266_n.jpg
 
I've been looking at the car styling pics, those I found. The other element to consider is the strip across the nose - some ppl only have the pinstripe, which looks OK - I don't want the "Dallara - Bertone" lettering, however I may make the wide strip, if for no ther reason than it affords some chip protection :) I think I also need it as my nose section feels overly drawn out compared to the actual Dallara - I guess becuase the Greenwood panels are added on the existing nose section, rather than replacing it.

Dallara-Nose00039.jpg


This car has what I would consider for the nose decal:

View attachment 30325

Here is another "real" car for you to compare with:

https://xwebforums.com/forum/index.php?threads/real-dallara-for-sale-on-subito-it.37499/

Cheers,
Dom.
 

Many thanks Dom. I had forgotten all about that post - at the time I saved a couple of the rear suspension pics, hadn't bothered to save any exterior pics. Interesting how basic the original stripes are - adding the outline in a different tone as seen on some of the others makes more sense now, if the original was as basic as shown. I wonder if the extra details were added for the show versions?
 
Looks as if the car in your B&W photo could even be the same car that was for sale?

Maybe? The Jolly Club one had additional pin striping around the paint stripes and long the top crease line, maybe those were removed? That pic was from '79, if the tag is accurate.
 
On the blue/yellow one there is some gravel rash in the paint. The paint in the picture may have been after a visit to a dirt bank and maybe not the original.
 
First version, not feelin' it.

IMG_20200329_141815.jpg


IMG_20200329_144919.jpg


IMG_20200329_145029.jpg


Closer to original
final1.jpg


final2.jpg


probably going to move the tape stripe closer to the main decal. Have to wait & see what the yellow block looks like, hard to see it in white.

final3.jpg


final4.jpg
 
Last edited:
Personally I don’t care for the nose band. The upper stripe is a nice unifying element which pulls your eye around the car. I wouldn’t drop it down into the blend on the nose, I would suggest keeping it closer to the break line like the car above that has all the words on it.

The nose on your car is more complex than the original cars, I don’t know that it needs more things added to it.
 
Last edited:
Washed the car and did the cut polish on the fenders and nose today, so I could start on the decals.

Did the PS door first. Was going to do the DS first, but found out I had cut two righthand decals.

Anyway, this is my first effort. It is a PITA to install. Ideally, one needs to tack it in the centre of the recess first, then smooth it upwards and downwards towards the creases.

I hung it on the top edge and worked it down from there, since I needed to make sure it overlapped the top crease. Ended up tapering on the rear lower, just inside the crease edge. I will have to remove & redo it, just not today. I'm happy with the color combination

IMG-20200330-175309.jpg


IMG-20200330-175650.jpg
 
Back
Top