Is this an E-gas pedal? It looks like that setup would allow toe-heel operation. Never managed that in a good way with the stock pedal.
Yes that's an electronic gas pedal indeed.
When I've sorted what I need to keep from the Stilo's electronics and the car drives, I'll be able to tell for sure if heel and toe works (I'd need to learn that skill first, though). But that was indeed how I tried to set-up the gas pedal.
 
Yes that's an electronic gas pedal indeed.
When I've sorted what I need to keep from the Stilo's electronics and the car drives, I'll be able to tell for sure if heel and toe works (I'd need to learn that skill first, though). But that was indeed how I tried to set-up the gas pedal.
For me it looks a bit low.

I have small feet so the OE pedal arrangement is perfect for heal and toe (which is a misnomer) its really big toe and little toe as you apply the force with the ball of your foot and roll the gas pedal with the right side of your foot.

I raised my 124 Sport Coupe’s pedal up along the rod it was mounted to as it was too low for me.

Can you change the ratio of the pedal assembly to the lever of the electronic component?
 
Last edited:
For me it looks a bit low.

I have small feet so the OE pedal arrangement is perfect for heal and toe (which is a misnomer) its really big toe and little toe as you apply the force with the ball of your foot and roll the gas pedal with the right side of your foot.

I raised my 124 Sport Coupe’s pedal up along the rod it was mounted to as it was too low for me.

Can you change the ratio of the pedal assembly to the lever of the electronic component?
Hi, your post made me rethink and I came up with gas pedal version number 2.

I found another location to mount the pedal mechanism, higher up. It required lengthening the shortened pedal, now it's only about 2-3cm shorter than the original, so stroke-wise it's better. The position is also better and I've more space to connect the connector too, so thanks a lot for the input.
IMG_20230201_210052.jpg


Below the previous version and a direct comparison of version number 2 with the X's original accelerator pedal (the new one is partly depressed by the original, but it illustrates rather well they are practically in the same position).
IMG_20230201_212327.jpg
 
Last edited:
Hi, your post made me rethink and I came up with gas pedal version number 2.

I found another location to mount the pedal mechanism, higher up. It required lengthening the shortened pedal, now it's only about 2-3cm shorter than the original, so stroke-wise it's better. The position is also better and I've more space to connect the connector too, so thanks a lot for the input.
View attachment 70197

Below the previous version and a direct comparison of version number 2 with the X's original accelerator pedal (the new one is partly depressed by the original, but it illustrates rather well they are practically in the same position).
View attachment 70198
Nicely done. I think you will be happier with this position.

Or you will hate me forever :)
 
I think you will find your caliper upgrades are significant and require a significant increase in the master cylinder output.

The "upgraded" master from MWB has the same piston as the stock unit, and therefore no difference in bore diameter. I believe the increased volume output is achieved by a slightly greater piston stroke travel. And that will make a small change in output, plus further increases a already too long travel distance. In my opinion it would only be effective for improving the pressure on a stock system or possibly a very mild brake upgrade (e.g. slightly larger pistons on only one end of the car). So you might be better off exploring the conversion to a Stilo master. ;)
Thanks for the input, I did some calculations and concluded it was better to switch to a 22.2 mm master cylinder before I filled the whole system with brake fluid.

Unfortunately the Stilo's master cylinder has the exits on the wrong side, so searched for an alternative, and found the Fiat Ducato 22.2 mm master that has three exits on the other and underside.The three exits are inversed compared to the X's, with two exits in the second and one in the first chamber.

The Ducato van has weird double piston calipers in the front (48 and 38 mm), the two 2nd chamber exits feed the 48 mm pistons left/right and the 1st chamber feeds both 38 mm front pistons, plus the 25,4 mm rear drum cylinders. This should match with my 54/48 mm calipers.

So I modified the pedal assembly to accommodate the Ducato master cylinder.
IMG_20230205_161457.jpg


Made a new cross-over hard line for the left front caliper. The right will fit directly on the master cylinder. The rear circuit passes through the proportion valve as before.

I'm waiting for the plastic elbow thingies (spigots?) to connect the reservoir hoses.

I also modified the brake switch mounting point to accommodate the Stilo's brake switch, as it has two switch circuits like the 500 Abarth, one switching from off to on and another from on to off. @TonyK needs the switch to feed the engine ECU, so I think the Stilo's ECU needs it too, plus a clutch switch.

That clutch switch switches from off to on, like the X's brake switch, so I simply mounted the the X's switch on the clutch's side, and will modify the connectors later.
 
Last edited:
Hopefully, the plastics elbows will be the correct diameter. When I replaced my MC the new ones were smaller than my reservoir lines. I wound up re-using the old ones.
 
Hi, I spent a lot of time trying to understand the Stilo's loom and identifying the controllers etc. Today I tested if the parts I thought that were needed to be retained were indeed enough to run the engine:
ezgif-3-7311d9fc88.gif

It starts! And revs!

Gifs have no sound, but it is a bit loud inside my tiny garage, it has a nice tone, though. The extended accelerator & pedal loom works too, but the instrument panel doesn't. It doesn't seem to needed. I maybe forgot a ground.

Now I know what I can remove and what I need to keep. Can easily save 8-10 kg of copper wire.

Another job is to find a solution for the fuel pump, I temporarily used the Stilo's fuel tank and pump. I plan to insert the Stilo's fuel pump in the X's fuel tank. My X was a caburetor and modern in-tank fuel pumps also include a mini surge tank, which my tank hasn't.
 
Last edited:
Hi, I spent a lot of time trying to understand the Stilo's loom and identifying the controllers etc. Today I tested if the parts I thought that were needed to be retained were indeed enough to run the engine:
View attachment 70834
It starts! And revs!

Gifs have no sound, but it is a bit loud inside my tiny garage, it has a nice tone, though. The extended accelerator & pedal loom works too, but the instrument panel doesn't. It doesn't seem to needed. I maybe forgot a ground.

Now I know what I can remove and what I need to keep. Can easily save 8-10 kg of copper wire.

Another job is to find a solution for the fuel pump, I temporarily used the Stilo's fuel tank and pump. I plan to insert the Stilo's fuel pump in the X's fuel tank. My X was a caburetor and modern in-tank fuel pumps also include a mini surge tank, which my tank hasn't.
Wow!!! Huge congrats. A great accomplishment.

You could go to an injected X fuel tank and use an external fuel pump. The standard X pump can achieve the fuel pressures needed or a newer injection system. It can still be controlled in PWM to provide the needed psi. Alternatively one could weld in a mounting for an internal pump assembly. New tanks can be had. Going with an X tank would give you the existing venting system without have to rethink the package.
 
Adding to what Karl said. If you use an external Bosch pump but need a little more volume/pressure than the stock X unit, there are several Bosch options to choose from. For example common ones used on many vehicles have the same external dimensions/connections as the X's but offer a greater flow rate. Or the Bosch "044" pump has more flow than you will ever need. Also you can use a aftermarket fuel pressure regulator with a return loop (constant flow) to regulate any pressure desired (below the pump's rating).
 
An external pump also works with a carbed tank, at least on EU models. I mounted my pump very low on the firewall but I don't think it matters. I also have an adjustable pressure regulator on the fuel rail. The newly upgraded Bosch 044 is now E85 capable but it is a little bit noisy.
 
An external pump also works with a carbed tank, at least on EU models. I mounted my pump very low on the firewall but I don't think it matters. I also have an adjustable pressure regulator on the fuel rail. The newly upgraded Bosch 044 is now E85 capable but it is a little bit noisy.
Indeed they can, one sometimes gets into issues with them being able to ‘lift’ the fuel as they do much better at pushing it. However if it can work it is one less thing.
 
The newly upgraded Bosch 044 is now E85 capable but it is a little bit noisy
That is what I hope to reduce if I can fit the in-tank solution. The tank is out of the car for a refurbishment, so now is a good moment as ever.

Plus, I suspect the pressure regulator drops fuel back in the surge reservoir (but I'm not sure). I understood this was one of first returnless fuel systems for Fiat (no return line from the engine).
 
Last edited:
Plus, I suspect the pressure regulator drops fuel back in the surge reservoir (but I'm not sure).
There's a return line also on carbed cars. I think it enters in the top of the tank. If you're going for an adjustable fuel regulator set it to the value as specified by injectors when engine idles and the regulator vacuum line blocked. I have no experience in PWM powered pumps but a high quality regulator works fine and doesn't involve the ECU.
I regret I didn't install a pressure sensor on the regulator and a gauge in the dash. I only have a mechanic gauge on the regulator itself that I can't read while driving.
 
That is what I hope to reduce if I can fit the in-tank solution. The tank is out of the car for a refurbishment, so now is a good moment as ever.

Plus, I suspect the pressure regulator drops fuel back in the surge reservoir (but I'm not sure). I understood this was one of first returnless fuel systems for Fiat (no return line from the engine).
From a noise viewpoint the in-tank solution must be the better solution it’s something I have been thinking about interested to see how you get on
 
Well, I think iI can safely say that I learned a lot more about vehicle wiring than I bargained for.

First the simple problem, on the maiden start of the 1.8 16v engine in the X I had the full Stilo loom in the trunk, plus a battery connected to that (the X’s wiring was not connected).

The engine started and revved, but the instrument panel did not work. After some digging in the pinouts and with the help of the multimeter I found that the instrument panel wasn’t getting ground. Ground is supposed to come through the body computer. Still trying to restore that, but in the mean time wired a ground directly from the pin, so I got to see the revs as well as the error messages (a lot). Most were harmless, others more worrying (like EDB/ASP/ASR/ESP), but the good news was there was no check engine light, which I hope indicates that the smaller Punto HGT catalysts plus secondary generic catalyst did work ok enough to make the O2 sensors read normal operating values.

Then I unpinned (and labeled) all wires of unconnected systems and reconnected the now extremely lean loom:
IMG_20230310_131003.jpg


In the future location of the X:
- The body computer + interior fuse box in the spare wheel space, as well as the batterie connector with the 150 A main fuse (the latter is now getting the power from the stock main and the battery in the stock X location).
- From there three connectors enter the engine bay through the stock cable port in the firewall and connect to the Stilo’s engine bay fuse box, with the main power supply, that also feeds the starter and gets the alternator current:
IMG_20230310_161708.jpg

(Yes I repurposed the old black ground to carry +12V as that was the only proper size wire I had available)

Fiat has nicely packaged the engine management ECU on the intake manifold so the engine bay loom is left as is.

Then when I test started it again and it ran still, ... but I got a check engine light… (and discovered my Mercedes specific ODB2 reader couldn’t connect with the FIAT ODB).

So I went over the whole system to try to find which wire I shouldn’t have unpinned, several times, but found nothing.
IMG_20230310_164342.jpg


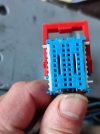
Except when I had everything out again I saw that one of the body computer plugs, the only one with a free moving sliding black module (these modern connecters are separate sliding modules all clipped in their connector but this one). Due to too much free room and poor poka/yoke the center part was connected one pin shifted, effectively cutting one of the four remaining circuits on this slider, and mis-connecting the other three.
IMG_20230310_164512.jpg


When I made sure it was in the correct position (the bottom one, difficult to spot the error) the check engine light was off again, Yes! (but it took much time and generated dispare and frustration).
IMG_20230310_131322.jpg


I still have all the kind of worrying error messages on the instrument panel (so the diagnostics is working and there is no reason the ODB port should work either). But I’ve decided that I will trouble-shoot that when I start road testing (after I’ve refurbished engine bay, re-fitted the engine and sorted out the fuel pump and radiator vent + controls and some more).
 

Attachments

  • IMG_20230310_120910.jpg
    IMG_20230310_120910.jpg
    120.4 KB · Views: 54
Back to mechanical stuff, preparing the X’s fuel tank to accommodate the in-tank fuel pump from the Stilo. When I removed the tank from the car I discovered the tank was crudely welded under one of the metal band hangers, which is strange as I bought the 78’s car I think in 84, only 6 years after production which is a bit quick to develop a rust leak. Anyway, I cut-out the ugly part and welded in a nice fresh new part of sheet metal and then removed the rest of the surface rust and applied rust converter/preventer.

To be able to insert the fuel pump I decide to cut a hole in the upper front face, and made a cover with studs that closes the tank from the inside, reusing the green rubber o-ring that sealed the Stilo’s tank (not visible in the picture). The edges are bend outward to get maximum out of plane stiffness to maintain the seal, the cover has the same but bent inward. The added benefit of the hole was that I could also remove the internal surface rust easily with some steel wool. There was relatively little so I think further treatment is not needed.

IMG_20230319_175328.jpg


The pump itself is held in place by an internal bracket that is also welded in. These in-tank pumps stay in place because they are spring loaded. To test this I dropped the tank on the side from 1 m, guessing that would exceed any normal driving lateral g-levels, and nothing moved, so that’s confidence inspiring.

When checking if the tank was airtight I discovered a tiny pin-hole at the location under the other metal band hanger. While trying to weld it at the lowest setting the hole kept getting bigger. The surface rust here was obviously going deeper than the surface. This time I took before and after pictures.

IMG_20230319_175455.jpg


I could grind the welds down to make it nicer, but I think it is functional as it is and perhaps even a bit stronger
 

Attachments

  • IMG_20230319_175455.jpg
    IMG_20230319_175455.jpg
    536.3 KB · Views: 65
  • IMG_20230319_175328.jpg
    IMG_20230319_175328.jpg
    547.2 KB · Views: 60
Last edited:
For cooling I have a Barchetta (183) radiator, a Punto (188) fan, and the Stilo (192) regulator matched to the modified radiator mount of the X.

IMG_20230328_170254.jpg


I needed a new radiator because the old radiator leaked and this option was quite a bit cheaper, but more important, this radiator was for the same 1.8l 16v engine, so the cooling capacity should match properly.

The radiator is 79 cm wide and only just fits with about 6-8 mm play, like everything else on the car now. It is a bit higher at 35 cm, and has to be mounted vertically due to the exits at 90°, the lowest part of radiator mount is level with the front spoiler, and I'm happy with that.

The coolant flow through the X's pipes is now opposite, left pipe caries hot, and right pipe returns cold, which is nice because it means they don't have to cross at the engine bay entrance, like in @TonyK 's Abarth builds.

The fan is smaller than Stilo's was, but if it doesn't flow enough I'll simply add a second one. The rating is 300W while the Stilo's was 360W, so not a huge difference.
 
Last edited:
Made some time to make the radiator feel at home in the X:
IMG_20230406_210759.jpg

I also lengthened the fan controller wires as they now have to travel from the engine bay all the way to the radiator bay. I found some free pins in an existing engine bay connector, and kept the original two wire waterproof connector that now connects in the cowl area.

Power for the fan now comes straight from the X's batterie (through the 50A fuse) There was a free slot in the big four-way connector on the bulkhead inside the cabin, as if it was planned that way.
 
Back
Top