The Rat's Nest - 81 X1/9 Build

This previous post on syncros might be helpful as you're working on this..


Bernice
 
Thanks for the info.
Got us a day in the shop yesterday.

Kid used a tiny diamond bit in the Dremel to detail burrs off of slider teeth tips.
Big magnifying lens helps.
IMG_6724.jpeg


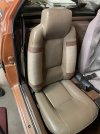
Afterwords we drug the seats out for some evaluation.
My friend longtime William came by to visit and one thing leads to another.
A true gearhead can’t just watch! :D
IMG_6735.jpeg

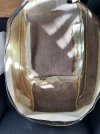
Seats came apart easily enough.
Interesting to see how it was done.
IMG_6744.jpeg


Frames were rusty and needed cleaning.
Going to need a few tabs re-made and welded on.
Think I’ll just push the ‘easy’ button and take them to the powder coater.
IMG_6771.jpeg


Got a ton of pics so i can remember how these go.
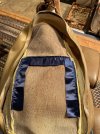
All of the stuff (waft? batting?) that white thin cloth the rods slide thru to give the seat shape are all rotten gone,
but otherwise the covers and foam look great.
IMG_6762.jpeg


Put everything on the trampoline to be rained on and sunshine.
IMG_6781.jpeg

The smell was enough already by the end of the day.
Two challenges i see with these:
1. Getting the aforementioned thin cloth replaced. I’m thinking an upholstery shop would make easy enough work of it.
2. Remediating dark stains; vinyl in odd areas has these dark brown blotches. Often it’s where direct sunlight hits.

Oh, and I scanned in the electrical pages from my Haynes manual,
And my kid helped me arrange and edit/clean up the images.
Got them printed out large and laminated.
IMG_6788.jpeg


IMG_6787.jpeg


On and on. Progress is progress.
 
Does anyone make reproduction seat covers for these things, or is it strictly custom upholstery work?

I'm blessed with a good upholstery shop nearby. She did up the full set for the Milano Verde Recaros for $1800 labor. Not chump change, but she cut the old covers apart, made new patterns, cut the new pieces and sewed everything up. Fit was excellent. I did all the removal and install work. Kind of fun but the hog ring pliers make my hands hurt. :)
 
If the vinyl is good and not cracking, and the fabric channels can be fixed, vinyl spray paint works really well. I used a colorbond VLP to good success.
 
I'm still interested in how well you are able to deal with the odor issue.
I just bought a set of new seat covers from these folks. www.Lseat.com
mail
I highly recommend them. The price was good and the order was filled in a very reasonable timeframe. I've seen that others here have used them too (Scorpion seats). If you are interested in working with them you might consider contacting them to see if they could duplicate the seat covers you have now. It would be nice if they had a pattern that would allow them to make covers for others too.

After reading this thread about the scorpion seats, I had a nice email exchange with the folks at L Seat about making some for my '81 X1/9. They were very open to making them, but don't have a pattern, yet. Since they'd need me to send my covers, and we are just coming into the driving season in Wisconsin, I put it on the back burner until next Winter.

The other options I know about are:
https://www.vickauto.com/parts/seat-upholstery-set-fiat-x19-1979-88-black-sku-50-1329-b/ (a bargain, but only available in black)
https://www.x19partsholland.nl/seat-covers (a couple options)

In the meantime, I've freshened up my passenger seat with SEM vinyl paint, and put a cover over the driver's seat which is too worn for paint to help.

Brian
 
"De-Burr"... or ... "burr-off"
~explain this?


Bernice
De-Burr would be correct, but a bit more, maybe?
When these balking ring synchro bands are trapped by the slider, there is friction - by design.
As the spinning rough coated spring ring thing gets compressed and drags against the ID of the slider it throws up a burr eventually.
The edges of these teeth on the ID of the slider have a slight bevel when new that gets worn away.
In addition, these burrs eventually can accumulate enough to hinder the smooth sliding of the slider teeth to the teeth on the gear.
Albeit slightly, but still...
Because these OEM 3-4 sliders are so rare and expensive now, and the one in our box was a fairly recent replacement, we're running it.
Since it's free for us to do, we knocked the burrs off of the edge of the slider teeth,
then went a slight bit farther, adding a bevel/chamfer similar to the factory inner tooth area that was not worn.

Should make the 3-4 shift smoother, and maybe help keep some trash out of the oil.
A known trick to help when re-using sliders.
 
After reading this thread about the scorpion seats, I had a nice email exchange with the folks at L Seat about making some for my '81 X1/9. They were very open to making them, but don't have a pattern, yet. Since they'd need me to send my covers, and we are just coming into the driving season in Wisconsin, I put it on the back burner until next Winter.

The other options I know about are:
https://www.vickauto.com/parts/seat-upholstery-set-fiat-x19-1979-88-black-sku-50-1329-b/ (a bargain, but only available in black)
https://www.x19partsholland.nl/seat-covers (a couple options)

In the meantime, I've freshened up my passenger seat with SEM vinyl paint, and put a cover over the driver's seat which is too worn for paint to help.

Brian
Oh, man, thanks for this info gentlemen..

It's now officially KILLING me to know that there are a set of brown NOS factory cloth/vinyl set covers on the planet, and for sale, even(!)
Might be my favorite period styling bit on the car; So perfectly 1981.

These would make our life better in so many ways.
While the upholstery shop might be able to sew new sleeves in, how long until other seams pop apart?
And how much will they charge?
Then there's the 'smell' factor.
And how well will vinyl dye match? Or hold up over time?

But.. Ack! That's $530 at today's rate.
Plus shipping... That's more than i paid for the car! :eek:

I'm reminded of my friend Jeremy the Fiend.
We're walking down Colfax Ave and some street dealer says "Yo, I got the rock".
The rest of Jeremy's day is now to be dominated by just one thought...
🤣🤣🤣
 
Last edited:
Didn’t mean to fling a craving on you…

The photos below show my passenger seat. The ‘listings’ (I think that’s what it is called) that loop around the wires to pull the upholstery into place had all rotted. I stitched in some ‘blanket edging’ to replace it. Changed the color from ‘parchment’ to SEM ‘Saddle’.
 

Attachments

  • IMG_0543.jpeg
    IMG_0543.jpeg
    324.3 KB · Views: 35
  • 66916990625__62CE1347-DD4F-4331-9D87-F8A4B56D7890.jpeg
    66916990625__62CE1347-DD4F-4331-9D87-F8A4B56D7890.jpeg
    346.7 KB · Views: 32
  • IMG_0545.jpeg
    IMG_0545.jpeg
    191.9 KB · Views: 32
Last edited:
De-Burr would be correct, but a bit more, maybe?
When these balking ring synchro bands are trapped by the slider, there is friction - by design.
As the spinning rough coated spring ring thing gets compressed and drags against the ID of the slider it throws up a burr eventually.
The edges of these teeth on the ID of the slider have a slight bevel when new that gets worn away.
In addition, these burrs eventually can accumulate enough to hinder the smooth sliding of the slider teeth to the teeth on the gear.
Albeit slightly, but still...
Because these OEM 3-4 sliders are so rare and expensive now, and the one in our box was a fairly recent replacement, we're running it.
Since it's free for us to do, we knocked the burrs off of the edge of the slider teeth,
then went a slight bit farther, adding a bevel/chamfer similar to the factory inner tooth area that was not worn.

Should make the 3-4 shift smoother, and maybe help keep some trash out of the oil.
A known trick to help when re-using sliders.
Think this over again, very carefully...
There is more than just the outer friction band involved. Add the braking bands inside the outer band and blocks and slider/slider teeth.

Hint:

The folks that designed this gear box really do know something as with how the parts are made/finished.

Bernice
 
Didn’t mean to fling a craving on you…

The photos below show my passenger seat. The ‘listings’ (I think that’s what it is called) that loop around the wires to pull the upholstery into place had all rotted. I stitched in some ‘blanket edging’ to replace it. Changed the color from ‘parchment’ to SEM ‘Saddle’.
Yea.. That’s the ticket. Listings!

I was fully planning on doing just like you did there.
But,
My seats have this black funky nastiness in the cracks,
And,
Well,
It ain’t so nice.

Maybe if i get the right chemicals into play?
Otherwise, the rot in the seams might just be fatal.
If that makes any sense…
 
Think this over again, very carefully...
There is more than just the outer friction band involved. Add the braking bands inside the outer band and blocks and slider/slider teeth.

Hint:

The folks that designed this gear box really do know something as with how the parts are made/finished.

Bernice
Yes, i have read that thread many times now.
The Pinto part is classic!

While i might have just fallen off the turnip truck with regard to Fiats,
When we talk transaxles I am fortunate enough to have apprenticed under some very talented people.
WRT detailing the teeth on the inside of a used Porsche-style slider, This technique was imparted to me by a man very well regarded in the Porsche/VW transaxle community.
I find it distasteful to drop names, but anyone involved in Porsche factory racing knows the guy, and he has become a personal friend.

We can all learn when we keep an open mind and have the humility to understand that there is always more than can be gleaned in several lifetimes.
 
Last edited:
Yes, i have read that thread many times now.
The Pinto part is classic!

While i might have just fallen off the turnip truck with regard to Fiats,
When we talk transaxles I am fortunate enough to have apprenticed under some very talented people.
WRT detailing the teeth on the inside of a used Porsche-style slider, This technique was imparted to me by a man very well regarded in the Porsche/VW transaxle community.
I find it distasteful to drop names, but anyone involved in Porsche factory racing knows the guy, and he has become a personal friend.

We can all learn when we keep an open mind and have the humility to understand that there is always more than can be gleaned in several lifetimes.
That was my thread. To sum up, I tried 2 different aftermarket third gear synchro rings before finally getting an OEM Yugo synchro ring which worked perfectly. Beware the aftermarket synchro rings…
 
That was my thread. To sum up, I tried 2 different aftermarket third gear synchro rings before finally getting an OEM Yugo synchro ring which worked perfectly. Beware the aftermarket synchro rings…
Excellent work on that box (and thread).
Even though it was more work/money than you would have liked, your sharing here has helped us greatly.

As for synchros, I have gotten 1-4 from SteveC in Aus. He has sworn that they are OEM.
Will get some close-up pics soon.
That, and internal gear hub shoe/block part pics.

That i could get this box together correctly first try seems a miracle.
And, unfortunately, having never driven the car, there’s nothing to know about its operation.

On that note, my Italian connection has sent me these pics.
Provided that those parts came from those boxes..
(The Italians were incredulous that anyone would put an aftermarket gear in an OE box)
These -should- be the good parts, right?
Ricambi originali printed on the box guarantees the good stuff as much as you could hope for, correct?
IMG_6813.jpeg

IMG_6812.jpeg
 
Interesting that there is no taper on the teeth of the slider where it engages the dogs. Alfa's are tapered on those internal teeth similar to the dog points. I generally judge the condition of the Alfa slider based on those points and the width of the fork groove. I'm learning vicariously. :)
 
When we talk transaxles I am fortunate enough to have apprenticed under some very talented people.
WRT detailing the teeth on the inside of a used Porsche-style slider, This technique was imparted to me by a man very well regarded in the Porsche/VW transaxle community.

We can all learn when we keep an open mind and have the humility to understand that there is always more than can be gleaned in several lifetimes.

Response to discover Porsche syncros in this Fiat transaxle and many other Italian and European cars from that era?

Another one would be Fiat licensing of valve adjustment with the shim on top of the valve bucket to VW/Porsche and Volvo.

While the oily bits are Fiat, the exxe remains a Bertone product from its beginnings.


Bernice
 
Well, dag…
The finance minister approved additional funds appropriated for seat covers,
And Henk tells me the last set got sold :(

However,
Dr. Hoelscher indicated that these particular boxes do indicate that good parts are contained within.

One step back, one step forward.

On that note,
My Italian agent Alberto, in conjunction with local hero Maurizio, has been making personal visits to different locations in Italy to verify provenance and obtain OEM factory gears and sliders.

Going to be some super sweet OEM transaxle parts here soon if everything works out.
:cool:
 
The finance minister approved additional funds appropriated for seat covers,
And Henk tells me the last set got sold :(
Sorry that lead didn't pan out. But the pointer to L Seat is still a viable option. (Vick's, too, if Black is acceptable.)
The L-Seat folks offered a discount for providing covers that they use to make a pattern. Seems to me that the extra time required for that won't really hold you back, as you still have - ummm - plenty of other facets of the project to keep you occupied...
 
Back
Top