
You are using an out of date browser. It may not display this or other websites correctly.
You should upgrade or use an alternative browser.
You should upgrade or use an alternative browser.
Torque suppressor
- Thread starter Agnelli
- Start date
Agnelli
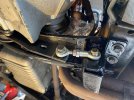
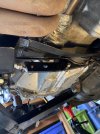
True Classic
Thanks. Having read Xweb postings on this I don’t think the rose joints will cause undue vibration. I am hopeful it will act as a taught line limiting block rotation while allowing motion up and down as the factory mount provides. Another view for you hereNice job, well done.
That's pretty much how I envision doing it. But I think I might go with urethane bushings instead of solid?
Attachments
ArtBasement
Erwin Timmers
I assume this mod will help increase the life of the bottom mount? In this case the engine will pull on the linkage, right? As it is pushing on the dogbone up top? Do you have a link where you got the hardware? Looks to be easy to add to a car that already has the exhaust mount
Dr.Jeff
True Classic
Somewhere in the following thread it was discussed:I assume this mod will help increase the life of the bottom mount? In this case the engine will pull on the linkage, right? As it is pushing on the dogbone up top? Do you have a link where you got the hardware? Looks to be easy to add to a car that already has the exhaust mount
Random Transmission Failures
I have a solid bottom mount and solid dog bone. I like them. No more engine rocking. When I gave gas, the car is moving, no delay no jet lag. But I will be happy to have spinning tires. Maybe I will with my rebuilt engine and DCOE's...:rolleyes:
xwebforums.com
There may be other discussions about as well.
Dr.Jeff
True Classic
I get what you mean, that it will "pivot" rather than "yank". Maybe some of both, I'm not sure? That's why I haven't decided on my approach yet...I need to do a little research and think it through. But the use of the lower mount with the exhaust support arm is ideal for this. I have one with a worn rubber bushing (lower support) that I hope to rebuild with a soft duro urethane, then add this torque strut. That's where I'm thinking urethane for the torque strut as well as the lower mount, to keep everything matching. But using heims is simpler.Thanks. Having read Xweb postings on this I don’t think the rose joints will cause undue vibration. I am hopeful it will act as a taught line limiting block rotation while allowing motion up and down as the factory mount provides. Another view for you here
")
Dr.Jeff
True Classic
Without any real consideration, this thought just came to mind. How about leaving the exhaust support arm longer then use only one bushing between it and the added mount on the crossmember?
This quick illustration is overly simplified. But the red line is one side of the urethane bushing mounted to the exhaust hanger arm. The green line is the other side of the urethane bushing mounted to the crossmember. The blue circle is the urethane bushing in between those two mounts. As the exhaust arm swings up and down the urethane bushing is compressed and pulled.

This quick illustration is overly simplified. But the red line is one side of the urethane bushing mounted to the exhaust hanger arm. The green line is the other side of the urethane bushing mounted to the crossmember. The blue circle is the urethane bushing in between those two mounts. As the exhaust arm swings up and down the urethane bushing is compressed and pulled.
Steve Hoelscher
True Classic
I assume this mod will help increase the life of the bottom mount? In this case the engine will pull on the linkage, right? As it is pushing on the dogbone up top? Do you have a link where you got the hardware? Looks to be easy to add to a car that already has the exhaust mount
Since I am the original developer of this type of torque suppressor I'll offer my reasoning and its purpose.
If you look at the stock mount you will see the voids on either side (front/rear) of the rubber mount. Those voids allow for fore/aft motion when the torque is applied to the driveline. That's their purpose. However, that does stress the rubber and over time it will wear, crack and ultimately break. It is this fore/aft movement that cushions driveline take-up when the clutch is released and that cushioning contributes to driveline windup and that, in part, makes it difficult to launch the car hard without bogging the motor.
When I was competing with my X1/9, I needed the car to launch very hard without bogging the motor and that requires a small amount of wheelspin. Thus I needed to reduce driveline windup in order to force the rear tires to spin on launch without axle hop. I designed this torque suppressor to allow for normal operation of the mounts but eliminate the fore/aft movement of the lower mount. I found, through testing, that stiffening the dog bone (top mount) only transferred more movement to the lower mount and made the problem worse. Using this style torque suppressor allowed for normal operation of the mounts but without the lower driveline motion. The car drives very much like stock and transferred very little vibration.
I had been regularly destroying lower mounts but after fitting this unit I never had another lower mount failure. And that is launching the car on 225/45-13 Hoosier racing tires.
Dr.Jeff
True Classic
And if I recall correctly Steve, you also used solid "bushings" (heims) on the ends of your torque strut?Since I am the original developer of this type of torque suppressor I'll offer my reasoning and its purpose.
If you look at the stock mount you will see the voids on either side (front/rear) of the rubber mount. Those voids allow for fore/aft motion when the torque is applied to the driveline. That's their purpose. However, that does stress the rubber and over time it will wear, crack and ultimately break. It is this fore/aft movement that cushions driveline take-up when the clutch is released and that cushioning contributes to driveline windup and that, in part, makes it difficult to launch the car hard without bogging the motor.
When I was competing with my X1/9, I needed the car to launch very hard without bogging the motor and that requires a small amount of wheelspin. Thus I needed to reduce driveline windup in order to force the rear tires to spin on launch without axle hop. I designed this torque suppressor to allow for normal operation of the mounts but eliminate the fore/aft movement of the lower mount. I found, through testing, that stiffening the dog bone (top mount) only transferred more movement to the lower mount and made the problem worse. Using this style torque suppressor allowed for normal operation of the mounts but without the lower driveline motion. The car drives very much like stock and transferred very little vibration.
I had been regularly destroying lower mounts but after fitting this unit I never had another lower mount failure. And that is launching the car on 225/45-13 Hoosier racing tires.
kmead
Old enough to know better
Adding GregS photos to this thread
Post in thread 'Random Transmission Failures'
https://xwebforums.com/forum/index.php?threads/random-transmission-failures.38210/post-345082


Post in thread 'Random Transmission Failures'
https://xwebforums.com/forum/index.php?threads/random-transmission-failures.38210/post-345082
Is this a bracket that was made up for a 4 speed without the extra arm on the engine mount?Adding GregS photos to this thread
Post in thread 'Random Transmission Failures'
https://xwebforums.com/forum/index.php?threads/random-transmission-failures.38210/post-345082
View attachment 59850View attachment 59851View attachment 59852View attachment 59853
Lowtechprime
Retro Grouch
The mount I got/modified for my 128 5 speed install didn't have those voids front and back, just 1 slot underneath...

Steve Hoelscher
True Classic
And if I recall correctly Steve, you also used solid "bushings" (heims) on the ends of your torque strut?
Yes, they were Rod Ends. As was was used there. My mounting method was little different. I suppose I need to get under the car and take a photo some time.
Dr.Jeff
True Classic
There was a discussion about this before. Actually it seems there's a few different variations for the lower mounts; locations of the voids, the size and shape of them, etc. Lots of speculation why the differences and which are "better". But I think the general consensus was none of the current production is very good - they all seem to sag quite quickly. Then we got talking about how to make a better one. Some suggestions for filling the voids on a new mount before they collapse. Other suggestions for making your own mount with better materials and no voids. Hopefully I'll get a chance to try making one of those "improved" mount options, along with making it into a "torque strut".The mount I got/modified for my 128 5 speed install didn't have those voids front and back, just 1 slot underneath...View attachment 59923
Since your mount is new I'd suggest trying a easy upgrade to it. Get a tube of windshield urethane and fill the void completely with it. You should remove the mount first so there's no load pushing down on the void. Let it completely cure for a couple days. After that it is just like a stock mount but much less likely to sag. And the urethane filler in that small area won't make any noticeable difference in how the mount "feels". Here's the stiff I'm referring to....it has been successfully used for such applications by thousands of people:
Last edited:
Jonohhh
True Classic
The mount I got/modified for my 128 5 speed install didn't have those voids front and back, just 1 slot underneath...View attachment 59923
The design of these is just so incredibly...no. I mean look at the load path, and the lack of support directly beneath the relatively small area under which the load is applied. The rubber should be put into compression instead of bending... It's like they decided to put material where there shouldn't be and no material where there should be.
The other design with slots simply on the side seems to be better at first glance, but the cross sectional area tapers down pretty small considering it's supporting a heavy iron block motor and trans, so it's probably a wash.
Lowtechprime
Retro Grouch
"Since your mount is new I'd suggest trying a easy upgrade to it."
It's a good idea, but I don't think I will go through the trouble. My engine/trans assembly is supported at both sides, so the center mount isn't really doing much....

It's a good idea, but I don't think I will go through the trouble. My engine/trans assembly is supported at both sides, so the center mount isn't really doing much....
Dr.Jeff
True Classic
I'd forgotten that your setup is different."Since your mount is new I'd suggest trying a easy upgrade to it."
It's a good idea, but I don't think I will go through the trouble. My engine/trans assembly is supported at both sides, so the center mount isn't really doing much....View attachment 59991
Lowtechprime
Retro Grouch
I would certainly think so. It's essentially the same setup, just in front. Anything to stop the engine moving around under load I think would be a benefit. Between my urethane top steady and three more points of attachment, I don't think I'll be tearing any mounts soon or breaking the exhaust manifold..... That extra left side trans mount is essentially solid, there's a urethane bushing there for noise, but it's basically just a 14mm ARP bolt into the frame rail so it really can't flex at all... I like Jeff's idea of filling in the standard mounts, certainly easier than making a new solid bushing from scratch..New question - would a torque suppressor like Steve’s, Greg’s or mine in our X1/9’s also yield benefits to a 128? I would think the answer is yes but certainly want to hear your thoughts.

Last edited: