
You are using an out of date browser. It may not display this or other websites correctly.
You should upgrade or use an alternative browser.
You should upgrade or use an alternative browser.
What did you do to your X1/9 today ?
- Thread starter Eastep
- Start date
KBabcock
True Classic
Show us pictures when you get it installed and the lights are on.I decided to add some aluminum tape to brighten up the gauges a bit at night. I'll report back how much this helped.
View attachment 54466
View attachment 54467
View attachment 54468
View attachment 54469
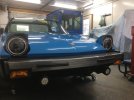
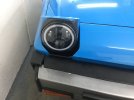
Worked on my headlights today ,installed leds from eBay ,with a little grinding on light housing they fit great , also made block off plates for smog removal, and start engine area clean up ,
Attachments
RyanG
True Classic
Very interested to see if this works. Yes, would love to see pictures of your results.I decided to add some aluminum tape to brighten up the gauges a bit at night. I'll report back how much this helped.
View attachment 54466
View attachment 54467
View attachment 54468
View attachment 54469
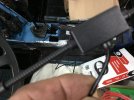
Threaded cables through the levers. I found that if I soldered the first two centimeters of the cable I could bend the end w/o it deforming or fraying and feed it through the hole. Tomorrow installing housing and fishing everything through the body.
The housing is cracked where someone monkey fisted the screws on the cable stops. Sigh.
Would CA work on this plastic or is there something better?
Thanks.
The housing is cracked where someone monkey fisted the screws on the cable stops. Sigh.
Would CA work on this plastic or is there something better?
Thanks.
SuperTopo
True Classic
Threaded cables through the levers. I found that if I soldered the first two centimeters of the cable I could bend the end w/o it deforming or fraying and feed it through the hole. Tomorrow installing housing and fishing everything through the body.
The housing is cracked where someone monkey fisted the screws on the cable stops. Sigh.
Would CA work on this plastic or is there something better?
Thanks.
Try plastic welding it. I did this for the first time last weekend on my short speedo cable. The plastic end was broken where it's crimped to the cable sheath. I figured what the hell, if it doesn't work I'll just buy a new one. So I went for it, did the steel wool as well. Worked awesome. Give it a go.
Rod Midkiff
True Classic
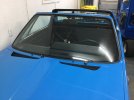
what type of antenna and where did you get it, I have tried two that don't work. still need to do something to make the radio work (been just using the phone)Got the windshield installed today , just a side note the little hide away antenna works well
The antenna was ( wlanoit universal car stereo am/fm dipole ) got it on Amazon $21 , works well getting channels in garage , placed on windshield just behind rear view mirror,what type of antenna and where did you get it, I have tried two that don't work. still need to do something to make the radio work (been just using the phone)
tvmaster
True Classic
“wlanoit”? Also - those LED headlights: how difficult was it getting those working?The antenna was ( wlanoit universal car stereo am/fm dipole ) got it on Amazon $21 , works well getting channels in garage , placed on windshield just behind rear view mirror,
Dr.Jeff
True Classic
Pretty much every cable housing I've seen is cracked or broken where the sheaths are clamped. It is a faulty design; the anchor screws need to be tight enough to hold the sheath from moving while the inner cable is functioning against the latch assemblies. Given the design, it requires quite a bit of clamping force to do that (they did not allow for any type of recess or ridge for the fastener to anchor to). And that force acts directly on the opposite side of the plastic housing, which is not strong enough to maintain it. Yes, if the cables are in excellent shape and well lubed, and if the latch mechanisms are also in great condition and well lubed, and if everything is properly adjusted and constantly maintained, then they will work much better. However none of that seems to happen on old cars like these.Threaded cables through the levers. I found that if I soldered the first two centimeters of the cable I could bend the end w/o it deforming or fraying and feed it through the hole. Tomorrow installing housing and fishing everything through the body.
The housing is cracked where someone monkey fisted the screws on the cable stops. Sigh.
Would CA work on this plastic or is there something better?
Thanks.
There have been a couple of members that modified the housing by making metal reinforcements around those sheath anchor areas. Also we've recently seen some great results making new housings using 3D printing with stronger materials and improved designs.
Today..
Installed new rubber gaskets for all the rear tail lenses, I bought 3-4 meters from LadaPower and it fits perfect. Little tip about putting screws into plastic I learned years ago. Lightly put the screw in, turn anti-clockwise a few turns and you will feel the click - that is to where to start the proper clockwise turn. A lot of people just jam the screw in and start turning. That will strip the threads in the (very old) plastic. Also - the rubber gasket is sure to shrink over the years - squeeze in a few millimeters more than you think will fit. In a few years it will shrink, but it will still be long enough.
If the rain stops it will be T oil fitting and I'll finally be able to see proper oil pressure. Yay.
Last edited:
I did the CA last night, I've never had luck with plastic welding.Pretty much every cable housing I've seen is cracked or broken where the sheaths are clamped. It is a faulty design; the anchor screws need to be tight enough to hold the sheath from moving while the inner cable is functioning against the latch assemblies. Given the design, it requires quite a bit of clamping force to do that (they did not allow for any type of recess or ridge for the fastener to anchor to). And that force acts directly on the opposite side of the plastic housing, which is not strong enough to maintain it. Yes, if the cables are in excellent shape and well lubed, and if the latch mechanisms are also in great condition and well lubed, and if everything is properly adjusted and constantly maintained, then they will work much better. However none of that seems to happen on old cars like these.
There have been a couple of members that modified the housing by making metal reinforcements around those sheath anchor areas. Also we've recently seen some great results making new housings using 3D printing with stronger materials and improved designs.
I can see where one might be able to put a small hose clamp or spring clamp around plastic anchor areas. If mine crack again I'll try that.
Dr.Jeff
True Classic
Nice find. They have a lot of compatible items for our cars, you just need to find out what fits. Do you recall specifically which part you got from Lada Power for this?I bought 3-4 meters from LadaPower and it fits perfect.
There isn't a lot of height to those cable "towers" where the anchor screw secures the sheath. So the clamping screw will likely need to pass through whatever support (metal reinforcement) you add. But that's not difficult to do. Otherwise a thin spring clamp (as you suggested) may fit above or below the anchor screw. I've even considered making a thicker metal ring and tapping it for a long set screw (replacing the stock one), to reinforce the plastic and offer a better anchor screw. That is another issue; the anchor screw is a tapered self-tapping type that "swages" the plastic apart as it is tightened. The plastic "tower" may need to be ground round for a good fit.I can see where one might be able to put a small hose clamp or spring clamp around plastic anchor areas. If mine crack again I'll try that.
So I cleaned the contacts on the back of the tachometer, ('75 ver 1 or 1.5, CA model) but tach still hangs/stops at about 3000 RPM.
It's smooth up and down, and fairly accurate until then. Is there something I can clean or adjust on the inside of the tachometer or is it not user friendly? I don;t want to pop it apart and break anything.
Thanks everyone,
Nice find. They have a lot of compatible items for our cars, you just need to find out what fits. Do you recall specifically which part you got from Lada Power for this?
There isn't a lot of height to those cable "towers" where the anchor screw secures the sheath. So the clamping screw will likely need to pass through whatever support (metal reinforcement) you add. But that's not difficult to do. Otherwise a thin spring clamp (as you suggested) may fit above or below the anchor screw. I've even considered making a thicker metal ring and tapping it for a long set screw (replacing the stock one), to reinforce the plastic and offer a better anchor screw. That is another issue; the anchor screw is a tapered self-tapping type that "swages" the plastic apart as it is tightened. The plastic "tower" may need to be ground round for a good fit.
Lada Niva 1600, 2106 Gasket Between Taillight Cover And Body 1000mm
Lada Niva 1600, 2106 Gasket Between Taillight Cover And Body 1000mm Electric 1600
Parts are fairly inexpensive, so I still come out ahead even if I get the wrong parts occasionally. Usually I'm choosing parts from the 2101 through 2107 Lada Niva
Dr.Jeff
True Classic
Thanks for the link. I'm the same, things are cheap enough to try. Sometimes I can make minor modifications to still use them even if they are not exact (for example the fuel level sender; although the pipe wasn't the right length, all of the other components were identical and swappable over to my original one to rebuild it like new). But overall I'm impressed at how much is a direct replacement. We should start a list of all the Lada parts that interchange with X items. Like you, I've found quite a few....including some hard to find "no longer available" Fiat parts.Lada Niva 1600, 2106 Gasket Between Taillight Cover And Body 1000mm
Lada Niva 1600, 2106 Gasket Between Taillight Cover And Body 1000mm Electric 1600ladapower.com
Parts are fairly inexpensive, so I still come out ahead even if I get the wrong parts occasionally. Usually I'm choosing parts from the 2101 through 2107 Lada Niva
Dr.Jeff
True Classic
By the way, you can also use a drop of your CA on the ends of this rubber cord to fuse them together. It works really well, that's how custom sizes O-rings are made. That way when it shrinks you won't get any gap at the ends. But I'd still use a little extra length as you suggest.Lada Niva 1600, 2106 Gasket Between Taillight Cover And Body 1000mm
Lada Niva 1600, 2106 Gasket Between Taillight Cover And Body 1000mm Electric 1600
Parts are fairly inexpensive, so I still come out ahead even if I get the wrong parts occasionally. Usually I'm choosing parts from the 2101 through 2107 Lada Niva
Weird name I know but that is what it is sold buy superbat on Amazon .the lights very easy , little grinding on side of cooling fins ,then they fit right in .“wlanoit”? Also - those LED headlights: how difficult was it getting those working?
tvmaster
True Classic
Any electrical modifications, relays, rewiring, etc.? We noticed last time driving at night how dim the original headlights are - this cures that problem?Weird name I know but that is what it is sold buy superbat on Amazon .the lights very easy , little grinding on side of cooling fins ,then they fit right in .
At the bottom of each lens are two little plastic 'ribs' in the gasket channel about 3mm apart, that look like you're not supposed to lay gasket across them. I cut my gaskets leaving that space. I guess it's for a moisture drain or something. The old gaskets did not overlap these little ribs either.By the way, you can also use a drop of your CA on the ends of this rubber cord to fuse them together. It works really well, that's how custom sizes O-rings are made. That way when it shrinks you won't get any gap at the ends. But I'd still use a little extra length as you suggest.