DanielForest
True Classic
And that Akron Platinum CV joint kit looks like great quality!Deep work project Alain!

And that Akron Platinum CV joint kit looks like great quality!Deep work project Alain!
Indeed. Supplied by Midwest Bayless.And that Akron Platinum CV joint kit looks like great quality!
Great idea on the tool mod. I'm have both of these tasks coming up. Is it easier to do them at the same time in any way? And did it matter which one you did first?Getting ready for summer fun! Valve adjustment and timing belt change. I needed 5 new shims to get to spec. Thank you Dan Sarandrea for your wonderful valve adjust write-up. I followed it to a T. I had a little issue with the valve tool not depressing the bucket down enough to slide the shim out. My remedy was to shape a thin piece of metal into the hook of the tool. This increased the depth the tool pushed down. This hack worked well.

 Will have to partially drop the column and re-clock the splined u-joint. It's a simple task, a phillips head to separate the plastic surround clamshell, 13mm and 10mm to loosen the column mounting points, and10mm socket and wrench to remove the u-joint clamp-cross bolt. There might even be enough play in the inner column to allow me to re-clock just by removing the u-joint clamp-cross bolt.
These sort of situations are very frustrating indeed. As I read you post one of my first thoughts was like you - the voltage regulator, considering you've already taken care of the usual bad grounds, etc.I had a very elusive charging issue on my '86. Started mid-summer in 2021. I was not happy with the indicated voltage showing on the voltmeter. Only briefly after startup and cut-in would it show what I would call normal charging voltage (say, 13.6 and above). After that with any sort of load it was living in the 12.8 - 12.9 neighborhood. This was especially frustrating as I have expended considerable effort, time, and expense in re-architecting the electrical system on my car to what I thought was a "bulletproof" level.
As best I could I checked and polished/tightened all connections, measured resistances as much as I could with a good quality but basic digital VOM, and even removed the alternator and took it back to my local electrical shop that had previously replaced the bearings and they said the alt was fine, giving me a decent charging curve and even putting out a few extra amps over its rated 65A at max rpm.
One theory I pursued was that heat was causing the internal voltage regulator to not keep the alt's amps up. I check my stock alt cooling duct work and all was well there. I bought a cheap but new internal voltage regulator to replace a Bosch branded component, just as a test, but with no effect. I bought an adapter and an external adjustable voltage regulator sold as a kit, and wired it in, but with no effect. Turns out what I bought as a kit pretty much converted by late Bosch alt with internal solid state regulator to something functional identical to the early 1500s that had a Bosch late with an external regulator!
After going thru the wiring once more, checking resistances on as many legs of the charging circuits as I could and not finding anything, I decided to replace the ignition switch. I got a good used unit from MWB. Testing both the original and replacement using my basic but good quality VOM, I could not pinpoint any discrepancies. I was always a bit suspicious of the ignition switch because most of the time, running it thru off, run, and start either in startup or shutdown mode, would cause a brief and unusual flicker or dropout of instrument panel lights.
After replacing the switch, I don't have that flicker anymore, and my driveway test runs are not showing that voltage drop. I have plans to attend two Cars & Coffee events this weekend, so I'll be keeping an eye on the voltmeter and will update this post.
PS I committed the cardinal sin of troubleshooting by simultaneously changing two things that may bear on the problem. One was the ignition switch as described above. The other was the replacement of a 7.5A fuse with a 25A in the very later model Fuse and Relay Center on the "Services" position. There is a FIAT Service document that says to do this (thanks to Tyler, member name "AARPCard"): https://www.xwebforums.com/forum/in...bertone-wiring-diagram-addendum-fuse-r.36743/
However, I cannot wrap my head around how installing an uprated fuse into a circuit that did not blow a 7.5A fuse would help to raise a car's charging voltage.....I just don't see how that action could effect such a result.....so maybe I'm making a mountain out of a molehill.
Looks like some rather beefy wires have been added.Installed a washer fluid bottle/pump. The original bag was in a bad location since that space is now full of wires for the headlight relay mod. Got it off Amazon. Works like a charm. Holds about 1.5L. Wires and hose were long enough make the new connections without any cutting.
Roy
12V Universal Car Windshield Washer Pump Washer Reservoir Bottle Tool Kit & 2 Jets by Wadoy, Windshield Washer Pumps - Amazon Canada
12V Universal Car Windshield Washer Pump Washer Reservoir Bottle Tool Kit & 2 Jets by Wadoy in Windshield Washer Pumps.www.amazon.ca
View attachment 61127
")
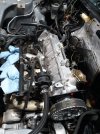
Yes, it goes to that tee and on to the aux air regulator. The middle port on the tee goes to the air conditioning step-up valve.Powerplant install nearly complete. Only remaining "mystery" is the small hose (2 ft long) coming out of the Intake manifold, near the blue Cold Star Valve (photo). What does it connect to? Is it to the small connector seen on the vertical hose of the Auxiliary Air Regulator, in the 2nd pic?
. Since there was still daylight left, I decided to install the new front lower control arms (did the radius rod bushings & MWB used rear control arms last year). Used the Rare Parts aftermarket ones. They looked to be good quality, but note that only 1 side was threaded for the small bolt that locks the radius rod main bolt. I just used a longer bolt & nut to secure. Since I was already dirty, tackled the RH wheel bearing that has been humming for years. You never realize just how loud they are until you replace them... Booking the alignment today. Thanks to everyone on this forum for the writeups & posts on these jobs which made all of them possible without breaking anything or bleeding!What skill level, and how long did it take to replace the boots - did you remove and replace them, or just plug them up somehow (newbie - not sure what ‘repack’ means) Would also like to hear about your alignment when it’s finished, aka computer aided etc. thanksI worked a good part of yesterday on my X, hopefully getting it ready to go to the MWB event (even though I be towing it there). Started with the leaking seal at the RH output shaft (did the shifter shaft seal earlier in the week). Repacked the CV joints. Refilled with Redline MTF, replacing the almost rounded off fill plug with a new 1. Road test (longer than I needed to
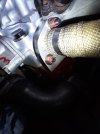
It's just standard heater hose. The original stuff is a metric size but widely available American hose (IIRC 5/8" but I could be wrong, see different sizes below) is close enough. That bend where it goes into the hard pipe under the exhaust manifold is a sharp one for a non-molded hose, so I found a length of hose at NAPA that was just standard hose BUT at one end it had a 90 degree molded elbow, just what the doctor ordered.Was a busy weekend, I was back to taking the AC compressor out of the engine bay and was having a hell of a time trying to get this out. After a coupe of hours trying from underneath I remembered I had the access through the trunk. Nevered used it before.
View attachment 61184
That access was a life saver, now I'm sure there are several readers nodding their heads going "Dah", once you need it you will never forget it. This led to this.
View attachment 61183
From there it was on to the coolant lines, out with the old and in with the new. Front two are next and I hear they teh passnagerside front is a pain to get at.
I did see a long smaller rubber line running from the small metal tube next to the two main metal lines under the car to a fitting under the manifolds, I believe this is the heater core line. The question I have, is this a custom hose or just standard hosing?
View attachment 61182
I seem to recall a older thread with some Gates part numbers for similar hoses also. Possibly the same hoses you listed with NAPA.It's just standard heater hose. The original stuff is a metric size but widely available American hose (IIRC 5/8" but I could be wrong, see different sizes below) is close enough. That bend where it goes into the hard pipe under the exhaust manifold is a sharp one for a non-molded hose, so I found a length of hose at NAPA that was just standard hose BUT at one end it had a 90 degree molded elbow, just what the doctor ordered.
All part numbers below are 36" on one leg and 4" on the other leg of the 90 degree bend:
1/2" (12.7mm) ID https://www.napaonline.com/en/p/NBG9806
5/8" (15.9mm) ID https://www.napaonline.com/en/p/NBG9812
3/4" (19.1mm) ID https://www.napaonline.com/en/p/NBG9820
I didn't disassemble them, just forced the grease into the joints. I will keep you posted on the alignment.What skill level, and how long did it take to replace the boots - did you remove and replace them, or just plug them up somehow (newbie - not sure what ‘repack’ means) Would also like to hear about your alignment when it’s finished, aka computer aided etc. thanks
Thank you Dan, much appreciated!It's just standard heater hose. The original stuff is a metric size but widely available American hose (IIRC 5/8" but I could be wrong, see different sizes below) is close enough. That bend where it goes into the hard pipe under the exhaust manifold is a sharp one for a non-molded hose, so I found a length of hose at NAPA that was just standard hose BUT at one end it had a 90 degree molded elbow, just what the doctor ordered.
All part numbers below are 36" on one leg and 4" on the other leg of the 90 degree bend:
1/2" (12.7mm) ID https://www.napaonline.com/en/p/NBG9806
5/8" (15.9mm) ID https://www.napaonline.com/en/p/NBG9812
3/4" (19.1mm) ID https://www.napaonline.com/en/p/NBG9820