87 Dash / Binnacle Modification

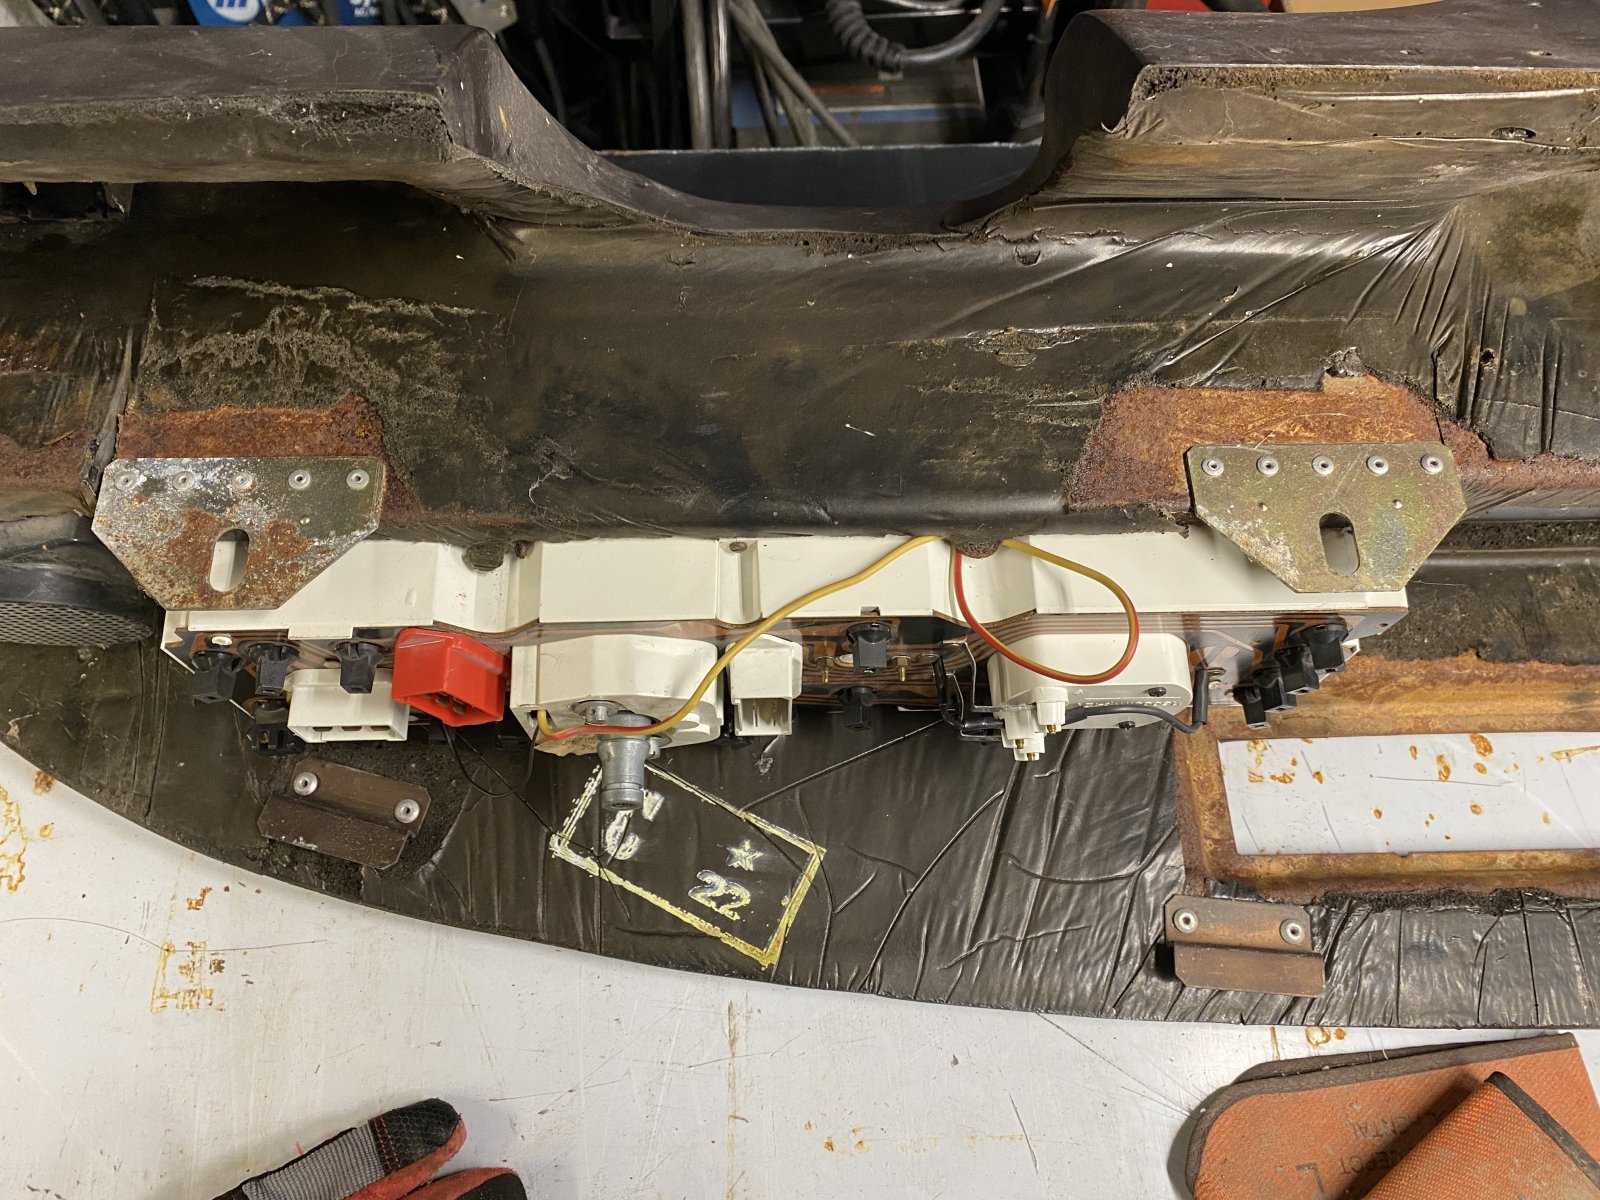
Comparing depth of cluster recess relative to forward mount points. Looking at the fixed angle brackets that locate in the bulkhead tangs - the earlier cluster is approx 2-2.5" further forward (away from the driver) - the vent hose is 2"(ID) .

I think I can gain about an 1" if I cut & angle the side vent tube and use a VW-style aluminum/carboard hose that can be squished into more of an oval cross-section. Heating the stock hose, it pretty much collapses when trying to manipulate the form.

I will have to make my own cluster support brackets & cut off the existing 5 mount points. Those will need to be bonded to the 'rubber' binnacle, hence the question regarding the composite.

I think I'm going to focus on getting the cluster as far forward as possible, then deal with the vent hose after..

index.php


Mine

IMG_20201218_145655.jpg
 
This subject is one I have been thinking about for a long time. I had meant to post earlier (I found a half completed post inline which happens to me a bunch) so my apologies for coming into this late.

The instrument panel and the adoption of the raised and pushed outward binnacle was to accommodate the left vent AC hose, as you well know.

To get back to the appropriate depth and height to gain back the sight line the original had, one needs to either omit the hose or reroute the hose downward then accross and then back up to the vent. Both of these are difficult, though omitting it would still allow you to get fresh air using the non AC duct which is blocked off.

The image below depicts mirroring the top surface of the glovebox top surface depth to the panel side and then finishing off the inset lower edge and the face which goes along the side of the left air vent. The AC controls would now be in a raised binnacle that separates the glove box volume and the instruments side.

An alternate would have the air controls move to the old position in the early interior and use the newer push push square buttons in two arrays down each side of the ac controls (this would change the air box control to only wires and need an “AC” button). This might allow a modern large screen entertainment system or a tablet with multiple gauges depicted using software to harvest data from the ECU of the Honda system. I will try to create a rough illustration of this concept later.

B307CCB7-EDD3-4E4B-B87E-3D9C7ABBF2F3.jpeg
 
I was thinking the same as Karl, perhaps the air vent hose (to the left outlet) can be repositioned under the dash rather than behind it. Maybe use a rectangle shaped tube across the lower portion of the dash so it sits flat against it, to avoid going too low into the passenger leg area. By dropping it down and around the benicle area you can place the benicle as far forward as the early dash is.

Also, looking at your pictures brought to mind another thought. Can the entire benicle "box" be lowered into the dash more? I don't mean just the gauge cluster, but the entire surround. I.e. dropping the "floor" under the rectangle benicle and move the benicle down accordingly. I guess this would be something like the image Karl just posted? (@kmead I like your ideas).
 
Here is a little illustration of what I'm referring to by dropping the benicle box down, by cutting a section out where the red lines are:
IMG_20201218_171453.jpg


Another possibility might be to "section" the benicle box now that you have lowered the gauge cluster (red arrows) further down into it. Effectively making the benicle box "shorter", cutting a slice out (red lines) and drop the top down (blue arrows):
IMG_20201219_180818.jpg


I know it is easy to say "why don't you just do....", but much harder to actually do it. I'm only making suggestions to stimulate ideas, which you always have plenty of already. ;)
 
Your question about the material the dash is made of is a good one. I've always wondered if there is any way to "test" a material to find out what it is. There are so many different "plastics" as you say, and their properties are vastly different.
 
This subject is one I have been thinking about for a long time. I had meant to post earlier (I found a half completed post inline which happens to me a bunch) so my apologies for coming into this late.

The instrument panel and the adoption of the raised and pushed outward binnacle was to accommodate the left vent AC hose, as you well know.

To get back to the appropriate depth and height to gain back the sight line the original had, one needs to either omit the hose or reroute the hose downward then accross and then back up to the vent. Both of these are difficult, though omitting it would still allow you to get fresh air using the non AC duct which is blocked off.

The image below depicts mirroring the top surface of the glovebox top surface depth to the panel side and then finishing off the inset lower edge and the face which goes along the side of the left air vent. The AC controls would now be in a raised binnacle that separates the glove box volume and the instruments side.

An alternate would have the air controls move to the old position in the early interior and use the newer push push square buttons in two arrays down each side of the ac controls (this would change the air box control to only wires and need an “AC” button). This might allow a modern large screen entertainment system or a tablet with multiple gauges depicted using software to harvest data from the ECU of the Honda system. I will try to create a rough illustration of this concept later.

Thanks for the input, Karl - however one of the things I absolutely hate about the dash is the AC pod 'overhang", so that has to go, no matter what :D

I could just eliminate the DS vent altogether, but I don't think I'll need to. I think with the work I did today, I have the gauges as far back as I can go & have the center gauges / AC control where they need to be

Moving the controls to the console doesn't make sense to me, as that would mean definitely having to take eyes off the road to change settings, never mind the rewire.
I am wondering whether I should get rid of the glovebox - I dislike that also 🤣
 
Here is a little illustration of what I'm referring to by dropping the benicle box down, by cutting a section out where the red lines are:
View attachment 40124

Another possibility might be to "section" the benicle box now that you have lowered the gauge cluster (red arrows) further down into it. Effectively making the benicle box "shorter", cutting a slice out (red lines) and drop the top down (blue arrows):
View attachment 40125

I know it is easy to say "why don't you just do....", but much harder to actually do it. I'm only making suggestions to stimulate ideas, which you always have plenty of already. ;)

I did consider chopping the binnacle down, but there is no way to fit the AC control/gauge stack if I do that. I've got the binnacle base down to 1/2" off the dash ledge, to go lower would require cutting the actual dash material down also, and then I would run into issues with all the wiring looms fitting behind & under the cluster/gauges..
 
I cut another chunk out of the binnacle depth today. Cut it so there is a slight curve on the left, to flow with the larger curve on the right. Also reduced the lower ledge thickness further. I'm wondering if it's solid rubber. It really cuts like it.

IMG_20201220_131200.jpg
IMG_20201220_133106.jpg


Then I cut the center housing in half and reassembled it in reverse - AC control on the bottom. Had to cut a fair bit off the back of the AC control, and some off the bottom to make it fit as designed- it has a locating peg on the left that fits into the housing, then the securing tab on the right. Plumber's ABS cement works for this type of plastic.

IMG_20201220_191122.jpg


IMG_20201220_191051.jpg


Still 2" deeper than the old style dash off the vent, but I think I'm reasonably happy with the look, overall

IMG_20201220_191201.jpg


Right side angles outward to allow the center gauges & AC control to angle toward the driver.

IMG_20201220_192851.jpg


I may bond the binnacle to the dash, and cover the two as one, eliminate the unnecessary divide - would be tricky at the ends though.
Also I had to cut off all the left side binnacle mounts, so I have to rework that aspect anyway, same with the cluster mount tabs.

IMG_20201220_192712.jpg


Now, a fresh issue here is that I now need to make a deeper cluster face - I have 3/4" extra space. I'm planning on setting the gauges at the height here - closer to the base - raising the side gauges would have them running into the upper dash frame. I'm going to cover the new cluster support in vinyl, so it will be all black

IMG_20201220_192659.jpg


The upper outer gauges will probably not align with the center gauge panel. I'll drop the speedo & Tach, so the four are not at the same height

I'll spend a little time adjusting the spacing & offset of the gauges

IMG_20201220_192729.jpg
 
Last edited:
Thanks for the input, Karl - however one of the things I absolutely hate about the dash is the AC pod 'overhang", so that has to go, no matter what :D

I could just eliminate the DS vent altogether, but I don't think I'll need to. I think with the work I did today, I have the gauges as far back as I can go & have the center gauges / AC control where they need to be

Moving the controls to the console doesn't make sense to me, as that would mean definitely having to take eyes off the road to change settings, never mind the rewire.
I am wondering whether I should get rid of the glovebox - I dislike that also 🤣

I don’t mind moving the HVAC controls down as I rarely manipulate them, I share your dislike of the mass high in the passenger compartment. I do like the base architecture and planar surface development of the later base of the IP it isn’t as fussy as the early panel with its shelf, I just hate the binnacle and the added height as well as how close it is to the driver which has spoiled the sightlines to the instruments, the whole point of an IP...

It is why I like the early lower console as it puts those things at hand, just off the shifter. The muscle memory of what to move and the references of the geography make it easy (for me) to manipulate them. I have a hankering to add a larger monitor type system ( https://www.crutchfield.com/p_500ILXW650/Alpine-iLX-W650.html ) which is shallow and gives me Carplay which I really enjoy having in a car. Yes I know this is anathema to many here :)

In any case, drive on. I always enjoy seeing where you go and how you intend to do it.
 
I'm enjoying your process Hussein, I also will have to redo my gauges and dash in the Scorpion. With respect to the ducting: instead of hose you can fabricate a positive form using some blue insulation foam that spans the space tight area and then coat it with fiberglass and epoxy resin. Then pour some acetone dissolving the blue foam leaving a rigid duct to connect your hvac. It could also be used to add back some lightweight structure to hold the pieces together...
 
I like your latest changes, the overall proportions for the benicle box are better. To some extent that's the general design in the pic I posted earlier (post #30), although it doesn't show well there (best appreciated when viewed from other angles).

After I posted the idea of sectioning the benicle box shorter I realized that would prevent the AC and other panel from fitting, so I agree with your comment on that.

I like the thought of molding the benicle into the rest of the dash, then covering it as one piece. However I think that will be difficult and risk turning out less than desired. I think it's a lot more work than it is worth.

Finding out the whole thing is a solid material helps explain its excessive weight. In addition to being overly heavy, it also seems like an expensive, inefficient approach to manufacturing a dash. And this might explain another thing that bothers me about these dashes; the way they sag and warp overall. All of mine droop across the top open areas, and it appears yours does also (see below). At first I thought in my case it might be due to the excessive heat here, but then I noticed it on many other dashes from other regions. Is that easy to resolve with all the changes you are making?

IMG_20201220_192729.jpg
 
I don’t mind moving the HVAC controls down as I rarely manipulate them, I share your dislike of the mass high in the passenger compartment. I do like the base architecture and planar surface development of the later base of the IP it isn’t as fussy as the early panel with its shelf, I just hate the binnacle and the added height as well as how close it is to the driver which has spoiled the sightlines to the instruments, the whole point of an IP...

It is why I like the early lower console as it puts those things at hand, just off the shifter. The muscle memory of what to move and the references of the geography make it easy (for me) to manipulate them. I have a hankering to add a larger monitor type system ( https://www.crutchfield.com/p_500ILXW650/Alpine-iLX-W650.html ) which is shallow and gives me Carplay which I really enjoy having in a car. Yes I know this is anathema to many here :)

In any case, drive on. I always enjoy seeing where you go and how you intend to do it.
I tend to agree with you Karl, for me it isn't an issue to locate some controls low down. Actually many of the more modern cars I've owned were arranged that way, with the HVAC controls lower on the center console. But it is a personal preference so I get why Huss wants it higher up.

Looking at your proposed design (copied below) I really don't mind the center pod being left after lowering the gauge pod area to match the other side....
9184CBA7A833 - Copy.jpg


I think it helps create a bit of dimension or shape that the early style dashes completely lack (the reason I don't care for them). You are the design expert, what are your thoughts here?

I'm even wondering if it might make for a opportunity to mold that center box into the console below (crude example)...
9184CBA7A833.jpg


Perhaps a bit like the example someone showed previously...
1971-lamborghini-miura-sv-4.jpg
 
I'm enjoying your process Hussein, I also will have to redo my gauges and dash in the Scorpion. With respect to the ducting: instead of hose you can fabricate a positive form using some blue insulation foam that spans the space tight area and then coat it with fiberglass and epoxy resin. Then pour some acetone dissolving the blue foam leaving a rigid duct to connect your hvac. It could also be used to add back some lightweight structure to hold the pieces together...

Thank you for the tips - What I have for the time being is the VW style hose - I have compressed it into an oval. I've cut back the DS neck & will bond a new section on the appropriate angle once all the gauges are sorted & I can test fit the dash in the car.

IMG_20201221_190927.jpg


I like your latest changes, the overall proportions for the benicle box are better. To some extent that's the general design in the pic I posted earlier (post #30), although it doesn't show well there (best appreciated when viewed from other angles).
After I posted the idea of sectioning the benicle box shorter I realized that would prevent the AC and other panel from fitting, so I agree with your comment on that.
I like the thought of molding the benicle into the rest of the dash, then covering it as one piece. However I think that will be difficult and risk turning out less than desired. I think it's a lot more work than it is worth.
Finding out the whole thing is a solid material helps explain its excessive weight. In addition to being overly heavy, it also seems like an expensive, inefficient approach to manufacturing a dash. And this might explain another thing that bothers me about these dashes; the way they sag and warp overall. All of mine droop across the top open areas, and it appears yours does also (see below). At first I thought in my case it might be due to the excessive heat here, but then I noticed it on many other dashes from other regions. Is that easy to resolve with all the changes you are making?

Yes, integrating the binnacle into the dash & removing the upper seam would be much work - I think I'll leave it be.

The dash actually isn't sagging in that pic, its the new curve creating the illusion. It shouldn't sag now- with all the depth I've removed. I'll weigh it compared to the stock binnacle, it's much lighter.

I may cut back the top even more - I recessed the cluster panel even further than before, so I could take off another 1/2", and accentuate the contour on the left some more.

IMG_20201221_185554.jpg


I cut out the gauge openings and drilled mount points that approximate the stock arrangement - 3 across the top, two on the bottom.

IMG_20201221_185649.jpg


What I did for mount tabs is use shelving tabs - with 4mm rivnuts added for the cluster screws. I drilled the rubber binnacle and countersunk the bracket flanges - practised on a scrap to make sure it would work as desired.
IMG_20201221_174328.jpg
IMG_20201221_174344.jpg


Got 3 of them done - have to do the two top outer tabs tomorrow.

IMG_20201221_175041.jpg
IMG_20201221_175046.jpg


I decided to set the main cluster back about 3/8"-1/2" relative to the center panels - looks better with a slight break I think

One thing that bugs the crap out of me is the AEM WBO2 gauge - even with the modded VDO bezel , it still sticks out too much for my liking. I'm probably going to move it to the main cluster

IMG_20201221_185941.jpg


Probably put the WBO2 over on the right with oil pressure, and have gas & coolant on the left. Move the clock to the center panel....

IMG_20201221_190758.jpg
 
The dash actually isn't sagging in that pic, its the new curve creating the illusion.
I see that now.

The spacing of the gauges in the new cluster panel looks better than the old one, less 'cramped' together. ;)

Are you bonding the "shelf tabs" onto the surround? If so, what sort of adhesive works on metal and the 'rubber' stuff?
Can you make the same mounting arrangement for the 3 gauge panel in the middle pod, so its mounting matches the main gauge cluster mounts?.....
IMG_20201221_185941.jpg
 
I decided to set the main cluster back about 3/8"-1/2" relative to the center panels - looks better with a slight break I think
Is the main cluster angled inwards a little bit? If not, have you thought about removing the AC front cover and having both clusters in one big single piece?
 
removing the AC front cover and having both clusters in one big single piece?
I like that idea. Maybe rather than remove the AC faceplate you could make the 3-gauge panel extend down and go over (on top of) the AC face, like a facade cover, so it is all one continuous panel?
 
Is the main cluster angled inwards a little bit? If not, have you thought about removing the AC front cover and having both clusters in one big single piece?
I like that idea. Maybe rather than remove the AC faceplate you could make the 3-gauge panel extend down and go over (on top of) the AC face, like a facade cover, so it is all one continuous panel?

You guys are funny. Making all kinds of work for me :D

The spacing of the gauges in the new cluster panel looks better than the old one, less 'cramped' together. ;)

Are you bonding the "shelf tabs" onto the surround? If so, what sort of adhesive works on metal and the 'rubber' stuff?
Can you make the same mounting arrangement for the 3 gauge panel in the middle pod, so its mounting matches the main gauge cluster mounts?.....

The cluster tabs are an interference fit in the rubber binnacle, they actual won't go anywhere as is. I did use a little epoxy to fill the gaps though.

The question of adhesives is a good one. I have quite a range now :). In addition to the below, I have two liquid variants for ABS, stryene & such, those are for more precision fabrication. Also 3M 90 spray adhesive for the vinyl covering. I had to think about the binnacle, since it is either all rubber or a composite. The only thing I have found that will bond it to itself, is cyanoacrylate (super glue). I just bought the DAP variety shown as it has a 30sec setup time, and I need to glue the 'trim' ring / facia back to the binnacle. The Liquid Nails Fuze-It also claims to bond rubbers, so I'll try that on some scraps.

IMG_20201222_165643.jpg
IMG_20201222_165648.jpg
 
Worked some more on various aspects.

The center housing is a patchwork that I piece together as I go - I figured out three mount points I could use to secure it to the dash

I cut up the original, then use pieces to bond & reinforce the structure as I go

IMG_20201222_180316.jpg
IMG_20201222_180321.jpg
IMG_20201222_180327.jpg
IMG_20201222_180329.jpg
IMG_20201222_180340.jpg
IMG_20201222_183836.jpg
IMG_20201222_183850.jpg


M4 Rivnuts in place for the machine screws that retain the gauge panel

IMG_20201222_185818.jpg


M4 cap screws in place

IMG_20201222_190002.jpg


Ambient temp gauge set in original digital clock housing will go back after I chop up the housing some. Veglia clock will go in the middle

IMG_20201222_190422.jpg


Figured out where to cut the (Volvo) tweeter holes. I have generic 1.5" black tweeter covers coming (at some point)

IMG_20201222_191735.jpg
 
Last edited:
Cluster work

5 angle brackets installed & bonded. A fair bit of back & forth trimming the cluster panel to fit & allow space for the vinyl cover

IMG_20201222_170503.jpg


2 brackets riveted to the dash that hold the binnacle on the center/left

IMG_20201222_175844.jpg


bracket bonded to the dash, then screwed to the binnacle - on the left vertical. The right side of the binnacle is secured by the two original mount tabs

IMG_20201222_175854.jpg


Covered the panel with vinyl, cut holes for the gauges

IMG_20201222_173459.jpg


Have to drill & mount all the idiot lights and voltmeter

IMG_20201222_180236.jpg
 
Last edited:
Back
Top