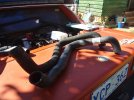
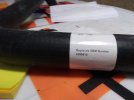
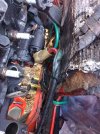
Its not cool to have coolant pipe leaks!

I think the hardest part if removing the whole box is drilling out all the spot welds where the side walls are welded to the floor. An easier solution would be to remove just the bottom of the box and attach a new piece when done. In fact if you cut the bottom off about an inch or so in from the joint to the side walls you could reattach the bottom by adding new attachment strips to the edges and weld/rivet/screw/glue gun the bottom back on.
 
They would need to be CherryMax structural rivets, universal head, 5/32 diameter.
They are available from aircraft suppliers like Aircraft Spruce and others. eBay is also possible.
https://www.aircraftspruce.com/catalog/hapages/cherrymax2.php

No small effort to do this. The cover will need to be fab-made, then put in place, holes drilled ( holes should be spaced about 4 to 10 rivet diameters apart, typically 6 rivet diameters apart). Once the first few holes are drilled in place, use a bucket of Clecos to keep the cover on while maintaining alignment of the two parts. After ALL the holes are drilled, the drilled holes will need to be deburred. Once all the deburr has been done, Cleco the cover back on, start riveting the cover in place with a GOOD rivet puller. Do not allow a gap between the two sheets of metal as the rivet is applied-installed.

Do not use hardware store pop rivets, these will fail as they do not have the shear strength required. Notable, this cover will be mostly shear loaded at the rivets due to the bending of the chassis front to back. There should not be much tension loading due to the structure and load direction.


Bernice

What rivet type would be suitable to close up the box?
 
This is probably why lazy people like me just gave up and don't run any cover. I did weld up the cracks in the tunnel next to the shifter but these were there when I bought the car and apparently not that unusual.
 
It is so much easier to leave the tunnel intact, just cut the rear S bends of the pipes off at the rear, 50mm past the tunnel, and wriggle and pull the pipes out the front. I am getting new 35mm mild steel pipes bent up at the moment. The only tricky part is once the new pipes are slid into the tunnel I will have to put a bead on the end of the straight section using a crimping tool to stop the hose joints to the rear S bends popping off. I intend painting the outside of the pipes before installing, and will have to reweld the 2 front support brackets. I have already done this once before on my track car using aluminium pipes, but steel is much easier for an exhaust shop to work with.
 
I know this method (cutting off the end and yanking them out) has been discussed previously. But I don't recall. How do you re-secure the new pipes inside the tunnel without access to the clamps?
 
They aren't actually clamps, otherwise you couldn't pull them out, just saddles top and bottom that are a close fit. There is some evidence of some kind of sealant at the saddles, but after 30 or 40 years it doesn't hold much anymore. The first time I did put some smears of silcone on in the appropriate spots, but I don't think I will bother this time.
 
The problem is that if the main pipes are rusted then odds are the heater pipe is rusted too. Cutting off the bottom of the box gives you access to everything. Also I was lucky enough to get complete SS pipes so the box had to be cut anyway. Yes the pipes just sit in saddles and I agree there is some type of insulation goop at one time but turns to a hard plastic over all these years. Hey, if you could buy radiator hose in bulk length like you can heater hose you could just run long lengths of the stuff from the motor to the radiator.
 
They aren't actually clamps, otherwise you couldn't pull them out, just saddles top and bottom that are a close fit.
That's what I was referring to, the "saddles"...I guess 'clamps' was not the right word. Did the new pipes slide into them fairly easily? Did you use the same OD pipe size as stock?
Thanks
 
Thanks Ulix, that link is one of the threads I was thinking of.
Your new pipes have about the same outside diameter as the stock pipes. I asked because the thought occurred if you had used smaller diameter pipes (as others have done) then it would make sense getting them back into the tunnel/brackets would be easier. But you did it with stock(ish) size pipes. Good to know.

The smaller heater tube on mine is also rusted out as Carl noted. But I won't be replacing it (have a completely different plan for that). However I would like to remove the old pipe just to get rid of it. I seem to recall someone managed to pull it out the end in the same method as you did for the larger pipes. So I think I will try this method for all three pipes, and only put the two larger ones back in. I'm using copper pipes so I can 'sweat' the end section on after the main portion is put through the tunnel.
 
When I replaced the upper heater pipe on my car a few weeks ago, I was able to get it out through the handbrake opening pretty easy by bending it. I was anticipating the need to replace the lower pipe if there was a problem and considered the possibility of pulling it up under the dashboard since it slid real easily fore and aft through the tunnel brackets that were holding it. The upper pipe was not all that hard to bend and the lower one looks like the same stuff. I should note that my upper pipe was in pretty good shape (except for the leak where a bad weld attached a bracket) so a rusty one might be even easier (or break off in the process). I replaced the upper pipe along with all the hoses with one 10 foot piece of 5/8" heater hose. My plan for the lower would have been to route another 10 foot hose down the driver side of the upper tunnel and follow the same path as the other hose.
 
Can I ask why everyone wants to replace their pipes with SS pipes? Do you honestly plan to keep your X for the next forty or so years?
So that they may never rust and leak again when my grandkids take X for a fun, spin in a vintage Italian sports car..... Like my uncle did in teaching me to drive the Stelvio in a 1958 Giulietta Spider
 
I think the hardest part if removing the whole box is drilling out all the spot welds where the side walls are welded to the floor. An easier solution would be to remove just the bottom of the box and attach a new piece when done. In fact if you cut the bottom off about an inch or so in from the joint to the side walls you could reattach the bottom by adding new attachment strips to the edges and weld/rivet/screw/glue gun the bottom back on.
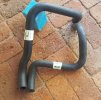
Angle grinder, goggles and gloves. To remove the bottom of the box and rusted steel pipes. Spot weld, rivets and body Schutz to hide imperfections. All on a borrowed garage hoist on a week-end in 1987. Have never had coolant problems since. Now looking to replace my old (soft) hoses with some new ones from Gates and smooth stainless steel clips.
 
Did not know how hard it would be to connect 'new' coolant hoses between thermostat housing and coolant pipes under the starter motor. The old and soft hoses came out easily enough. In feeding new hoses down I forgot where the 'gap' between fire-wall and starter/engine was for feeding them down. Anyone have any pics of where the hoses live in that narrow space. Despite comparing new hoses to the old and matching, finding it hard to find the wriggle room.
 
5 speed hoses form a "square" around the srarter motor and don't actually lay over the top of it ...

I just happen to have a pair I'm about to pack and ship....

20210418_073525.jpg

SteveC
 
Last edited:
New hoses check with above part numbers. old:new top hose 82 X1:9.jpg82 X 1:9. OEM No-top hosejpg.jpg82 X 1:9 space to   s:s  coolant pipes.jpg small space to feed hoses past starter motor. With oil filter and fuel pump off. 1982 Australian right hand drive X 1/9 with carburettor.
 
New hoses check with above part numbers. View attachment 46234View attachment 46235View attachment 46236 small space to feed hoses past starter motor. With oil filter and fuel pump off. 1982 Australian right hand drive X 1/9 with carburettor.
that's the correct "top" hose for a five speed...

what's the part number on the bottom hose? this seems to be the one VAS supplies incorrectly according to previous posts...

edit: you're third picture gives a clue to what's going on.... your steel pipes have been replaced and are too long, normally you cant see the pipes from the engine bay, they are further in than that, so that will probably make the rubber hoses seem too long

SteveC
 
Last edited:
Steve its CH 2325. Probably correct. Its going on but with little clearance to starter motor and other bits. That area of firewall seems like a 'dogs breakfast' for hoses and wires.
 
20210418_124933.jpg

this is a 1978, but pipes are the same all model years, so your's are definitely too long. you cant even see them if I took a picture from the same angle as yours.

SteveC
 
Back
Top