
You are using an out of date browser. It may not display this or other websites correctly.
You should upgrade or use an alternative browser.
You should upgrade or use an alternative browser.
What did you do to your X1/9 today ?
- Thread starter Eastep
- Start date
Dr.Jeff
True Classic
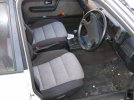
Thanks. I love it. Also looks like vinyl on the backs of the seats, which is how it was usually done back in the day.HI here is a close up of seat material, they were done at a local upholstery shop . On the switch everything seems to work , will have to check we’re wires are going ,
")
Older VWs also had a similar tweed cloth. And it can be a bit scratchy, but I love it as period correct 70's nostalgic upholstery.I also like them.
Reminds me of some very aesthetic Audi 90 b2 interior. Only in Audi that fabric was very specific for touch, not comfortable in shorts or in T shirt
Here is another common pattern:The "feel" has never bothered me before, but now that I'm living in a hotter climate I might be driving more with shorts on. Also due to the strong sun I will use lighter colors; like grey instead of black. It will attract less heat. Maybe colors more like these examples:
Someone on Xweb (sorry I forgot who you were) posted these seats in his X, which I also like:
KBabcock
True Classic
Really nicely done, I like fabric over leather anyday. Wares better and you do not stick to the seat in warm weather.HI here is a close up of seat material, they were done at a local upholstery shop . On the switch everything seems to work , will have to check we’re wires are going ,
Michael Oxman
The Journey Begins!
My mystery steering column switch was part of an alarm system put in by the PO.HI a did some more work on inside , carpet , seat belts ,seats , speaker grills , just have steering wheel to clean up and paint , sun visors and roof latches , question there is a red switch on steering column does anyone know what this is for or could be from po.
kmead
Old enough to know better
Likely the horn.HI a did some more work on inside , carpet , seat belts ,seats , speaker grills , just have steering wheel to clean up and paint , sun visors and roof latches , question there is a red switch on steering column does anyone know what this is for or could be from po.
Looking very nice.
The chrome window winder doesn’t match the theme. The originals were a black plastic (for black interior cars).
Janis
True Classic
try leather seats with leather jacketReally nicely done, I like fabric over leather anyday. Wares better and you do not stick to the seat in warm weather.
 that grip is excellent, no need for bucket seats
Followed the wires today they go and come from gauge cluster , still not sure why , going to connect and see what it does , there is also a little resister in the line ,Likely the horn.
Looking very nice.
The chrome window winder doesn’t match the theme. The originals were a black plastic (for black interior cars).
kmead
Old enough to know better
Odd.Followed the wires today they go and come from gauge cluster , still not sure why , going to connect and see what it does , there is also a little resister in the line ,
KBabcock
True Classic
Well, I finally got around to the maintenance on my 3D printer this weekend then printed up these puppies. This was a test batch created with PLA plastic, it was a few years old so when I do the installation pieces I will most likely move to PLA+ which has a little higher melting point and other benefits. Next steps are removal of the old needles and want to compare weights, if these are significantly heavier I will deal with that. After the initial run there was very little post printing clean up to do, The sides are very smooth and look great the beveled tip needs some light sanding due to supports that were printed with it. These pictures are pre clean up. I'll document the whole project in detail.


Dr.Jeff
True Classic
While in theory the weight could have a miniscule effect on its motion, and therefore the accuracy of the gauge, in reality I do not believe it will be anything significant. Especially considering these gauges are not very accurate to begin with. But even if they were I doubt such a small delta in mass would actually affect the movement; gauges are actually pretty robust units.Well, I finally got around to the maintenance on my 3D printer this weekend then printed up these puppies. This was a test batch created with PLA plastic, it was a few years old so when I do the installation pieces I will most likely move to PLA+ which has a little higher melting point and other benefits. Next steps are removal of the old needles and want to compare weights, if these are significantly heavier I will deal with that. After the initial run there was very little post printing clean up to do, The sides are very smooth and look great the beveled tip needs some light sanding due to supports that were printed with it. These pictures are pre clean up. I'll document the whole project in detail.
View attachment 55687View attachment 55688
KBabcock
True Classic
I was wondering this but was unsure how the actual gauge mechanics work so when in doubt try to replicate the original best I can.While in theory the weight could have a miniscule effect on its motion, and therefore the accuracy of the gauge, in reality I do not believe it will be anything significant. Especially considering these gauges are not very accurate to begin with. But even if they were I doubt such a small delta in mass would actually affect the movement; gauges are actually pretty robust units.
Today got the trunk on , finished cleaning and painting underneath, getting there !
Attachments
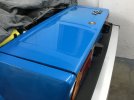
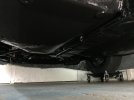
All these updates would have made a great build thread.Today got the trunk on , finished cleaning and painting underneath, getting there !
I,am not to good with this computer stuff ,All these updates would have made a great build thread.
Schmenge
Canada West Coast
I put the beast to bed for the winter, could possibly drive it if we get some sunny days but I hate to take it out if it's wet and so far it's been one he** of a wet fall here. Spring will come soon !That's quite the ordeal. But absolutely necessary given your location. So grateful for my friend's garage. It's a real blessing.
Jonohhh
True Classic
Just discovered (working on the car at the moment) that at some point in the cars lifetime, around 2003, the tank to pump fuel line was replaced with a section of one from a 1990s VW Fox.
Interesting.
Does anyone have a picture of how the fuel hoses are supposed to be routed between the tank, the mounting of the fuel pump, and the line routing to the hardline up near the air cleaner? I mine is ALL messed up. The previous owner had the fuel pump hanging by the outlet hose.
Interesting.
Does anyone have a picture of how the fuel hoses are supposed to be routed between the tank, the mounting of the fuel pump, and the line routing to the hardline up near the air cleaner? I mine is ALL messed up. The previous owner had the fuel pump hanging by the outlet hose.
Jonohhh
True Classic
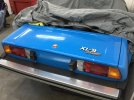
Today I installed LED bulbs into the taillights, and I'm absolutely pleased at the results.
I wanted to change them for two reasons:
* While the brake lights are of acceptable brightness, the OEM taillight solution is just too dim when the brake is not depressed. I'm sure that in the 80's when all car taillights were this way, it was acceptable, but nowadays with car taillights being so large and bright, it's easy for an inattentive driver to not notice our measly 5w taillights.
* POWER DRAW. Okay. Admittedly my electrical system is not in top condition- I have done the BBrown Wire mod, and upgraded the battery ground strap, but there is still excessive resistance in the ignition switch circuit that I need to rectify.
However, when driving at night with the headlights, cooling fans, and heater on (especially during turn signal use), pressing the brake causes the voltage gauge to dip into the red. I believe this gauge is being skewed by something else, but that's out of the context of this I guess. On a few occasions, the car has even stalled at stoplights due to the low voltage.
So. LED bulbs fix both of these problems.
1. The 5w running light has been replaced by a 21w equivalent red LED bulb (7506R). This provides MUCH more light output, however, I do not believe it looks like the brake is on at all times because it's about average compared to modern cars, and only the top half of the taillight is illuminated when the brake is not depressed.
The 7506R I selected is the two diode style, like this

Which works perfectly in the reflector design used in our taillights. Due to the bi directional output, light only shines left and right in line with the reflectors. This creates defined "lighting zones" between the running and brake lights. Perfect.
2. The actual brake light has been replaced with another 7506R (red) led. I was originally worried that having the two be the same wattage would make the brake light engagement too subtle, but this turned out to not be a concern due to the reflector effectiveness mentioned above.
I am very happy and wouldn't change anything about it. The red leds have a great, deep red. None of that pink-hue that the factory lenses do a little bit, and that white LEDs do badly. Another advantage is the instantaneous on and off of LEDs- great for getting drivers attention when you brake.
Overall, power draw has been reduced from 10/42w (running lights/brake light) to 3/6w. The voltage gauge, heater, and dash lights no longer dip whenever the brake light is engaged.
Up next is going to be an electronic flasher, LED turn signals (7506A for the rear), and LED headlights of some type. Either GE, Hella, or potentially a new OEM option that uses 7in LED headlights (or even HIDs for that matter), like JL Jeeps (still need to do research on that).
Here's a photo of just the running light on, with the car off. Obviously a photo with no comparison is useless, but you can see what I'm saying about the distinct lighting zones now visible in the taillight. Of course, the brake light just looks the same but with the bottom illuminated to, and a LOT of light output.

I'll be sure to make an "LED conversion diagram" for which bulbs go where, and drop it in the wiki.
I wanted to change them for two reasons:
* While the brake lights are of acceptable brightness, the OEM taillight solution is just too dim when the brake is not depressed. I'm sure that in the 80's when all car taillights were this way, it was acceptable, but nowadays with car taillights being so large and bright, it's easy for an inattentive driver to not notice our measly 5w taillights.
* POWER DRAW. Okay. Admittedly my electrical system is not in top condition- I have done the BBrown Wire mod, and upgraded the battery ground strap, but there is still excessive resistance in the ignition switch circuit that I need to rectify.
However, when driving at night with the headlights, cooling fans, and heater on (especially during turn signal use), pressing the brake causes the voltage gauge to dip into the red. I believe this gauge is being skewed by something else, but that's out of the context of this I guess. On a few occasions, the car has even stalled at stoplights due to the low voltage.
So. LED bulbs fix both of these problems.
1. The 5w running light has been replaced by a 21w equivalent red LED bulb (7506R). This provides MUCH more light output, however, I do not believe it looks like the brake is on at all times because it's about average compared to modern cars, and only the top half of the taillight is illuminated when the brake is not depressed.
The 7506R I selected is the two diode style, like this
Which works perfectly in the reflector design used in our taillights. Due to the bi directional output, light only shines left and right in line with the reflectors. This creates defined "lighting zones" between the running and brake lights. Perfect.
2. The actual brake light has been replaced with another 7506R (red) led. I was originally worried that having the two be the same wattage would make the brake light engagement too subtle, but this turned out to not be a concern due to the reflector effectiveness mentioned above.
I am very happy and wouldn't change anything about it. The red leds have a great, deep red. None of that pink-hue that the factory lenses do a little bit, and that white LEDs do badly. Another advantage is the instantaneous on and off of LEDs- great for getting drivers attention when you brake.
Overall, power draw has been reduced from 10/42w (running lights/brake light) to 3/6w. The voltage gauge, heater, and dash lights no longer dip whenever the brake light is engaged.
Up next is going to be an electronic flasher, LED turn signals (7506A for the rear), and LED headlights of some type. Either GE, Hella, or potentially a new OEM option that uses 7in LED headlights (or even HIDs for that matter), like JL Jeeps (still need to do research on that).
Here's a photo of just the running light on, with the car off. Obviously a photo with no comparison is useless, but you can see what I'm saying about the distinct lighting zones now visible in the taillight. Of course, the brake light just looks the same but with the bottom illuminated to, and a LOT of light output.
I'll be sure to make an "LED conversion diagram" for which bulbs go where, and drop it in the wiki.
Last edited:
kmead
Old enough to know better
FYI the gauge has a peculiarity to it. It doesn’t really tell you what is happening in the system of the battery and the alternator accurately. What it shows is the relative voltage from the ignition switch and its loads which are as you state rather variable. Being a rather sensitive device and certain nearby loads being notable it tends to overstate the overall reality of certain loads.Today I installed LED bulbs into the taillights, and I'm absolutely pleased at the results.
I wanted to change them for two reasons:
* While the brake lights are of acceptable brightness, the OEM taillight solution is just too dim when the brake is not depressed. I'm sure that in the 80's when all car taillights were this way, it was acceptable, but nowadays with car taillights being so large and bright, it's easy for an inattentive driver to not notice our measly 5w taillights.
* POWER DRAW. Okay. Admittedly my electrical system is not in top condition- I have done the BBrown Wire mod, and upgraded the battery ground strap, but there is still excessive resistance in the ignition switch circuit that I need to rectify.
However, when driving at night with the headlights, cooling fans, and heater on (especially during turn signal use), pressing the brake causes the voltage gauge to dip into the red. I believe this gauge is being skewed by something else, but that's out of the context of this I guess. On a few occasions, the car has even stalled at stoplights due to the low voltage.
So. LED bulbs fix both of these problems.
1. The 5w running light has been replaced by a 21w equivalent red LED bulb (7506R). This provides MUCH more light output, however, I do not believe it looks like the brake is on at all times because it's about average compared to modern cars, and only the top half of the taillight is illuminated when the brake is not depressed.
The 7506R I selected is the two diode style, like this
View attachment 55820
Which works perfectly in the reflector design used in our taillights. Due to the bi directional output, light only shines left and right in line with the reflectors. This creates defined "lighting zones" been the running and brake lights. Perfect.
2. The actual brake light has been replaced with another 7506R (red) led. I was originally worried that having the two be the same wattage would make the brake light engagement too subtle, but this turned out to not be a concern due to the reflector effectiveness mentioned above.
I am very happy and wouldn't change anything about it. The red leds have a great, deep red. None of that pink-hue that the factory lenses do a little bit, and that white LEDs do badly. Another advantage is the instantaneous on and off of LEDs- great for getting drivers attention when you brake.
Overall, power output has been reduced from 10/42w (running lights/brake light) to 3/6w. The voltage gauge, heater, and dash lights no longer dip whenever the brake light is engaged.
Up next is going to be an electronic flasher, LED turn signals (7506A for the rear), and LED headlights of some type. Either GE, Hella, or potentially a new OEM option that uses 7in LED headlights (or even HIDs for that matter), like JL Jeeps (still need to do research on that).
Here's a photo of just the running light on, with the car off. Obviously a photo with no comparison is useless, but you can see what I'm saying about the distinct lighting zones now visible in the taillight. Of course, the brake light just looks the same but with the bottom illuminated to, and a LOT of light output.
View attachment 55821
I'll be sure to make an "LED conversion diagram" for which bulbs go where, and drop it in the wiki.
This is where reducing the reliance on the now quite old and likely high resistance contacts in the ignition switch is worthwhile. Moving to three relays, two for the primary switched circuits used in the ‘run’ position and one for the start position with a larger supply wire to two of them makes a lot of sense, the third will also gain a significant supply increase due to being fed from the starter main feed. I presume this is what you were referring to in your “power draw” comment above.
I like the LEDs you found for the running and brake light, its light dispersion is somewhat unique and as you noted works well with the lensing. Where did you pick up the 7506R bulbs?
Thanks!
kmead
Old enough to know better
Some of the pics in this thread should help:Just discovered (working on the car at the moment) that at some point in the cars lifetime, around 2003, the tank to pump fuel line was replaced with a section of one from a 1990s VW Fox.
Interesting.
Does anyone have a picture of how the fuel hoses are supposed to be routed between the tank, the mounting of the fuel pump, and the line routing to the hardline up near the air cleaner? I mine is ALL messed up. The previous owner had the fuel pump hanging by the outlet hose.
Fuel Injected Fuel Line and Fuel Filter Replacement
A few years ago I had one of my OE cloth covered fuel lines from the pump to the filter burst, no surprise as it was well past its use by date. I had bought some 7.5mm fuel hose prior to this as it was my intent to replace them anyway so I was prepared for this eventuality. Happily this is a...
xwebforums.com
This is one of the many threads in the Best of Xweb. Alternatively one can use the Advanced search system to search on Tags. The BOX threads are categorized using Tags which can be easier to find things (assuming folks add appropriate tags).
Hope that helps.