
You are using an out of date browser. It may not display this or other websites correctly.
You should upgrade or use an alternative browser.
You should upgrade or use an alternative browser.
What did you do to your X1/9 today ?
- Thread starter Eastep
- Start date
Dr.Jeff
True Classic
Sound like a fun meet.I went to SpaItalia yesterday with Kermit. It was the first big trip I did with him.
More than 700 km (434 Miles) over the weekend without a single problem.
There were hundreds of his friends present, but only 3 other siblings. I catched them all in a single picture.
View attachment 62696
Did they allow you to drive the track?
")
tvmaster
True Classic
What a fine collection of feisty FIATS. SuperbI went to SpaItalia yesterday with Kermit. It was the first big trip I did with him.
More than 700 km (434 Miles) over the weekend without a single problem.
There were hundreds of his friends present, but only 3 other siblings. I catched them all in a single picture.
View attachment 62696
Kermit
Low Mileage
There were 4 options,Sound like a fun meet.
Did they allow you to drive the track?
- park your car outside the circuit
- park your car in ‘the paddock‘ (where Kermit was)
- go on the circuit in the parade (slow drive, passengers allowed)
- race session on the circuit (helmet obligatory, no passengers allowed)
Jonohhh
True Classic
Tonight (er, this morning),
I pulled the alternator out for what feels like the 7000th time. Thankfully the new one is far more willing to thread in than the old one, which makes it much easier.
I think I have determined that it's going to be possible to delete the water pump pulley entirely- eliminating an extra belt, and preventing future headaches with the water pump bearing and shaft seal.
It seems that I'll be able to drive the alternator off of the AC compressor belt. While this is more load than the V belt takes in factory form, this should still be well within acceptable amounts of load for a configuration like this.
edit: what an incredible design this water pump, water pump housing, AC compressor bracket, and pulley is
Last edited:
tvmaster
True Classic
Looks better than the Red Blacks did Friday night…Took part in the Italian Car Parade along Preston Street, Little Italy, Ottawa. Mine was the only X, but it had good company on a side street before the parade.
View attachment 62849
View attachment 62850
Roy
Dr.Jeff
True Classic
There were a few different belt arrangements from the factory; not only with and without AC but also different AC layouts, and with or without additional smog equipment. And there are different pulley offsets to go with those configurations. You can mix and match those pulley profiles to achieve any layout you wish. There were also different pulley diameters so you can alter the drive ratios as well.Tonight (er, this morning),
I pulled the alternator out for what feels like the 7000th time. Thankfully the new one is far more willing to thread in than the old one, which makes it much easier.
I think I have determined that it's going to be possible to delete the water pump pulley entirely- eliminating an extra belt, and preventing future headaches with the water pump bearing and shaft seal.
It seems that I'll be able to drive the alternator off of the AC compressor belt. While this is more load than the V belt takes in factory form, this should still be well within acceptable amounts of load for a configuration like this.
edit: what an incredible design this water pump, water pump housing, AC compressor bracket, and pulley is
RoyS
True Classic
Yea, they still suck. Just not as bad.Looks better than the Red Blacks did Friday night…
I did make it onto the local paper's online photo gallery...
They posted 3 of the 12 photos of that beautiful Guilia Sprint GT. I think that is the only reason I'm in the shot!
Roy
Jonohhh
True Classic
Awesome, thanks for the tip! It appears* that the alternator pulley and AC compressor double pulley line up, with the one that drives the AC compressor from the crank, meaning I should be able to get rid of the split pulley on the crank, and have two points of belt tension adjustment. The alternator adjustments path of travel isn't necessarily ideal, but it shouldn't matter as the AC compressor will still be very effective as a means of adjusting belt tension.There were a few different belt arrangements from the factory; not only with and without AC but also different AC layouts, and with or without additional smog equipment. And there are different pulley offsets to go with those configurations. You can mix and match those pulley profiles to achieve any layout you wish. There were also different pulley diameters so you can alter the drive ratios as well.
Looking forward to getting this car running again! Removing the WP has made it much less cluttered down there. I figure I should tackle the snail mount while it's all apart too.\
Dr.Jeff
True Classic
Just as a side, some of the belt arrangements (depending on AC and extra smog equipment) are extremely difficult to work with. There isn't enough movement on either the alt nor the compressor to even get the belts on and off without having to stretch or force them. Another issue I've encountered is finding the best fit of belt size. None of the recommended sizes (of which I found several) were correct. In the end I purchased one of every size within the range and did a trial fit of each, then returned the unneeded ones.Awesome, thanks for the tip! It appears* that the alternator pulley and AC compressor double pulley line up, with the one that drives the AC compressor from the crank, meaning I should be able to get rid of the split pulley on the crank, and have two points of belt tension adjustment. The alternator adjustments path of travel isn't necessarily ideal, but it shouldn't matter as the AC compressor will still be very effective as a means of adjusting belt tension.
Looking forward to getting this car running again! Removing the WP has made it much less cluttered down there. I figure I should tackle the snail mount while it's all apart too.\
Jonohhh
True Classic
I may have gotten very lucky in that case- I absolutely could not even get the alternator out without cutting the belt, until I replaced the belts with the full set for my car (85, AC, no smog) from MWB. It seems the MWB belts were sized just right to allow tensioning and "ease" (it's relative lmao) of removal.Just as a side, some of the belt arrangements (depending on AC and extra smog equipment) are extremely difficult to work with. There isn't enough movement on either the alt nor the compressor to even get the belts on and off without having to stretch or force them. Another issue I've encountered is finding the best fit of belt size. None of the recommended sizes (of which I found several) were correct. In the end I purchased one of every size within the range and did a trial fit of each, then returned the unneeded ones.
At the very least, without the convoluted split pulley setup, and without having to get a belt installed across a double pully mounted in the worst to service position possible (WP), it should be miles easier. Admittedly, the belt drive system and the setup of the accessories is part of the reason I want to get rid of the WP there and never look at it again.
Something I didn't realize until struggling for an hour is that its near impossible to remove the WP pulley bolts with a sagging snail mount. I ended up jacking the car up a little bit by the engine (yikes, I know), eliminating the sag and making the removal pretty "straightforward" (again, relative).
Jonohhh
True Classic
Today I started working on sorting the spare tire well, and cleaning up all of the mess in there. The factory insulation is beginning to come apart, leaving a nasty residue on anything it touched. I really want to pull it all out but I already bit off more than I can chew with projects and classes this summer.  I was hoping to get the car painted as well but that's a bit ambitious.

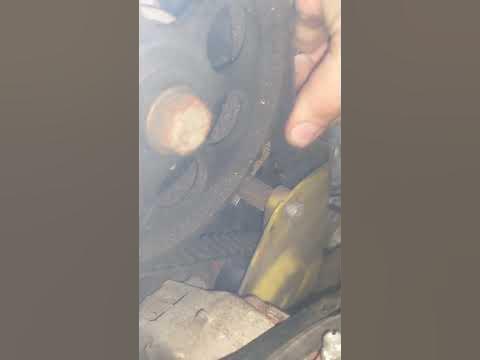
Beyond that, I removed the upper timing cover in preparation for replacing the snail mount bushing, and found a quite floppy timing belt. I believe it has been replaced at some point, and surprisingly the belt actually looks better than my Abarths did at 5yrs old and 60,000mi (interval is 150k for those cars).
How does the tension look? It sure seems too loose to me. It seems I'll need to dig through the service manual to figure out how to re tension it (unless the spring is not doing its job?).
 youtube.com
I was hoping to get the car painted as well but that's a bit ambitious.Beyond that, I removed the upper timing cover in preparation for replacing the snail mount bushing, and found a quite floppy timing belt. I believe it has been replaced at some point, and surprisingly the belt actually looks better than my Abarths did at 5yrs old and 60,000mi (interval is 150k for those cars).
How does the tension look? It sure seems too loose to me. It seems I'll need to dig through the service manual to figure out how to re tension it (unless the spring is not doing its job?).
X1/9 Timing Belt Tension
youtube.com
kmead
Old enough to know better
Some of the variations. The ones you don’t have.I may have gotten very lucky in that case- I absolutely could not even get the alternator out without cutting the belt, until I replaced the belts with the full set for my car (85, AC, no smog) from MWB. It seems the MWB belts were sized just right to allow tensioning and "ease" (it's relative lmao) of removal.
At the very least, without the convoluted split pulley setup, and without having to get a belt installed across a double pully mounted in the worst to service position possible (WP), it should be miles easier. Admittedly, the belt drive system and the setup of the accessories is part of the reason I want to get rid of the WP there and never look at it again.
Something I didn't realize until struggling for an hour is that its near impossible to remove the WP pulley bolts with a sagging snail mount. I ended up jacking the car up a little bit by the engine (yikes, I know), eliminating the sag and making the removal pretty "straightforward" (again, relative).


This is what you likely have. Yes the main pulley, the AC compressor and the alternator should align. The biggest issue you will likely have is not enough belt wrap around the two driven elements, particularly the compressor.
You might consider adding an idler between the two to increase the wrap of the belt onto each pulley.
The other issue you may have is getting a neck onto the face of the water pump housing if you going in that direction rather than the cross tube. If you are just making a cap then likely not an issue.
Last edited:
Jonohhh
True Classic
Hey! Thanks for the info!Some of the variations. The ones you don’t have.
View attachment 62961View attachment 62962
This is what you likely have. Yes the main pulley, the AC compressor and the alternator should align. The biggest issue you will likely have is not enough belt wrap around the two driven elements, particularly the compressor.
You might consider adding an idler between the two to increase the wrap of the belt onto each pulley.
View attachment 62963
The other issue you may have is getting a neck onto the face of the water pump housing if you going in that direction rather than the cross tube. If you are just making a cap then likely not an issue.
View attachment 62964
There is indeed not a lot of wrap, definitely not as much as factory form, but my hope is that it's still sufficient. Many Chevy small blocks have configurations such as this:
Where the WP pulley also drives a huge mechanical fan without too much fuss.
If needed, I would be willing to run extra tension and replace the belt at shorter intervals.
Thankfully though, this won't become too much of an issue for quite a while as the AC currently does not work, and probably won't for a while, so that gives me some time.
The image you edited is indeed exactly what I plan to do- also, I may be able to get a couple more degrees of wrap around the AC pulley by adjusting the alternator all the way forward. Every bit counts
And yes- I am retaining the factory feed pipe setup, I'm going to get a simple flat plate waterjetted to serve as the water pump delete plate. The pump housing does not seem like it'll be all too restrictive, and while I don't particularly like the coolant inlet pipe being underneath and in close proximity to the hottest part of the engine for nearly a foot, it is very convenient for packaging considering where the pump is going.
Last edited:
kmead
Old enough to know better
Lost the battle with my frunk cable replacement.
The lock itself won’t come off the bracket due to the internally threaded bushing spinning in the lock. The lock with bracket can’t come out of the space due to the lock sticking up too high.
Accessing the grubscrew to clamp the wire bent the cable as it goes into the clamp so now can’t feed it far enough into the clamp due to the bend to take up the slack.
New wire will be on the way and likely a new hole in the body to access the clamping grub screw directly to avoid crimping the wire…
Any other pointers to dealing with this part they built my car around is appreciated
Dr.Jeff
True Classic
That is a very tight space with the heater box deflector right there. I'm trying to remember how it was when I did mine. Is that a captured nut that is now spinning, or are there stripped threads?Lost the battle with my frunk cable replacement.
The lock itself won’t come off the bracket due to the internally threaded bushing spinning in the lock. The lock with bracket can’t come out of the space due to the lock sticking up too high.
Accessing the grubscrew to clamp the wire bent the cable as it goes into the clamp so now can’t feed it far enough into the clamp due to the bend to take up the slack.
New wire will be on the way and likely a new hole in the body to access the clamping grub screw directly to avoid crimping the wire…
Any other pointers to dealing with this part they built my car around is appreciated
One thing I did was replace the wire clamp with a different set-up. I made something like this (below) so the cable can go straight through (no bending the wire). Mine has a bolt on both ends; one attaches it to the locking mechanism (where the wire used to pass through), and the other secures the cable like a "set screw". Look at the cable clamp on the rear trunk lock to get an idea of how it works.
Dr.Jeff
True Classic
What did you use to clean the old switches? In the past I made the mistake of using too strong of a cleaner and it also removed the printed label.Cleaned up the switches, and got new switchgear mounted. Just need to add labels, and it goes all together.
View attachment 63125View attachment 63126
tigeravg
True Classic
Those are the old style, with the fibre optic (behind) embossed symbols. Cleaned with simple green and toothbrush, then re-blacked with a Mothers "Return to Black" type product.What did you use to clean the old switches? In the past I made the mistake of using too strong of a cleaner and it also removed the printed label.