DanielForest
True Classic
Can't wait to see them on the car! 

245/45? 245/40r15 is all I could find in 245 width and 15 inch rim. And way closer to stock diameter. Not that it really matters with a honda back there. Unless you were trying to match the 205s. Then I get it as the 205s are taller than rhe 245/40. Which is why I went to 225/45 in the front and 245/40 in the rearOH WOW!!!! those are stunning!
I agree 100%! I would love to know the dimensions of the original Dallara wingYou probably need to remove some material from the stands to follow the contour of the lid to make it rigid. You can probably shave the stands without respraying them. My mistake was that I didn't have the lid on the car when doing this, and after mounting it didn't fit as the lid had flexed a little bit when off the car. Got it right on second try with a lot more work involved than expected. But with a metal lid it should be easier.
How does your lid look inside? I did a lot of reinforcements on mine. The wing will cause a lot of stress even with little down force so make sure it is rigid and robust.
View attachment 62370
BTW, the height of the wing has been discussed as well. I put my wing 1" lower than the roof to meet Swedish racing regulations. -It sits in line with the car w/o the roof. It still does a good job because of its width and shape. Would be interesting to know the height of an original Dallara wing.
View attachment 62372
245/45? 245/40r15 is all I could find in 245 width and 15 inch rim. And way closer to stock diameter. Not that it really matters with a honda back there. Unless you were trying to match the 205s. Then I get it as the 205s are taller than rhe 245/40. Which is why I went to 225/45 in the front and 245/40 in the rear
Odie
@lookforjoe I absolutely love your X. I remember when I was a mechanic in the early 80's, thats when I had my first X. The shop I work for was called ItalAuto we worked on Fiat, Lancia and Alfas.
I would look at this picture
In this book
And wish I could do that to my X1/9
Very cool car!
It failed because I broke it going over a culvert after hydro-planeing. I thought the control arm was what failed, but looking at the pics Karl Mead took, the lower tube tore open along the vertical weld(s). I'm not posting pics at this time, the prospective purchaser requested that I not do so.This is most odd Hussein.......hard to believe the strut tube itself failed...but FYI:
The strut tube you used was from the FRONT of a:
VW Rabbit '75-84
VW Jetta '80-'84
VW Scirocco '75-'88
VW Cabriolet '75-'93
There were 2 different types of strut housings VW used. The most common type - the one you need - had EXTERNAL threads at the top for the gland nut. But some had INTERNAL threads there - you do NOT want that type. As far as I can tell.....all the cars above used the external type...except...USA made Rabbits ( hatchbacks and pick-ups ) from '81-'84 which came with internally threaded strut housings. Those cars can be identified by having square headlights - all the German made cars had round headlights.
You only used a bare stripped VW housing. You welded onto that the knuckle from the REAR of a 1500 X1/9.....
Hard to believe the VW tube failed...it is slightly larger OD...and thicker wall...than an X1/9 tube...both which make it stronger.....
Love your sketches, they are up there with some of the most talented Industrial Designers with whom I’ve worked (and they greatly surpass mine).@rx1900 - I couldn't find what VW (rabbit?) the tubes came from - I broke a strut on Friday on the way to FFO, so I need to remake one rear strut. I'll add a couple pics later when I take it apart.
All my photos are gone from the original post, and I never noted the VW info
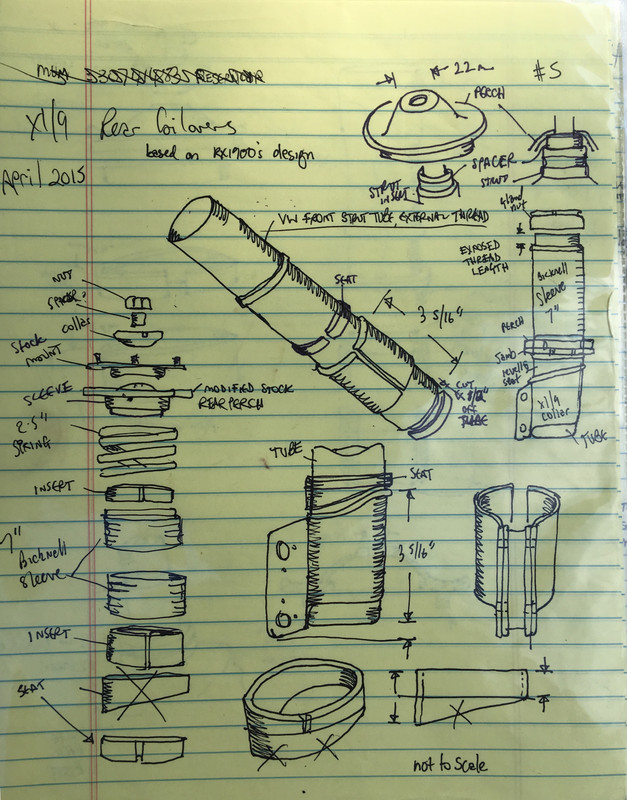
Love your sketches, they are up there with some of the most talented Industrial Designers with whom I’ve worked (and they greatly surpass mine).
Interesting how the part you used allowed the crack to start on both sides under an extraordinary load. In this case you see a load concentration in two mechanical planes where the notch occurs and the surface changes direction to align with the knuckle.When I did it the first time, I know they were really close, and I didn't note how much I cut off the bottom of the strut bracket
I was wondering about that. I had forgotten that the step in the bracket was because the bottom was cut off to get through the weld on the ID of the bracket, where the tube seats.Interesting how the part you used allowed the crack to start on both sides under an extraordinary load. In this case you see a load concentration in two mechanical planes where the notch occurs and the surface changes direction to align with the knuckle.
One has to wonder if this was intentional.
When one looks at suspension parts they are often designed to protect the overall vehicle structure by providing a place to release the energy from an incident on a part which can be relatively easily replaced with minor damage to surrounding structures.
Happily this is exactly what happened for you.
View attachment 74440


I tend to prefer the taper/radiused base given one should avoid a stress riser. Its a funny area given the tangential transition.I was wondering about that. I had forgotten that the step in the bracket was because the bottom was cut off to get through the weld on the ID of the bracket, where the tube seats.
I was wondering whether I should:
1) cut less material away, angling the transition from sleeve to bracket
2)add welds at the base of the dogleg
3) do it exactly the same, since it worked & saved much more severe damage
View attachment 74446