Found a few new water leaks. Living in south Mississippi with an X1/9 is quite stressful, especially one that hasn't been completely restored and sealed up. Living 1000ft from a saltwater gulf + water leaks into a car aren't very classic fiat friendly I do imagine. Considering my car is almost entirely original and rust free...I'd rather not find out.
Water drips in very slowly on both the passenger and driver side foot wells, right in the middle near the vinyl patches.
I first thought was that the water is getting in via the HVAC inlet in the middle of the cowl...but I'll have to rest that theory. As far as I am aware the cowl is completely sealed up inside, and has had sections re-undercoated for protection.
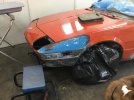
I also finished installing a new right rear caliper. No more adding brake fluid every 3 days... hopefully no more spongy pedal either.
The left rear is getting installed soon as the parking brake assembly regularly gets stuck at full...stop. 75hp (wishful thinking considering how mine runs out of puff at 5500) and a stuck on brake don't blend too well.
Very glad to not have to look at this anymore.
View attachment 47876
View attachment 47877
The previous owner painted the caliper brackets yellow, the calipers some weird green that turns blue in the right light, the tie rods metallic sparkly green, and the top part of the oem bicolor paint job orange.  To each their own.

")