Hasbro
True Classic
Homegrown, what coilovers are you using?

They are the ones from Vick's. With 225# and 275# it drives and handles very nice.Homegrown, what coilovers are you using?

")
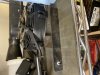
I have this one on my shelf without a home. I reinforced one of the pins with superglue. It’s yours if you can use it.Does anybody know where I can get a badge like this?
The one I have is broken.View attachment 41731
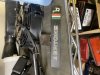
I like the idea of added storage. But I am torn between the idea of having added storage, and the style of a simple no frills design.Looks great, could you put a glove box/shelf in next to the radio. Storage in the X has always been an issue.
It could be a drop down from underneath the right side like the early X IP glove box. Just bigger.I like the idea of added storage. But I am torn between the idea of having added storage, and the style of a simple no frills design.
Thanks to JDExSquid I am going to put the Bertone badge there to finish off the design.