
You are using an out of date browser. It may not display this or other websites correctly.
You should upgrade or use an alternative browser.
You should upgrade or use an alternative browser.
My Car So Far...
- Thread starter Ben Louis
- Start date
lookforjoe
True Classic
Anyone on lubing the strut thrust plate or not?
Not going to hurt if you apply some silicone paste to those plastic washers that sit inside the spacers, that's what you are referring to, no?. I wouldn't use a petroleum based lube / grease.
DanielForest
True Classic
Ok so another mystery (well to me anyway)
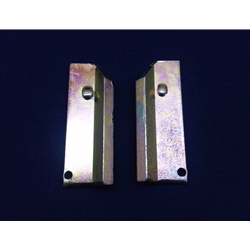
I decided while I was there to replace my brake pads and clean up the sliding wedge areas shiny smooth. But I noticed that my rears had two different wedges.
These were right rear
View attachment 11273
And these came from the left (drivers) rear
View attachment 11274
So I guess my question is as always: should it be this way?
Your question puzzled me for a few days. Nobody answered.
All my sliding wedges are the same. Just one angle and the holes at the extremity. So the first pic with the 2 angles, I never saw that. And the second pic look like they were custom build. At first, I was thinking about stock wedges with a corner grinded to help insert them, but then, I noticed the second hole is kind in the middle. None of mine are like that. And I probably dismantled 10 X1/9 for parts in the past.
So I looked on MWB web site and the early style are like mine, but I never knew there were some late style. Here is the pic from Matt's web site. Just one hole. But again, both of your pics are different than those. Maybe you got a unique special edition! ;-)
Ben Louis
True Classic
Thanks for getting back to this it is strange. I got to the fronts yesterday night and guess what? Same thing on both. They dont look like they were DIY at least not by someone who didnt have skill as the metal work has a good finish. They are also longer than the ‘square’ wedges. I just got anti rattle springs for all four corners so maybe when I pull the wedges Ill take a side by side pic

darwoodious
Darin Nelson
I concur. I had some "new" brake parts in a box with new wedges. They were shinier but far inferior to the stock rusted ones, so I cleaned and polished and took the best ones I could from the OEMs. Probably depends on the brand for sure.Replacement wedges are offered by several sources. Perhaps someone has purchased aftermarket ones at some point and they were different from the originals?
kmead
Old enough to know better
There are several versions of the OE ones for the X and 124s which use the same calipers and mounts.
The late ones only use one cotter pin and have a bump on them to keep them from pushing through, others have a radius on the surface that touches the slide face of the mounting, there are others as well that I know were OE. The variety is somewhat surprising but given how problematic the base design is in poor weather areas it makes sense that they would try different solutions on the cheapest part of the system.
The late ones only use one cotter pin and have a bump on them to keep them from pushing through, others have a radius on the surface that touches the slide face of the mounting, there are others as well that I know were OE. The variety is somewhat surprising but given how problematic the base design is in poor weather areas it makes sense that they would try different solutions on the cheapest part of the system.
Ben Louis
True Classic
Completed some little jobs that are adding up!
Checked all my studs. Found one that was slightly damaged. Luckily I was able to drill and retap the hole going to a slightly larger stud but same pitch. Its kinda odd to have one off size but its better than buying a new hub

Tapped the front shock collars for locking screws

Brake goodies

Checked all my studs. Found one that was slightly damaged. Luckily I was able to drill and retap the hole going to a slightly larger stud but same pitch. Its kinda odd to have one off size but its better than buying a new hub
Tapped the front shock collars for locking screws
Brake goodies
Last edited:
Ben Louis
True Classic
Native habbitat of a fiat fixer.

Im nearing the end of my planned rebuild and as Im sure some of you know things start to dragg a bit after youve been going on and on project after project trying to get your car done but I think Ive got enough oomff to be driveable soon. At least before Christmas, maybe.
Im nearing the end of my planned rebuild and as Im sure some of you know things start to dragg a bit after youve been going on and on project after project trying to get your car done but I think Ive got enough oomff to be driveable soon. At least before Christmas, maybe.
lookforjoe
True Classic
Coming Along!
You need to unkink the brake hose if that right side pic was after you were done assembling....
You need to unkink the brake hose if that right side pic was after you were done assembling....
Ben Louis
True Classic
Coming Along!
You need to unkink the brake hose if that right side pic was after you were done assembling....
It does look kinked in the above picture. Here is a different angle of the same line:
This was the smoothest routing I could get on the line. I think it may bee too long. The kink you might be seeing is actually the outer sleeve which has been pushed up and hardened into a little ring IDK why. Or do u mean the loop?
The braided lines are a nice upgrade on this car but they have seen better days. For now I think theyre ok, maybe to be replaced if when I do a brake system overhall. Its been floating in the back of my mind.
lookforjoe
True Classic
It does look kinked in the above picture. Here is a different angle of the same line:
View attachment 11736
This was the smoothest routing I could get on the line. I think it may bee too long. The kink you might be seeing is actually the outer sleeve which has been pushed up and hardened into a little ring IDK why. Or do u mean the loop?
The braided lines are a nice upgrade on this car but they have seen better days. For now I think theyre ok, maybe to be replaced if when I do a brake system overhall. Its been floating in the back of my mind.
The loop on the inside end. The hose is not in a relaxed state as it is routed now. You might get away with loosening the flare nut & spinning the line to find the 'neutral' flow - otherwise, removing the banjo union would be next step.
Ben Louis
True Classic
The loop on the inside end. The hose is not in a relaxed state as it is routed now. You might get away with loosening the flare nut & spinning the line to find the 'neutral' flow - otherwise, removing the banjo union would be next step.
Better yes?
After doing all four corners one after the next its easy to miss something and good to have some ‘proof reading’ from u gents so thanks. I had actually twisted the caliper around when I was trying to secure it out of the way with bungies.
lookforjoe
True Classic
Looks much better  - don't want a line rupturing from the twisting back & forth.
- don't want a line rupturing from the twisting back & forth.Isotope9
Daily Driver
I couldnt find a good source for the plastic inserts but after calling two vendors I was given basically the same answer/solution. The answer is to use a simple fuel hose of the right size cut to take up the space like this.
View attachment 11271
Admittedly its not perfect but I was told this is actually a decent setup and has been used with success in X race cars which are pushed very hard. Im told the only real downside is mileage life. They must be replaced every 1000 miles or so. Well see how they hold up.
I just replaced the front bushings and discovered that my car was missing these inserts...any advice on what size fuel hose you used?
Ben Louis
True Classic
I just replaced the front bushings and discovered that my car was missing these inserts...any advice on what size fuel hose you used?
I believe I used 3/4” line, but to be fair I rumaged through my ‘hose drawer’ and tried a few till one fit. It only takes about 1/2” length to do both sides. Also measuring the diameter of the radius arm at that end would get you close to the size u need.
Ben Louis
True Classic
Somewhere along the line I put a pause on finishing my longer axle CV joint because I realized it would be easier to instal them if I had my suspension sorted and especially an E brake. So having finished my brakes and suspension I got along with CV stuff
Why did I paint that small exposed section of the axles? Because why not thats why


Why did I paint that small exposed section of the axles? Because why not thats why
Last edited:
Ben Louis
True Classic
Both CVs installed and all torqued. As brought up earlier in the thread (Dr. Jeff I believe) the wrong bolts were installed so I ordered up some correct ones. Also made sure to use the short bolts in the right place, ahem, at least the second time round...

This allowed me to drop the car, hooray hoorah! Set ride height and a basic allignment on the car. After everything was basically set I did a quick bounce check on all four corners. Control arms, axles, etc are all in line and relatively level. Yay


Sometimes its the little stuff. I repaired these old cracked trim peices and finished them in VHT crinkle which matches the plastics texture very well. Add in some new hardware and boom

This allowed me to drop the car, hooray hoorah! Set ride height and a basic allignment on the car. After everything was basically set I did a quick bounce check on all four corners. Control arms, axles, etc are all in line and relatively level. Yay
Sometimes its the little stuff. I repaired these old cracked trim peices and finished them in VHT crinkle which matches the plastics texture very well. Add in some new hardware and boom
Last edited: