My Car So Far...

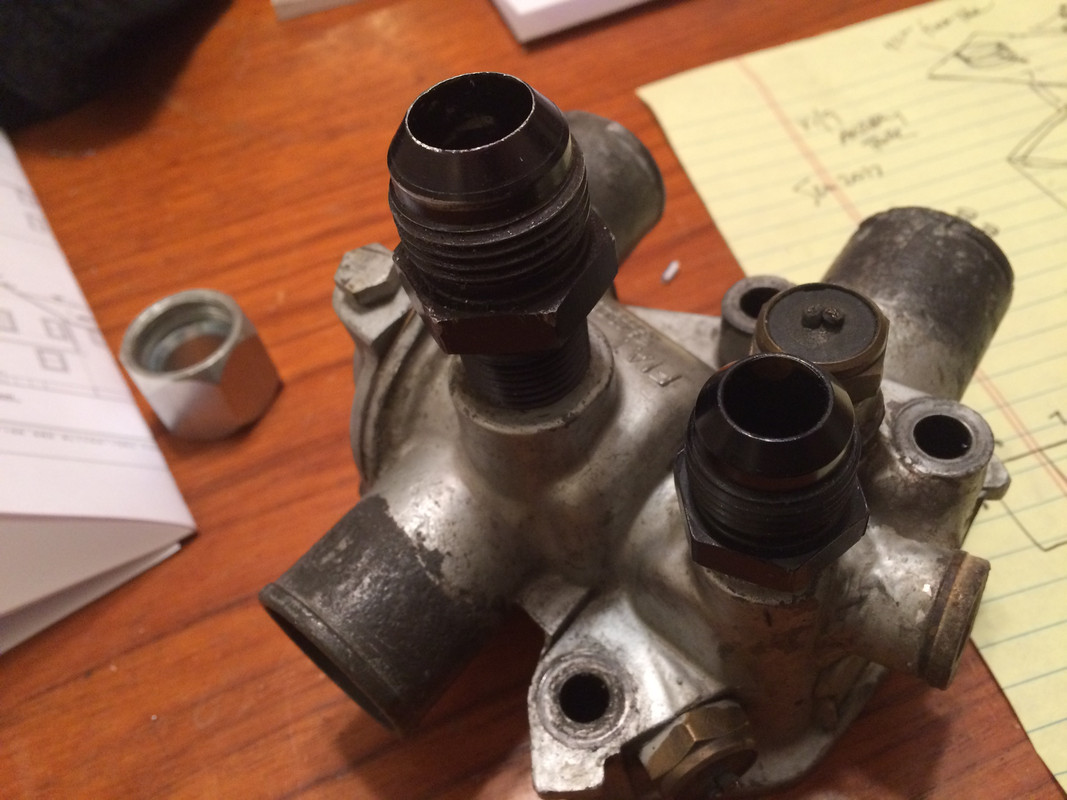
I'm not clear on this. You attached a AN fitting to the cut-off pipe? Or did you remove the rest of the pipe fitting? Thanks.

I tried to find a clear pic of it last night for reference. I don't seem to have one. I bought a range of AN/JIC fittings from McMasterCarr years back, and that worked perfectly. Think it's 10AN, I'd have to check. I cut the pipe in the short straight after the lock nut, and braised the male JIC fitting to that. Female collar sleeves the other pipe, with nut installed first of course. Braise that one, done. There is room to get an AN-specific wrench in there, even with all the AC-version WP/Alt bracketry.

You can see it in the bottom of this pic:

X19_HG2017_00048.jpg
 
@lookforjoe
I agree it would be illogical for Fiat to use NPT and it probably is metric. I tried the threads of the elbow in all metric and pipe thread NPT-F blanks to try and find the right pitch threads and diameter and even 1.5 metric thread was way too fine. Lining the elbow threads up with 3/8 NPT was a near exact match to whatever fiat used. I wish I took a pic its spot on. The only difference is that the thread profile (shape/thickness) is a bit different because NPT threads are designed to be used with sealant. So to clarify 3/8 FLARED bungs should work without issues. I was able to hand thread about 1/2 way and with sealant there was almost no drag and no self cutting of new threads while still getting good engagement. Im glad you bring it up though maybe someone out there knows the exact
M?x1.something sizing.

Having said all that well see if it holds up

It is perplexing. I had the same issue when I removed the pipes from the T/stat housing to install AN fittings for the coolant tank I made. I rethreaded the housing to the NPT thread in my case (test fit in a spare housing first)

X19_0046b.jpg
 
Last edited:
@Dr.Jeff
Yes it was small torture going 1/16 of a turn at a time praying like hell nothing snapped. Plus everytime I wrenched it went eeeeeee eeeeee eeeeee but in the end nothing was damaged. Better out than in they say

Sounds way too familiar haha. On some years I believe that pipe was made of bronze instead of steel. I think MWB sells the bronze variant. Not sure which variant is preferrable. Maybe bronze as its softer than the steel and therefore won't bind as much - but then the risk of breaking it if it does bind goes up.

Either way, having dissimilar metals touching each other (aluminum head + bronze or steel pipe) will cause galvanic corrosion (that's probably why these pipes are a PITA to get out) - not the best design decision by Fiat . . .

EDIT: http://www.midwest-bayless.com/fiat...ad-heater-tube-elbow-fiat-x19-1973-77-u9.aspx

Found it - apparantly up till 78 it was brass. They say it's interchangable with the 1500 head . . .
 
Last edited:
@Dr.Jeff
Yes it was small torture going 1/16 of a turn at a time praying like hell nothing snapped. Plus everytime I wrenched it went eeeeeee eeeeee eeeeee but in the end nothing was damaged. Better out than in they say

Plus I knew that if I didnt destroy the threads toooo bad I could probably drill them out and cut new ones. Ive already helicoiled or cut about half to a dozen threads on the car already. I actually had an exhast stud break and then pull out while I was using a stud extractor on it o_O

Part of the beauty in resurecting a basketcase is that its hard to make it worse
If you do destroy the threads on the head when trying to remove the pipe you can drill it out and retap for 1/2" NPT. Then you have tons of options to plug the hole including temp sensing switches.
 
Thanks for posting info on replacing corroded cooling tubes with copper. It looks to me that it's much easier to repair the car using this method, and probably a lot cheaper too. Can you tell us about how much the copper cost you?
 
Thanks Huss, I get it now... brazing the AN fitting to the pipe.

I also re-tapped a few places with standard NPT threads in order to plug unused holes with common plugs. In some cases I did not even need to drill out the hole, the tap size was close enough to allow rethreading the existing hole. The taper on a NPT allows for some difference in the exact size over a straight thread, as it gets tighter the further the taper goes in.
 
I suppose it's time for a conclusion and overview of the copper re-pipe now that it's finished.

Total cost as of 03/06/18 ***This depends a lot on the current price of copper so it's likely to go up as time goes on

- 10' 1"copper pipe $37.61 X 2 - $75.22
- 1" 45 elbow 7.34 X 8 - 58.72
- 1"-11/4 Reducer 7.99 X 4 - 31.96
- Flux 4.64 - 4.64
- Solder 12.72 - 12.72
- 1" Pipe brush 4.49 - 4.49
Total $187.75

- You will also need things like a solder brush, clean rags, a pipe cutter, and a MAP torch. You can use other fuels but I wouldn't recommend it, you want things done quick and hot hot hot

Not cheap but in my opinion well worth it. It's not an easy job either but well within the scope of a 2 car garage mechanic like me. More than anything it takes patience and careful measurement.

I would assume that an initial road block to many considering this would be never having sweat pipe before. I sometimes call it Brazing because it reminds me of that a lot, but it is different than that welding method. I can assure you that if you prep and apply things right the joint will actively want to want to seal itself. Capillary action is a Very strong force at these scales. You just need to give it the best opportunity. There are plenty of good YouTube videos out there but here are some notes

SWEATING

-A pipe cutter is the only way to cut copper pipe!
- Sanding is how you make sure surfaces are clean, no cleaners are needed just a quick wipe with a clean cotton rag after plenty of sanding. I've been using T-shirt cotton for a long time, hardware stores sell them in pre-cut squares and they are awesome for a bunch of projects.
- Sand only the Male part of the joint in parallel to the butt end following around the circumference of the pipe.
-Use the specific 1" brush for the female joints this brush is cheap and is the only effective (and easy) way to get things clean and ready for solder.
- Use lots of flux everywhere. But, a trick to making clean joints is to wipe away excess flux on the pipe itself slightly away from the joint that way when you're applying the solder it wont stick there and make a cleaner line of flux once it cools.
- Heat joints from the bottom first and most.
- Apply solder from the top down. You can remove excess 'gobs' of solder on the bottom of the joint by holding your solder wire to the solder bubble that forms on the pipe as it cools then pull it away before it completely solidifies.
- A trick is that when watching the flame it will flicker green when the joint is almost ready heat wise. It doesn't last forever so once you see it heat for a few (2-3) seconds more and then apply solder. Reheating a joint to reapply solder will not affect it much but there is a limit.
- After soldering wipe every joint down aggressively with a rag. Make sure the flux is cool but still warm or you'll smear your flux everywhere. And don't burn yourself
- When you look at your completed joint you may see dark spots which are easily confused with gaps in the solder. Usually these are impurities mixed with flux. Run a pick around the joint to check it. If set up properly the solder reallllyyy wants to seal the joint. When practicing try only soldering 3/4 of the circumference, let it cool, heat it back up and pull it apart. Even with a huge gap in application you're likely to find that the solder pulled itself throughout the joint regardless.

Buying a few 1" strait couplings and using some of the extra 1" pipe is well worth the money for some practice before you dive in. This is a committed project because once you cut those OEM pipes you have no choice but to go forward. Having said that it's a very satisfying and fun process, stick with it and the results are great. Mine deff needs some more testing mileage but initial indications are as good as they could be. Good Luck!
 
Last edited:
@lookforjoe

I really like the idea of AN fittings, they're so pretty. I've got a stainless coolant tank though (it's also very pretty), so I'm not sure I would want to mess with it. Something to keep in the back of my mind though...
 
Ben, thanks for giving a good summary of the job. Especially your sweating tips. I admit I'm one of those who does not have much experience at it and not 100% confident about it.
I will add a link to a prior discussion on doing the re-pipe job with copper pipes, just for additional input:
https://xwebforums.com/forum/index.php?threads/re-pipe-diagram-tools-materials-and-method-s.32484/

I recall there were other threads on it but I don't have them saved for quick access at the moment. One thing that was discussed in the past was the size of the replacement pipes. Using 1" makes it easy because they will slide into the old pipes, meaning they don't need to be completely removed (just cut off the ends as was done here). However some feel 1" pipes might be too small and not allow sufficient coolant flow. It might depend on the climate where you live, how you drive, any modifications to your engine, the condition of the rest of your cooling system, etc. But it was found 1-1/4" copper pipes are almost exactly the same size as the stock pipes. Naturally this requires complete removal of the old pipes; either by removing the bottom box cover or by wrestling the old pipes out through the ends of the box (this has been done...maybe someone has the link to it?). This size pipe allows the rubber hoses to fit directly on the ends without 'adapting' them. I'm just mentioning this for reference, each installation may differ.

Nice job. On mine the smaller heater pipe also needs to be replaced so I will likely end up removing the box cover...so not looking forward to drilling out all those spot-welds.
 
Last edited:
Yes I thought about the size difference but was put slightly more at ease when I compared the thermal conductivity of steel pipe vs copper

@100C
Copper - 377
Steel - 44.8

This means copper is about 8.5x more conductive than steel.

Although discounting flow rates some of the cooling capacity is surely made up for by coppers excellent thermal transfer. How much in reality is debateable
 
Although discounting flow rates some of the cooling capacity is surely made up for by coppers excellent thermal transfer.

I would think Bernoulli's principle is helping you more here than anything. Pretty sure I'm thinking of the right scientific law but not positive... anyhow, the law states that when you have a thinner spot that you have a fluid flowing through, it just speeds up in relation to the size of the thin spot, so you don't really lose that much flow. Make it TOO thin and you can induce backpressure and impede flow. My math (always double check my math... :) ) says that a 1 inch pipe has only 64% of the area as a 1.25" pipe, so you have made a pretty drastic reduction in size. Whether you are into the territory of significant backpressure and flow impedance, I am not smart enough to calculate.

Pete
 
Youre right. As an aside Im currently an Allied health major and we use a similar rule called Boyles law as a constant when calculating things like glomerular filtration rates and arterial pressures
 
Might need to look at total volume capacity as well as flow rate.
I think a 1" pipe has about half the flow of a 1.25" pipe at the pressures found in a cooling system. That is significant, especially considering the system's design is not optimum to begin with. But as I said, there are several factors at work.

By the way, I need to correct my earlier post...the stock size pipes are very close to 1.25", NOT 2.25" (typo, sorry).

Just for clarification, we are talking ID, not OD, correct?
 
Actually that is a larger question than you might think. We are talking about standard plumbing copper pipes. Most "pipe" is named by the ID, while "tube" by the OD. However here in America copper pipe is neither the ID nor OD, but a "nominal" size. Take a look here:
https://en.wikipedia.org/wiki/Copper_tubing
 
Just keepn on keepn on

Decided to adress another leak coming from the sump gasket (I think) plus I get to kill some more rattle can yellow
1EE470D5-18DB-42B9-81B3-FD47AC29C91B.jpeg


AC9D63FE-4988-4B16-A0AA-A55252E9C0E9.jpeg


I expected to find more metal after 30 plus years and mid 100k mileage. Its a good thing

A6D09BB8-B2EB-4E56-931E-0627776117C6.jpeg
 
Last edited:
Fry baby Fry!!!
:mad: AHAHAHAHAHAAAAAAAHHAHAAAA

CAF04934-2C3E-4190-93F4-BF2BA325DA65.jpeg


Beautiful alloy such as this should not be hidden
ABE9EBE7-5DD9-4BB7-AB92-C06A032ADD20.jpeg


I feel like Fiat really spoiled us with this piece
 
I certainly dont believe all of seafoams wonder claims but if your working with hydrocarbon grime and staining, which we as car people almost always are, its by far the best solvent Ive ever used. It laughs at oil stains acetone wont touch.

Before
17B82F35-14FA-4622-BE6D-B1DE1A819CD5.jpeg


After
0E004EE6-1205-44FD-866C-719ADF8BEF33.jpeg


An added benefit is that unlike acetone or carb cleaners you dont have to worry about leaving a little bit and having it degrade your oil. In fact a little bit is great for your oil.
 
Back
Top